文章目录
什么是docker
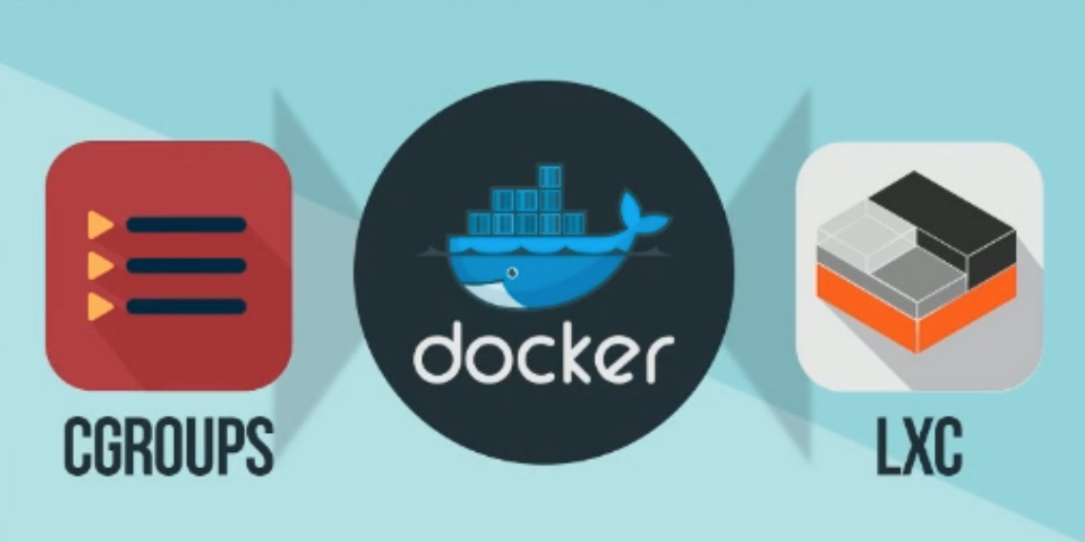
docker中的容器:
- lxc --> libcontainer --> runC
docker最开始是使用LXC做存储引擎,然后淘汰了LXC自己研发了libcontainer做存储引擎,再后来就用到了runC。
管理容器的工具。
OCI&OCF
OCI
开放容器的规范
- 由Linux基金会主导于2015年6月创立
- 旨在围绕容器格式和运行时制定一个开放的工业化标准
- 包含两个规范
- 运行时规范(runtime-spec)
- 镜象规范(image-spec)
OCF
开放容器格式
runC是一个CLI工具,用于根据OCI规范生成和运行容器
- 容器作为runC的子进程启动,可以嵌入到其他各种系统中,而不需要运行守护进程
- runC构建在libcontainer之上,同样的容器技术支撑着数以百万计的Docker引擎安装
docker提供了一个专门容纳容器镜像的站点:https://hub.docker.com
私有仓库Harbor
Docker容器应用的开发和运行离不开可靠的镜像的管理,虽然Docker官方也提供了公共的镜像仓库【https://hub.docker.com】,但从安全和效率等方面考虑,部署公司私有环境内的 Registry 是非常必要的。之前介绍了Docker私有仓库Registry,在Kubernetes集群中,推荐使用Harbor仓库环境。
docker架构
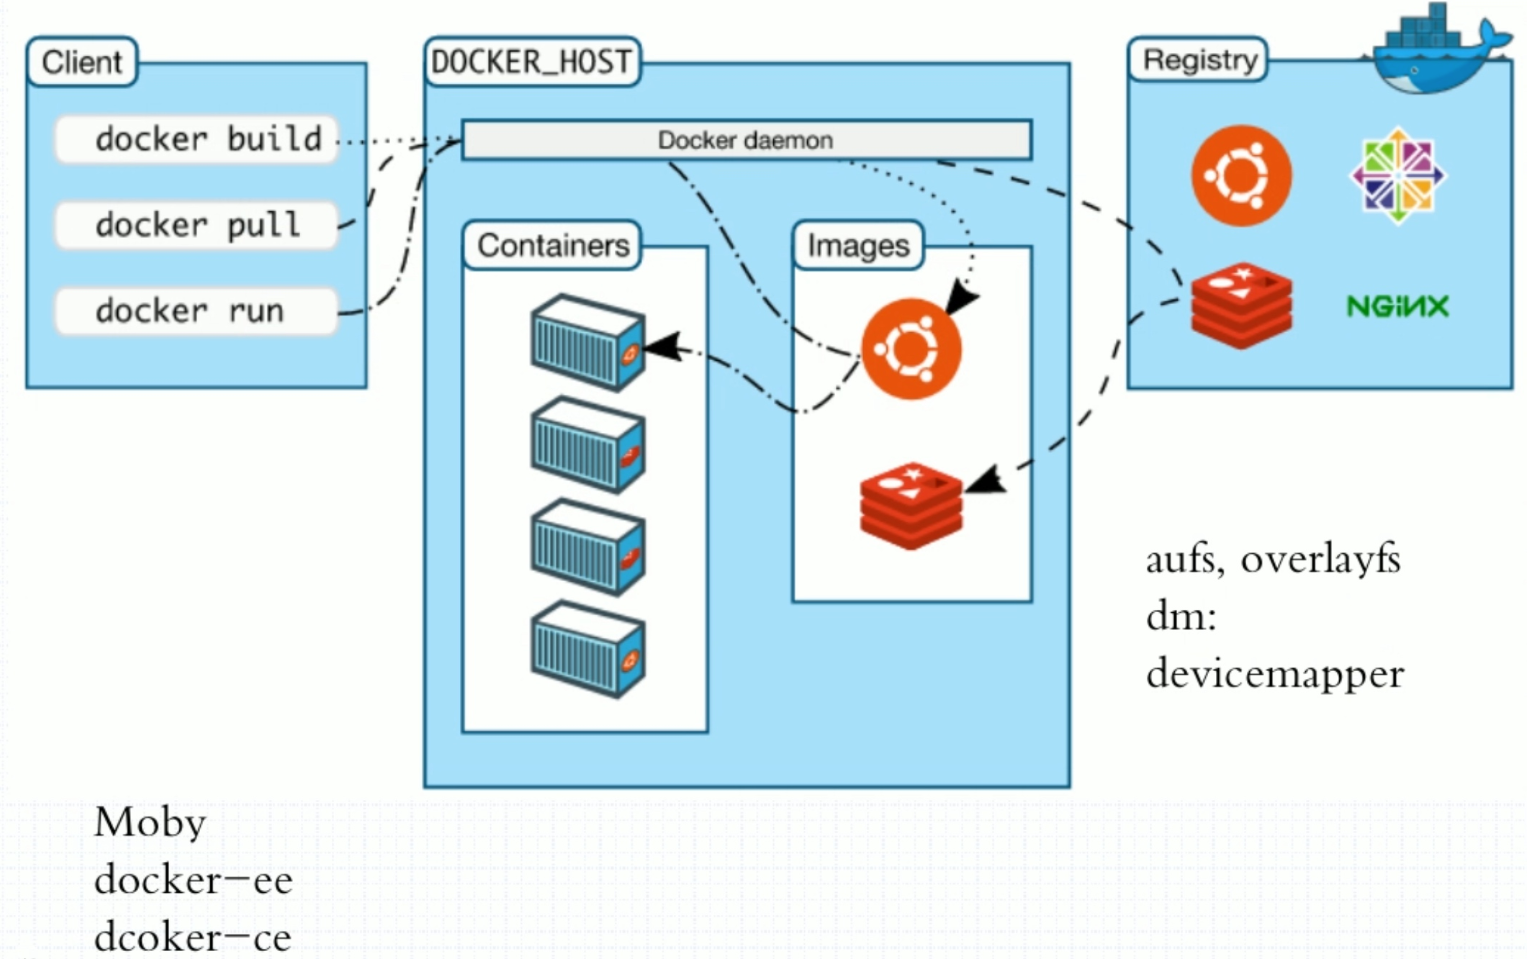
docker架构:简单理解就是在client(客户端)运行命令,
Client(客户端)跟Docker_hos(docker主机)在一台主机上面。客户端就是docker的一些命令,就是装了docker之后就有命令,通常情况下客户端跟docker主机是同一主机上的。当然也可以在另一台主机上弄客户端,但是平时不会这样做。
运行容器需要镜像

Client
docker bulid  # 构建
docker pull   # 拉镜像
docker run    # 运行容器

DOCKER_HOST
docker daemon docker的守护进程。就是装完docker之后要启动的一个服务。在client执行命令之后要交给某一个服务处理,会找这个服务(docker daemon)向它提交请求,运行容器,docker daemon 就会处理请求。docker守护进程就会查看要启动什么容器,在本地是否有所需的镜像,如果有直接启动,如果没有就会去镜像仓库里面拉下来在启动。
  举例:比如你要启动apache服务
首先在客户端执行启动apache服务命令,然后docker守护进程会处理,查看本地是否有apache的镜像,如果有直接启动,如果没有会去镜像仓库拉下来再启动。
docker容器要设置为开机自启
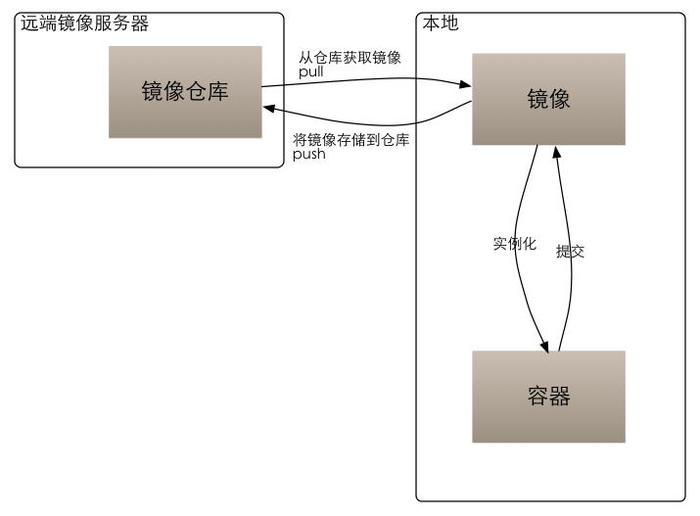
docker镜像与镜像仓库
为什么镜像仓库名字是 Registry 而不是 repository ?在docker中仓库的名字是以应用的名称取名的。
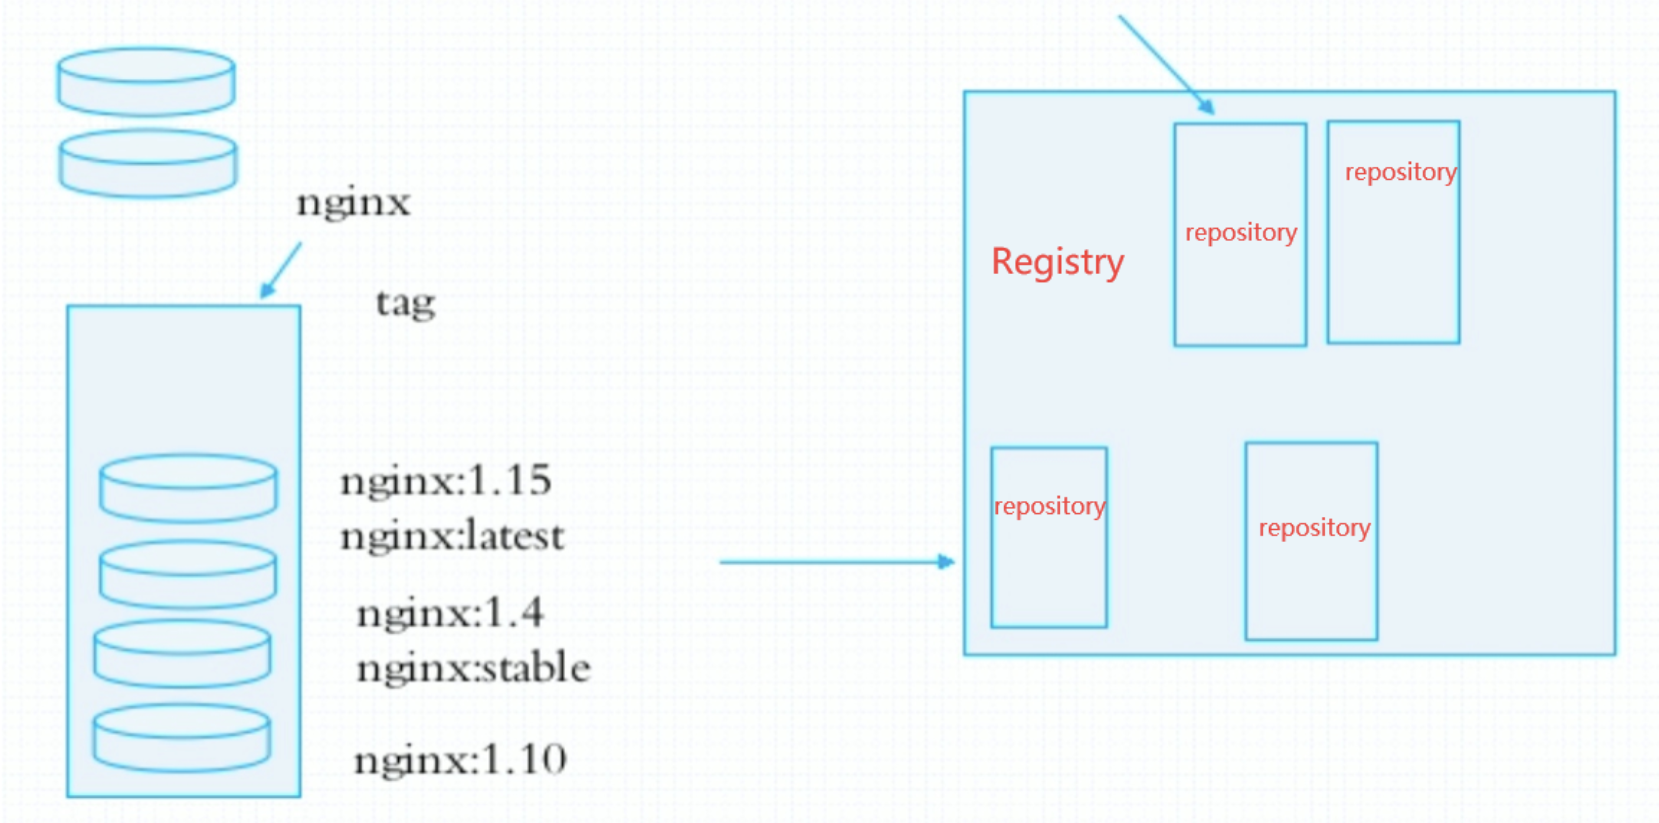
镜像是静态的,而容器是动态的,容器有其生命周期,镜像与容器的关系类似于程序与进程的关系。镜像类似于文件系统中的程序文件,而容器则类似于将一个程序运行起来的状态,也即进程。所以容器是可以删除的,容器被删除后其镜像是不会被删除的。
docker对象
当你使用docker时,你是在创建和使用镜像、容器、网络、卷、插件和其他对象。
- 镜像
- 镜像是一个只读模板,用来创建 docker 容器的。
- 通常情况下,一个镜像基于另一个镜像,并添加一些额外的定制。
- 您可以创建自己的镜像,也可以使用其他人创建好的镜像并在注册表(Registry)中发布你自己的镜像。
- 容器
- 容器是镜像的可运行实例。
- 您可以使用docker API(API是开发人员用程序来操作)或CLI(使用命令来控制)来创建、运行、停止、移动或删除容器。
- 您可以将一个容器连接到一个或多个网络,将存储附加到它里面去,甚至根据它的当前状态创建一个新的镜像。
安装及使用docker
docker安装
阿里云镜像官网 https://developer.aliyun.com/
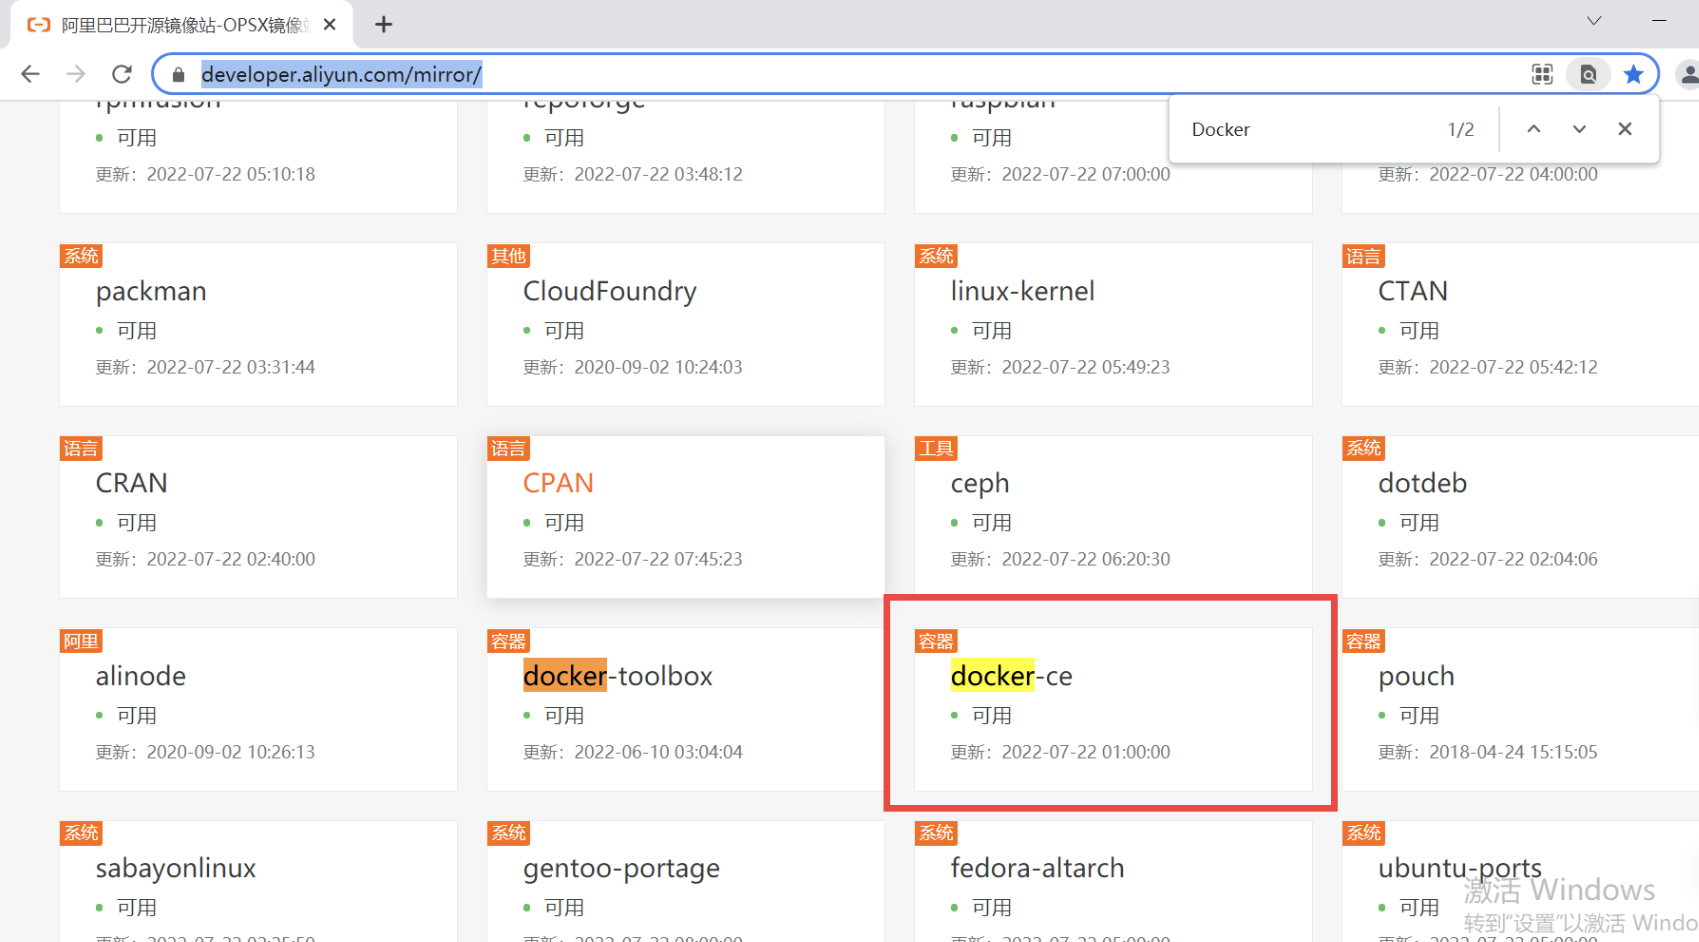
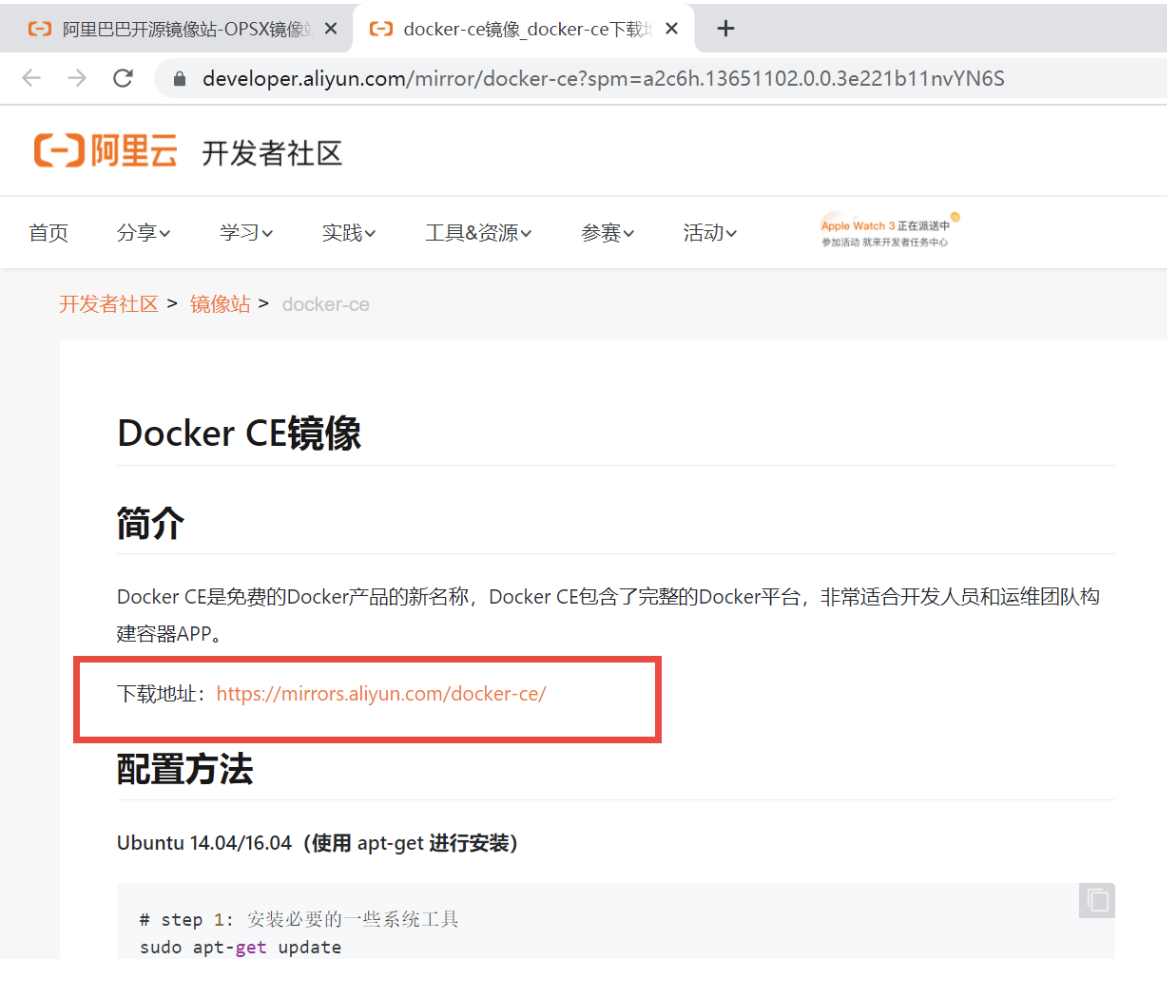
cd /etc/yum.repos.d/
# 下载docker镜像
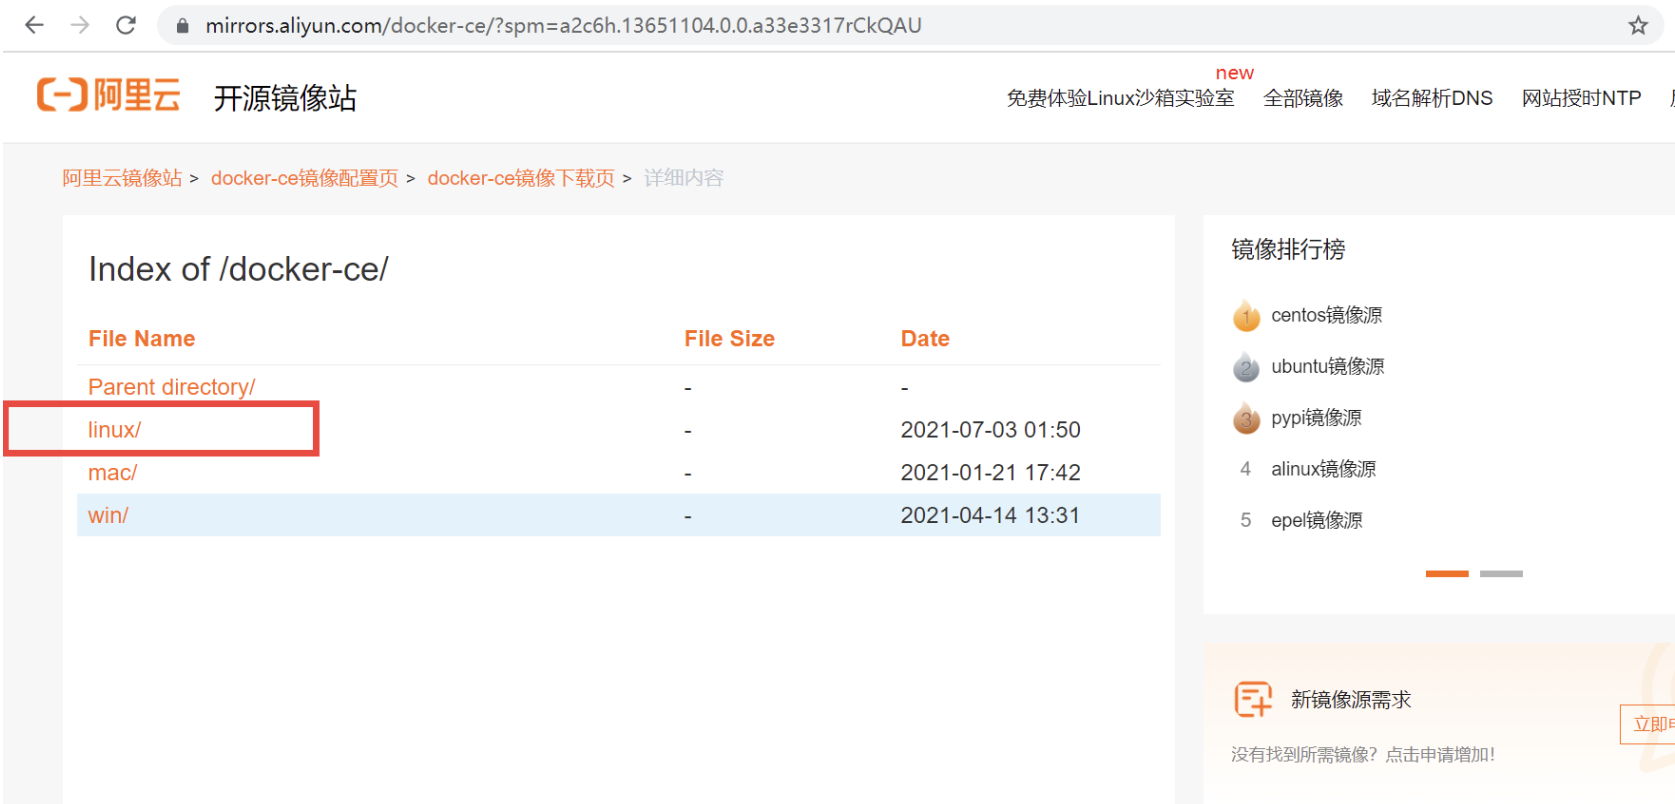
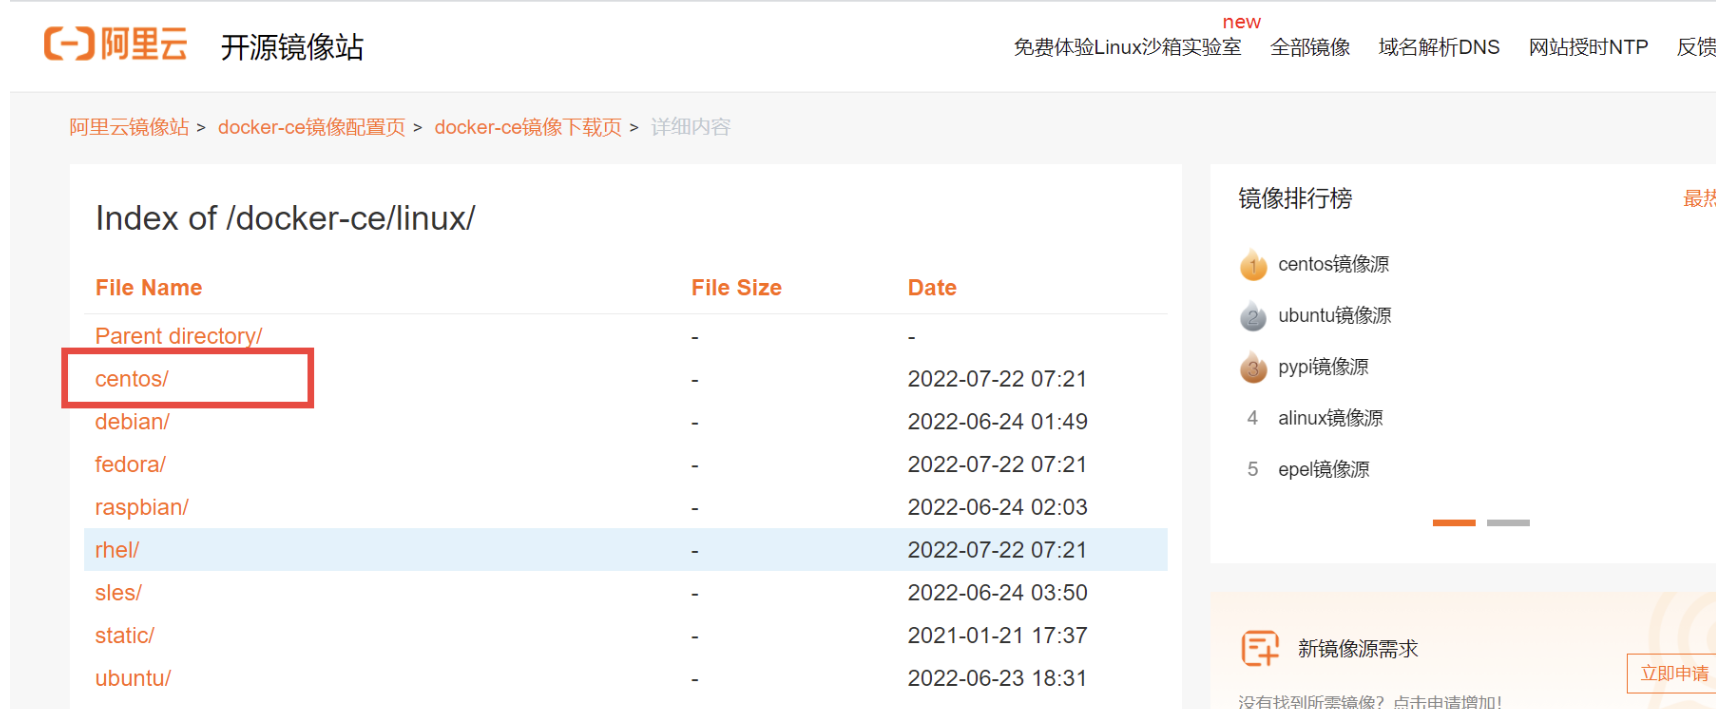
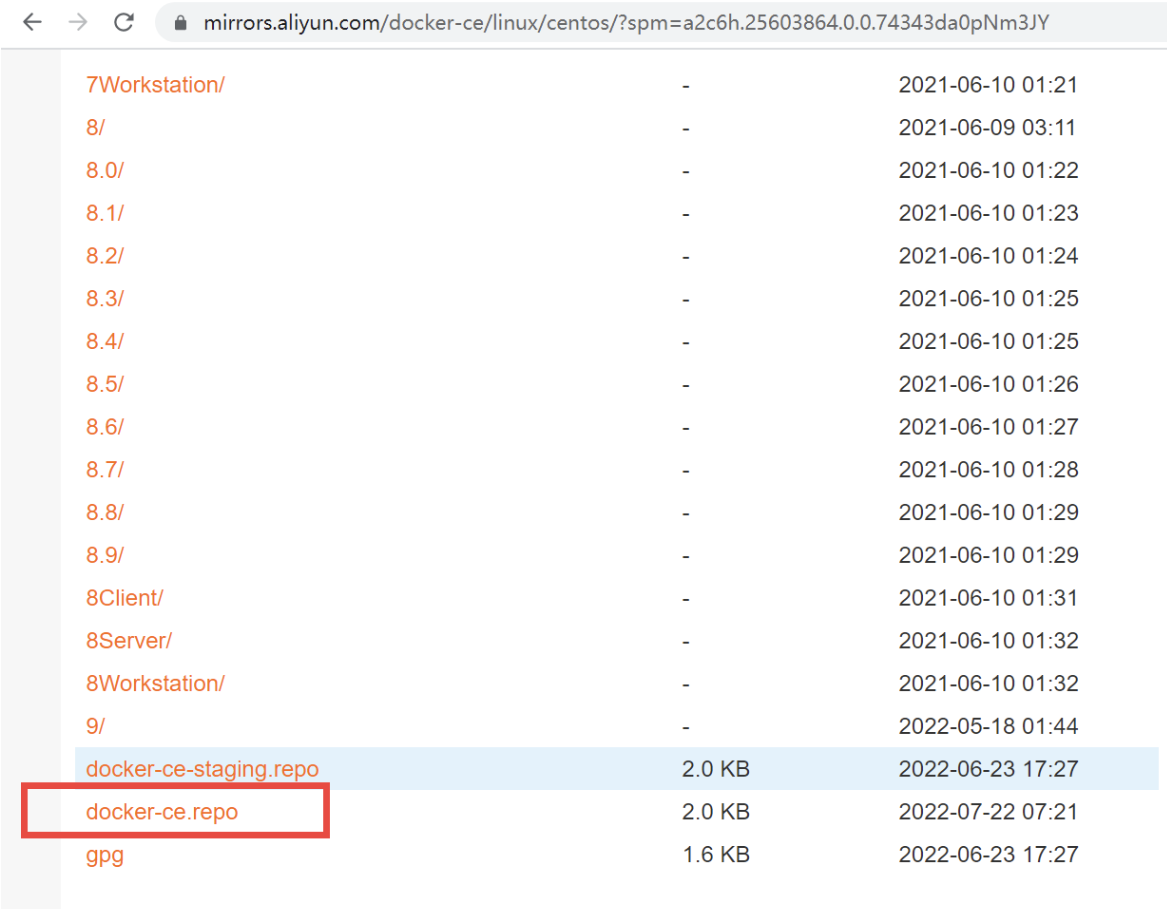
wget https://mirrors.aliyun.com/docker-ce/linux/centos/docker-ce.repo
# 下载docker
yum -y install docker-ce
docker加速
docker-ce 的配置文件是/etc/docker/daemon.json,此文件默认不存在,需要我们手动创建并进行配置,而docker的加速就是通过配置此文件来实现的。
docker的加速有多种方式:
- docker cn
- 中国科技大学加速器
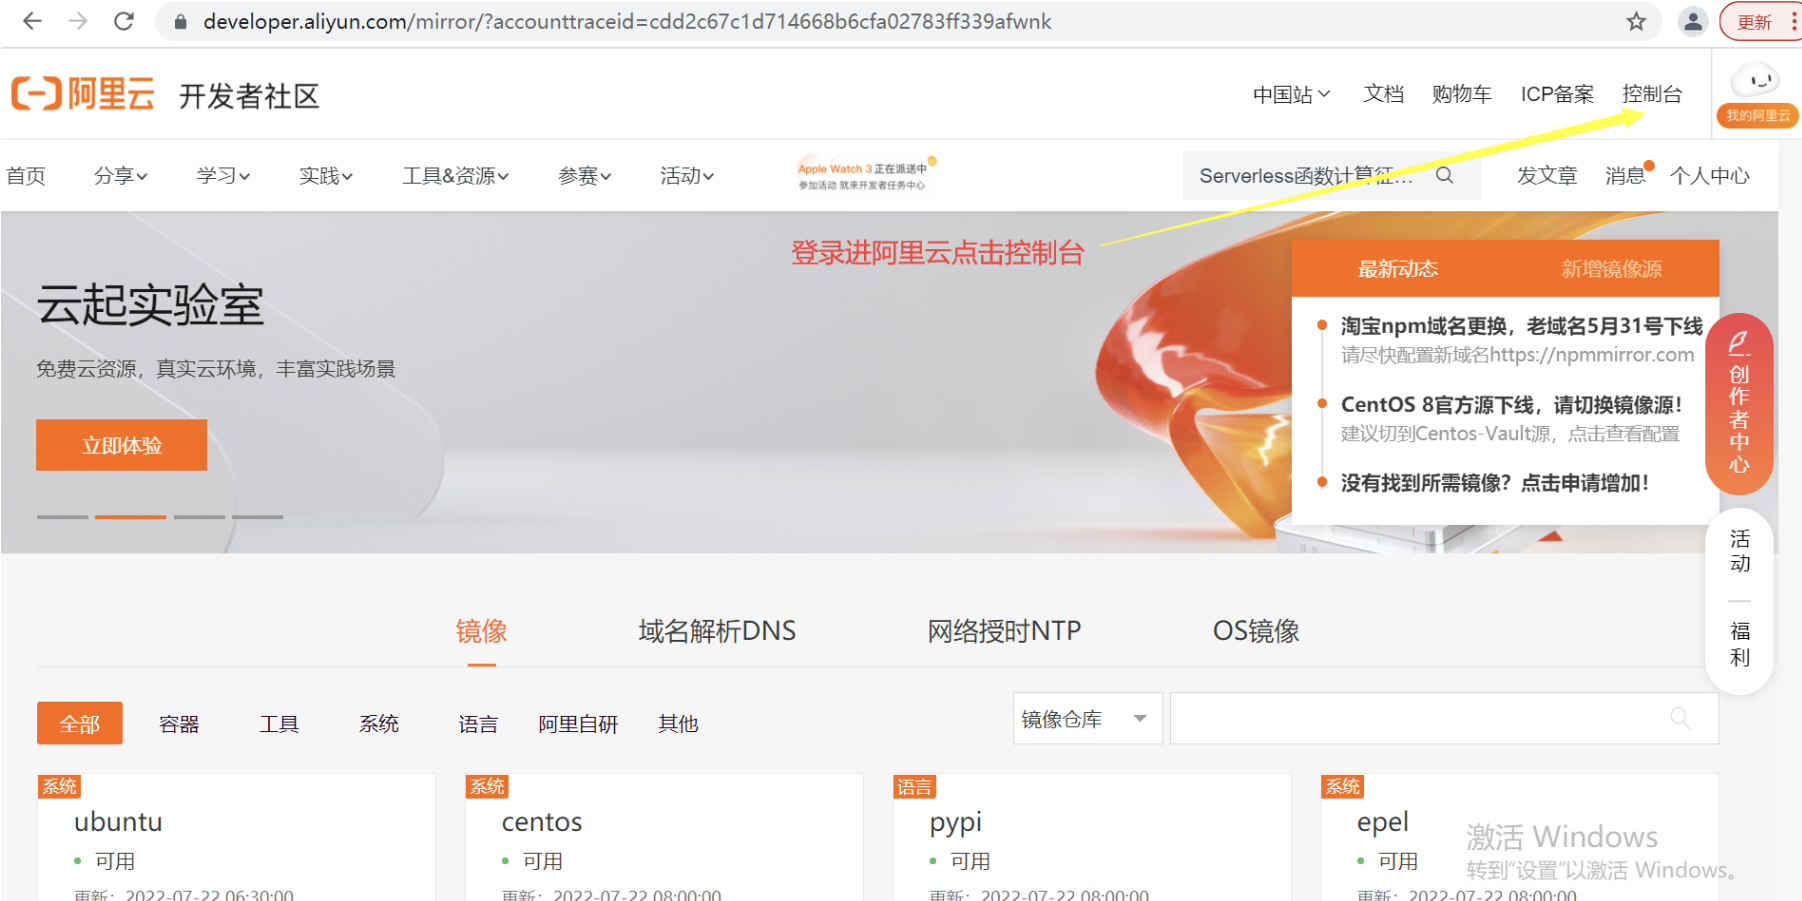
- 阿里云加速器(需要通过阿里云开发者平台注册帐号,免费使用个人私有的加速器)<—
在这里使用阿里云的加速器
登录阿里云网址
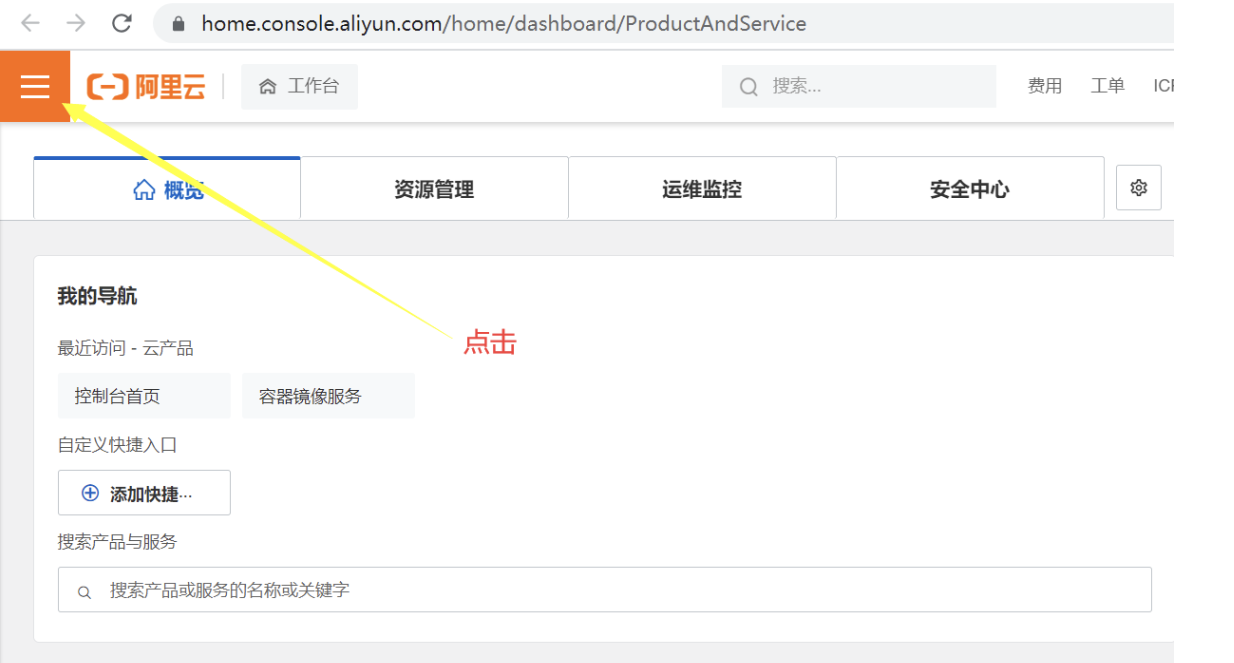
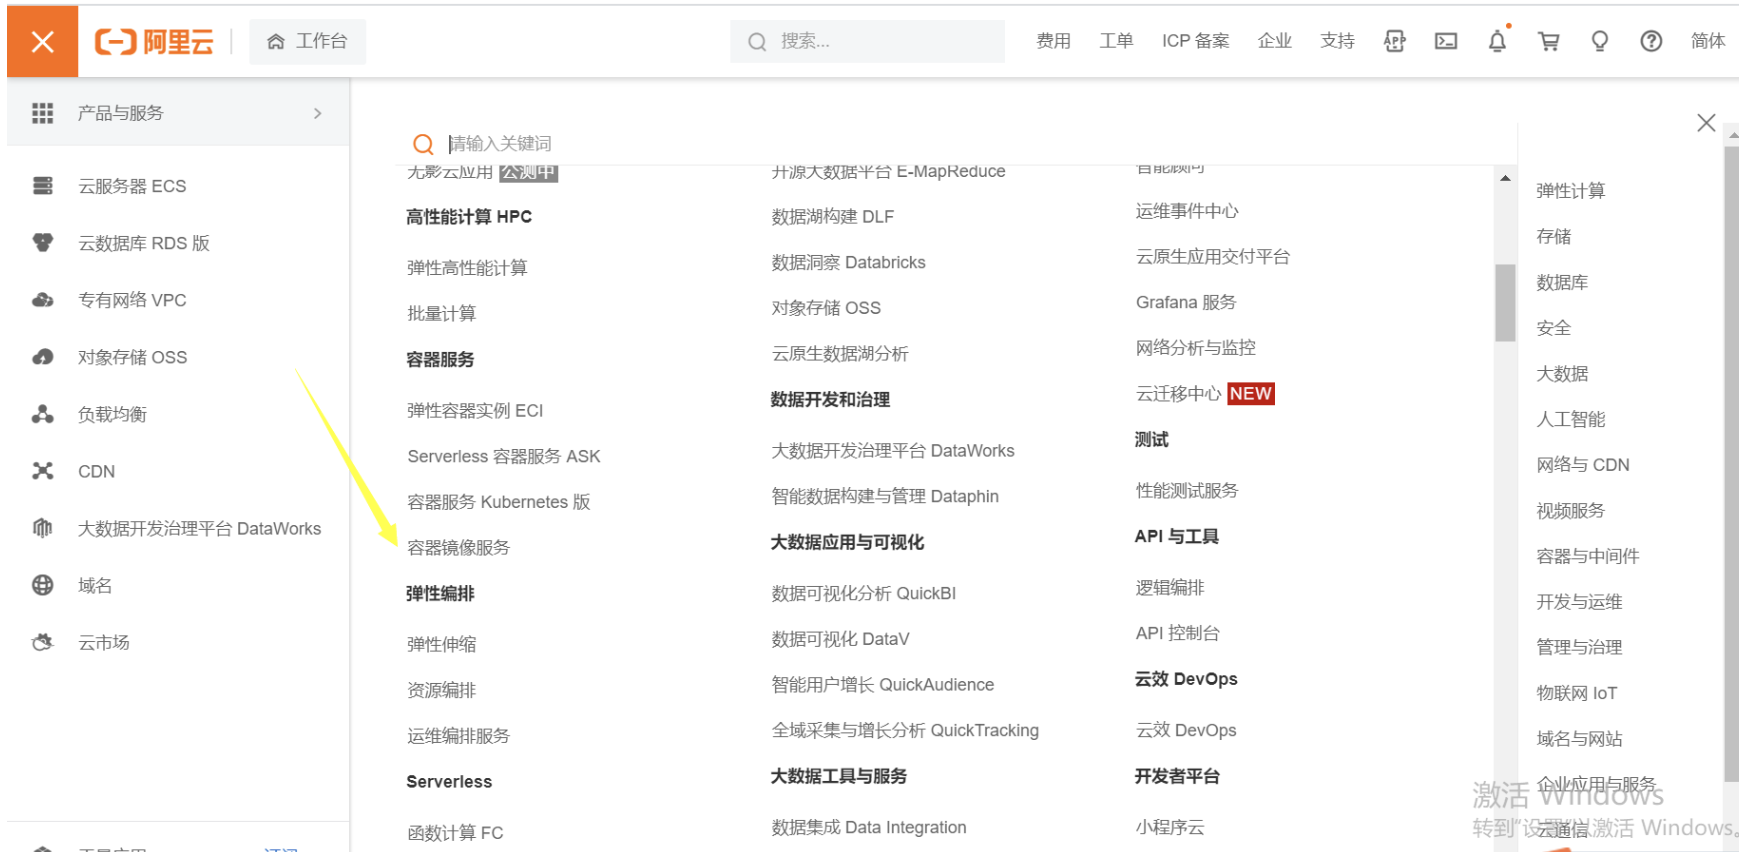
点击控制台
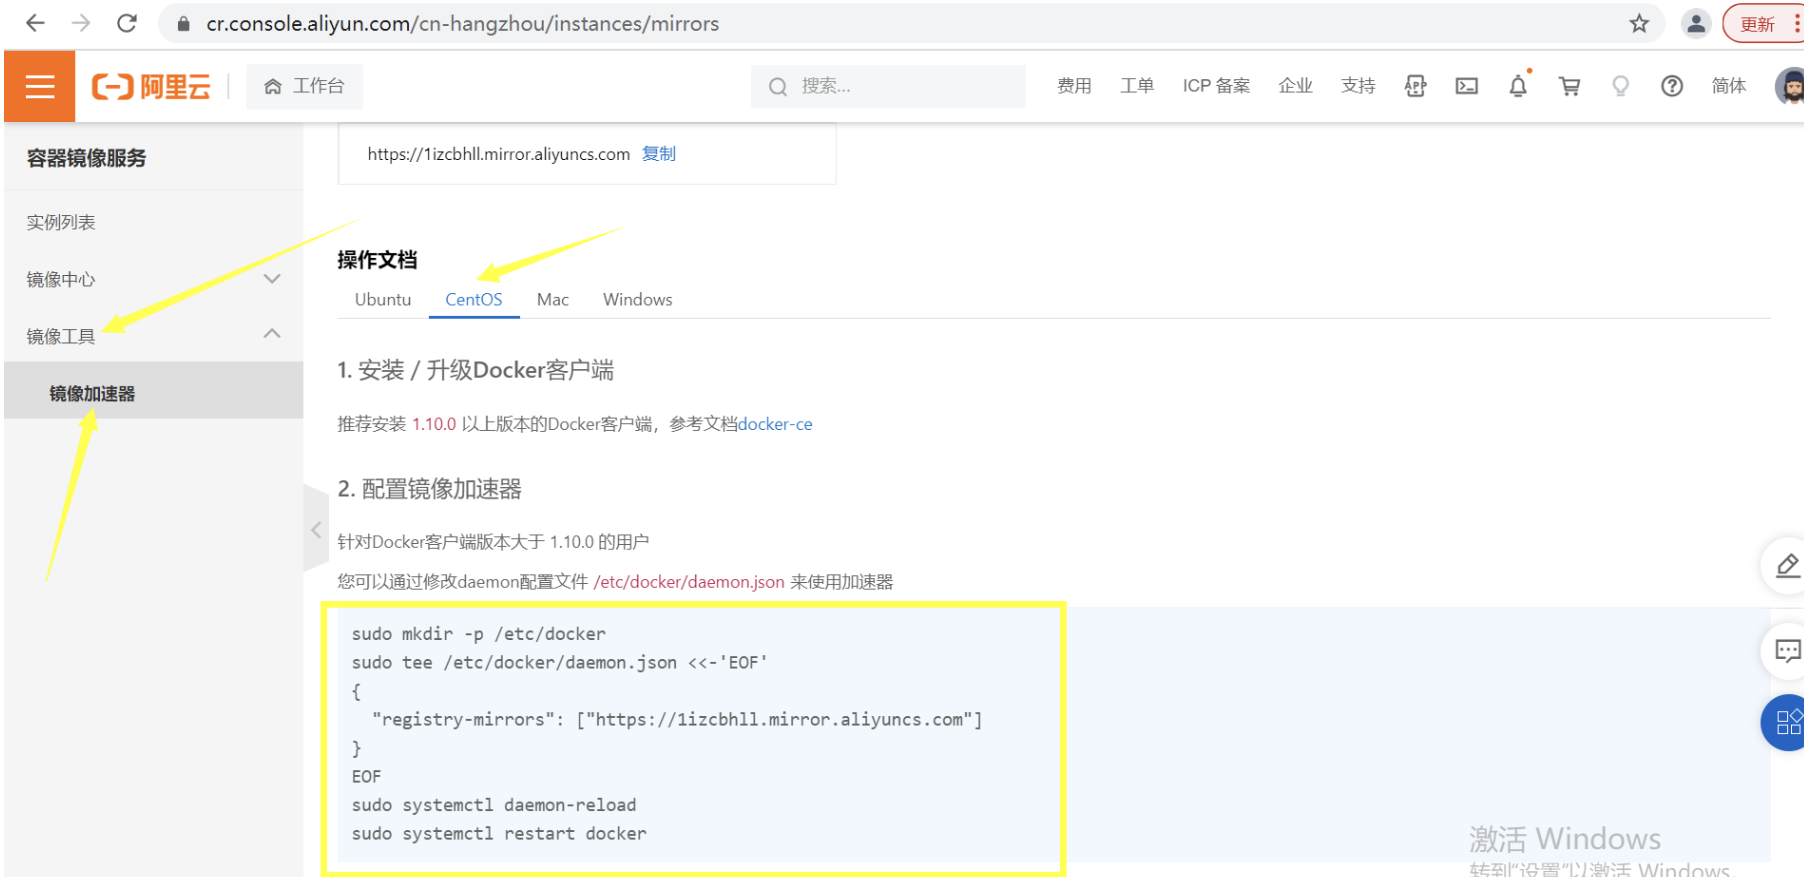
mkdir -p /etc/docker
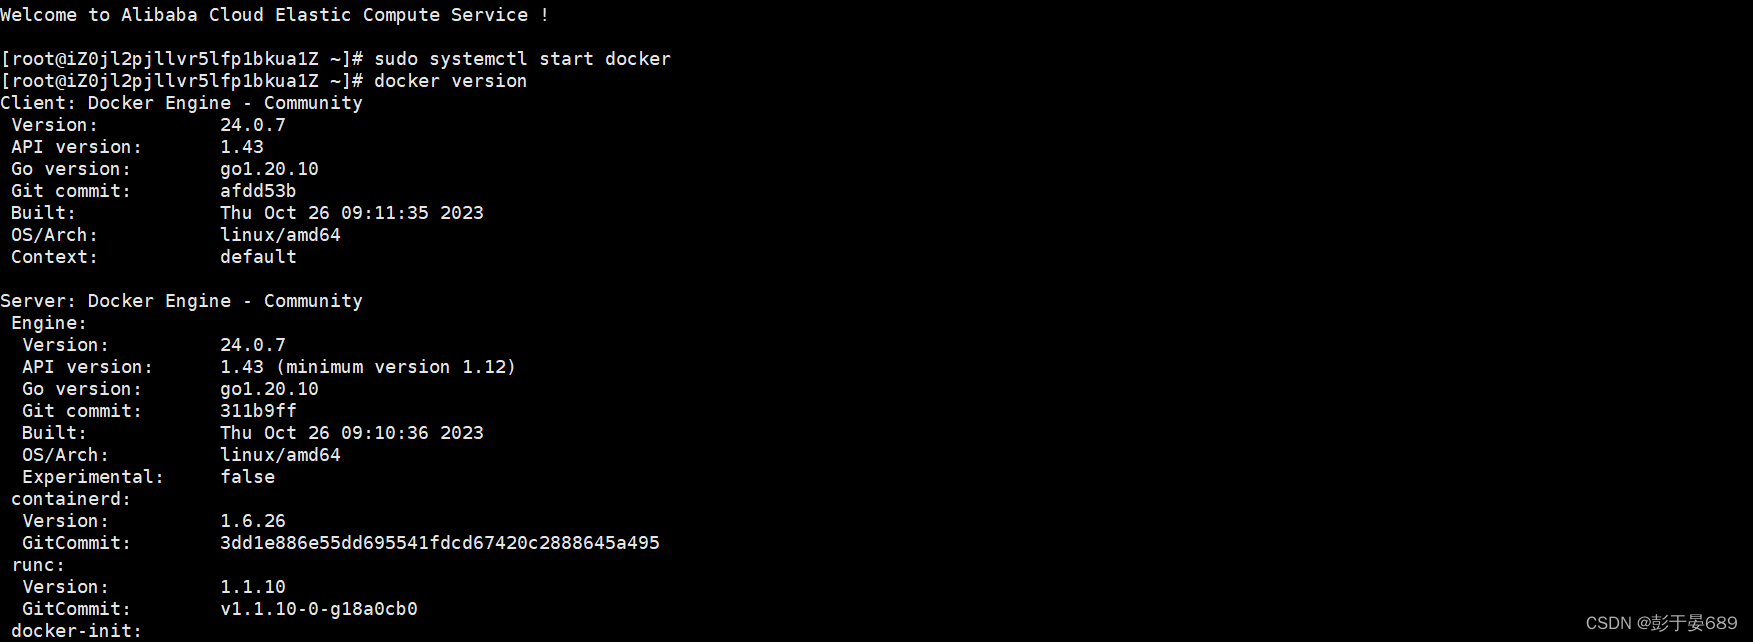
systemctl start docker # 启动docker
cat > /etc/docker/daemon.json <<EOF
{
"registry-mirrors": ["https://docker.mirrors.ustc.edu.cn/"]
}
EOF
systemctl daemon-reload # 重新加载程序
systemctl restart docker # 重启docker
docker version # 查看版本
docker info # 查看信息
# 查看信息,以下内容翻译成中文,原文是英文
[root@localhost ~]# docker info
Client: Docker Engine - Community
 Version:    25.0.4    # docker版本
 Context:    default
 Debug Mode: false
 Plugins:
  buildx: Docker Buildx (Docker Inc.)
    Version:  v0.13.0
    Path:     /usr/libexec/docker/cli-plugins/docker-buildx
  compose: Docker Compose (Docker Inc.)
    Version:  v2.24.7
    Path:     /usr/libexec/docker/cli-plugins/docker-compose
    Server:
 Containers: 5  # 有多少个容器5个
  Running: 1    # 正在运行的容器有1个
  Paused: 0
  Stopped: 4    # 停止的容器有4个
 Images: 5      # 有5个镜像
......省略N
Kernel Version: 3.10.0-1160.71.1.el7.x86_64  # Linux内核
 Operating System: CentOS Linux 7 (Core)  # 操作系统
 OSType: linux
 Architecture: x86_64  # 架构
 CPUs: 2     # CPU 核数
 Total Memory: 1.777GiB
 Name: k8s-node02     # 主机名
 ID: 4da00c4c-a26e-44ad-919d-f4b9404a269e
 Docker Root Dir: /var/lib/docker  # docker 存放数据位置
 Debug Mode: false
 Experimental: false
 Insecure Registries:
  127.0.0.0/8
 Registry Mirrors:
  https://1izcbhll.mirror.aliyuncs.com/
 Live Restore Enabled: false
docker常用操作
| 命令 | 功能 |
|---|---|
| docker search | 在Docker Hub上搜索镜像 |
| docker pull | 从Docker Hub中提取镜像 |
| docker images | 查看镜像 |
| docker create | 创建一个新容器 |
| docker start | 启动容器 |
| docker run | 在新容器中运行命令 |
| docker attach | 连接到运行的容器 |
| docker ps | 列出正在运行的容器 (加上-a就是列出运行和没有运行的) |
| docker logs | 获取容器日志 |
| docker restart | 重启容器 |
| docker stop | 停止一个或多个运行中的容器 |
| docker kill | 杀死一个或多个运行中的容器 |
| docker rm | 移除一个或多个容器 |
| docker exec | 在运行的容器中运行命令 |
| docker info | 查看信息 |
| docker inspect | 返回Docker对象的低级信息 |
| docker push | 推 镜像到镜像仓库中 |
| build | 从Dockerfile构建镜像 |
# 查看docker 命令用法
[root@localhost ~]# docker --help
......省略N
Commands:
  attach      Attach local standard input, output, and error streams to a running container
  build       Build an image from a Dockerfile  # 从Dockerfile构建镜像
  commit      Create a new image from a container's changes
  cp          Copy files/folders between a container and the local filesystem # 在容器和本地文件系统之间复制文件/文件夹
  create      Create a new container # 创建一个新容器
  diff        Inspect changes to files or directories on a container's filesystem
  events      Get real time events from the server
  exec        Run a command in a running container
  export      Export a container's filesystem as a tar archive
  history     Show the history of an image
  images      List images
  import      Import the contents from a tarball to create a filesystem image
  info        Display system-wide information
  inspect     Return low-level information on Docker objects
  kill        Kill one or more running containers
  load        Load an image from a tar archive or STDIN
  login       Log in to a Docker registry
  logout      Log out from a Docker registry
  logs        Fetch the logs of a container
  pause       Pause all processes within one or more containers
  port        List port mappings or a specific mapping for the container
  ps          List containers  # 列出容器
  pull        Pull an image or a repository from a registry
  push        Push an image or a repository to a registry  # 将镜像像或存储库推送到注册表
  rename      Rename a container
  restart     Restart one or more containers   # 重新启动一个或多个容器
  rm          Remove one or more containers    # 移除一个或多个容器
......省略N
# 使用search命令跟在docker仓库直接搜索httpd是一样的
[root@localhost ~]# docker search httpd
NAME     DESCRIPTION            STARS     OFFICIAL   AUTOMATED
httpd    The Apache HTTP Server Project    4090       [OK]
......省略N

# 拉取镜像,不指定版本就是拉取最新版latest
[root@localhost ~]# docker pull httpd
Using default tag: latest
latest: Pulling from library/httpd
a2abf6c4d29d: Pull complete
dcc4698797c8: Pull complete
41c22baa66ec: Pull complete
67283bbdd4a0: Pull complete
d982c879c57e: Pull complete
# 有五层,层次越少越好。

# 查看本地有哪些镜像
[root@localhost ~]# docker images
REPOSITORY   TAG       IMAGE ID       CREATED        SIZE
httpd        latest    dabbfbe0c57b   7 months ago   144MB
[root@localhost ~]#


# 使用httpd镜像创建一个新的容器
注意:这样创建的容器是停止状态
[root@localhost ~]# docker create --name web httpd
61dc31d6aab05055dc5c0fab0cfd2ab8dba3768e89960e2a82d2b48313a83b61

# docker ps 是查看容器状态,加上-a 是查看正在运行的和没有在运行的容器
[root@localhost ~]# docker ps -a
CONTAINER ID   IMAGE     COMMAND          CREATED       STATUS    PORTS NAMES
61dc31d6aab0   httpd  "httpd-foreground" 6 seconds ago  Created          web

# 启动web容器、如果在创建时没有指定名字,则用容器id来启动:61dc31d6aab0
[root@localhost ~]# docker start web  # docker start 61dc31d6aab0
web
[root@localhost ~]# docker ps
CONTAINER ID   IMAGE     COMMAND              CREATED         STATUS      PORTS     NAMES
61dc31d6aab0   httpd     "httpd-foreground"   7 minutes ago   Up About a minute   80/tcp    web

# 停止web
[root@localhost ~]# docker stop web
web
[root@localhost ~]# docker ps
CONTAINER ID   IMAGE     COMMAND   CREATED   STATUS    PORTS     NAMES
[root@localhost ~]#

# 重启web
[root@localhost ~]# docker restart web
web
[root@localhost ~]# docker ps
CONTAINER ID   IMAGE     COMMAND              CREATED         STATUSPORTS     NAMES
61dc31d6aab0   httpd     "httpd-foreground"   8 minutes ago   Up 1 second80/tcp    web
[root@localhost ~]#

# 杀死web,跟杀死进程一样
[root@localhost ~]# docker kill web
web
[root@localhost ~]# docker ps -a
CONTAINER ID   IMAGE     COMMAND              CREATED          STATUS                PORTS     NAMES
61dc31d6aab0   httpd     "httpd-foreground"   29 minutes ago   Exited (137)3 seconds ago             web
[root@localhost ~]#

# 删除一个正在运行的容器
[root@localhost ~]# docker start web
[root@localhost ~]# docker rm -f web
web
[root@localhost ~]# docker ps -a
CONTAINER ID   IMAGE     COMMAND   CREATED   STATUS    PORTS     NAMES
[root@localhost ~]#

# 注意删除容器镜像还在的
[root@localhost ~]# docker images
REPOSITORY   TAG       IMAGE ID       CREATED        SIZE
httpd        latest    dabbfbe0c57b   7 months ago   144MB
[root@localhost ~]#

# docker run就是执行docker pull、docker create和docker start,如果本地没有所需的镜像,会从镜像仓库里拉取下来,启动成容器。如果本地有容器直接docker start就OK了

# it交互模式。在新容器中运行命令/bin/sh
[root@localhost ~]# docker run -it --name test busybox /bin/sh
Unable to find image 'busybox:latest' locally
latest: Pulling from library/busybox
5cc84ad355aa: Pull complete
Digest: sha256:5acba83a746c7608ed544dc1533b87c737a0b0fb730301639a0179f9344b1678
Status: Downloaded newer image for busybox:latest
/ # ip addr show  eth0 # 查看容器里的ip
12: eth0@if13: <BROADCAST,MULTICAST,UP,LOWER_UP,M-DOWN> mtu 1500 qdisc noqueue
    link/ether 02:42:ac:11:00:02 brd ff:ff:ff:ff:ff:ff
    inet 172.17.0.2/16 brd 172.17.255.255 scope global eth0
       valid_lft forever preferred_lft forever
/ #
# 如果使用exit退出容器,这个容器就会停止。
/ # exit
[root@localhost ~]# docker ps -a
CONTAINER ID   IMAGE     COMMAND     CREATED         STATUS    PORTS     NAMES
4beeb9550425   busybox   "/bin/sh"   5 minutes ago   Exited (0) 9 seconds ago             test
[root@localhost ~]#

# 使用attach命令进入容器,有一个缺点就是用exit退出容器后就会停止容器
[root@localhost ~]# docker start test
[root@localhost ~]# docker attach test
/ #
# 使用exit命令退出就会停止容器
/ # exit
[root@localhost ~]# docker ps -a
CONTAINER ID   IMAGE     COMMAND     CREATED          STATUS     PORTS     NAMES
4beeb9550425   busybox   "/bin/sh"   16 minutes ago   Exited (0) 3 seconds ago             test
[root@localhost ~]#

# 推荐使用exec命令进入容器,因为就算使用exit退出容器也不会停止容器
[root@localhost ~]# docker start test
[root@localhost ~]# docker exec -it test /bin/sh
/ # exit
[root@localhost ~]# docker ps -a
CONTAINER ID   IMAGE     COMMAND     CREATED          STATUS              PORTS     NAMES
4beeb9550425   busybox   "/bin/sh"   23 minutes ago   Up About a minute        test
[root@localhost ~]#

# 返回Docker对象的低级信息
[root@localhost ~]# docker inspect test
.....省略N
                    "Gateway": "172.17.0.1",  # 网关
                    "IPAddress": "172.17.0.2", # ip 地址
                    "IPPrefixLen": 16,
                    "IPv6Gateway": "",
                    "GlobalIPv6Address": "",
                    "GlobalIPv6PrefixLen": 0,
                    "MacAddress": "02:42:ac:11:00:02",
                    "DriverOpts": null
...... 省略N

# 加上-q 是取出所有正在运行的容器ID
[root@localhost ~]# docker ps -q
b10ced22fc07
daa8fc40249e
371980f52bb1
db450ac87a4a
029edca838fb
a1726d4849a6
e063df0b9040
24f5a6b7ed86
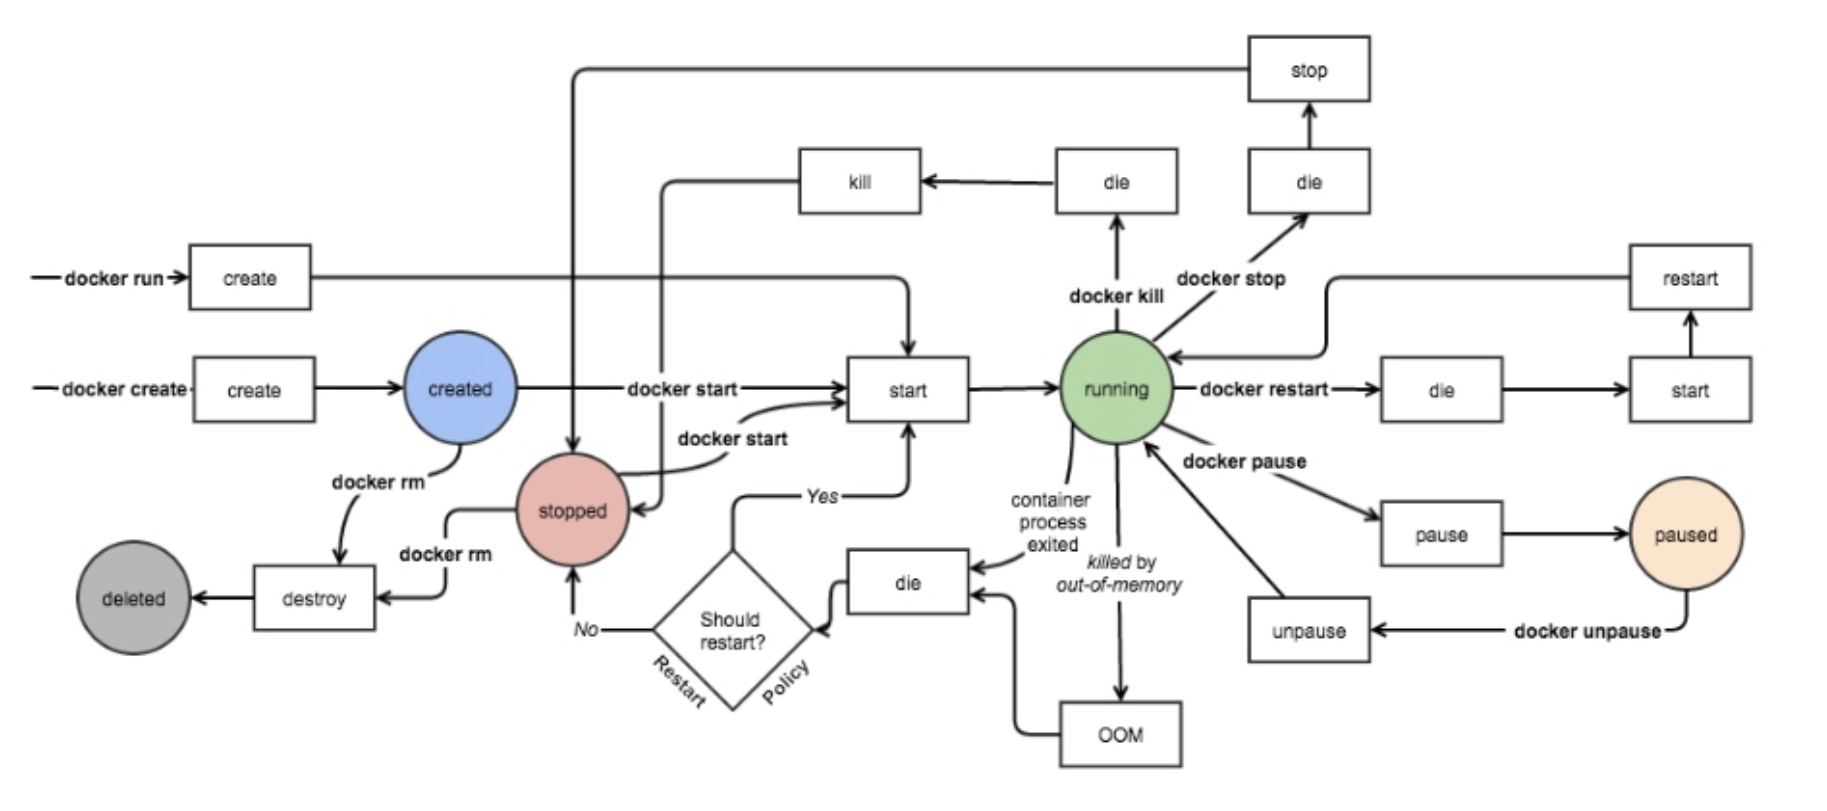
docker event state
防火墙状态及规则
1、查看防火墙状态:firewall-cmd --state
[root@localhost ~]# firewall-cmd --state
running
[root@localhost ~]#
2、查看防火墙:firewall-cmd --list-all
[root@localhost ~]# firewall-cmd --list-all
3、防火墙放行协议
[root@localhost ~]# firewall-cmd --add-rich-rule 'rule family=ipv4 source address=0.0.0.0/0 service name=http accept' --permanent
注意:在centos8/redhat8版本里不设置防火墙放行是访问不的


--permanent   //  表示永久添加

如果要删除的话,把add改为remove,其他不变
[root@localhost ~]# firewall-cmd --remove-rich-rule 'rule family=ipv4 source address=0.0.0.0/0 service name=http accept' --permanent
4、防火墙有好几种
iptables
firewalld
ebtables
主流是iptables跟firewalld
iptables  # 默认放行
firewalld # 默认拒绝

# 查看防火墙规则命令用法
[root@localhost ~]# firewall-cmd --help

Usage: firewall-cmd [OPTIONS...]

General Options
  -h, --help           Prints a short help text and exists
  -V, --version        Print the version string of firewalld
  -q, --quiet          Do not print status messages
........省略
5、防火墙放行规则
使用httpd镜像创建成容器,使用母机的浏览器访问
# 查看有哪些容器正在运行
[root@localhost ~]# docker ps -a
CONTAINER ID IMAGE COMMAND CREATED STATUS PORTS NAMES
[root@localhost ~]#
#选项解释:
run: 运行容器
-d: 后台运行容器
--name: 指定容器的名字
-p: 指定宿主机和容器的端口映射,宿主机端口:容器端口
-v: 指定挂载映射,宿主机路径:容器路径
-it:交互模式
案例
docker run -d --name web -p 8080:8080 -v ~/container_journal:/var/log/journal:Z 镜像
后面的Z是docker将Selinux的container_file_t的标签值应用到宿主机的目录上,以便容器可以访问宿主机的目录。
# 创建跟容器映射目录data
[root@localhost ~]# mkdir -p /opt/data
#创建容器名叫web、-p是把容器的80端口映射到真机上,-v是将宿主机目录跟容器的目录关联,用httpd镜像创容器
[root@localhost ~]# docker run -d --name web -p 80:80 -v /opt/data/:/usr/local/apache2/htdocs:Z httpd
7ef195d60c63c4196e82ee793f2b347ab38332d90380687264875e06716095d0
[root@localhost ~]# docker ps
CONTAINER ID IMAGE COMMAND CREATED STATUS PORTS NAMES
7ef195d60c63 httpd "httpd-foreground" 3 seconds ago Up 2 seconds 0.0.0.0:80->80/tcp, :::80->80/tcp web
[root@localhost ~]#
# 去百度搜索源码之家,把网站下载到/opt/data目录下面来
# 把网站放到/opt/data下面
[root@localhost data]# ls
qadmin-1.3.zip
# 解压
dnf -y install unzip # 下载解压命令
[root@localhost data]# unzip qadmin-1.3.zip
[root@localhost data]# ls
qadmin qadmin-1.3.zip
[root@localhost data]# ls
article_add.html db_backup.html index.html pages_component.html static user_index.html
article_index.html db_reduction.html login.html pages_model.html type_add.html web_cache.html
base.html flink_add.html nav_add.html pages_msg.html type_index.html web_index.html
data flink_index.html nav_index.html README.md user_add.html web_pwd.html
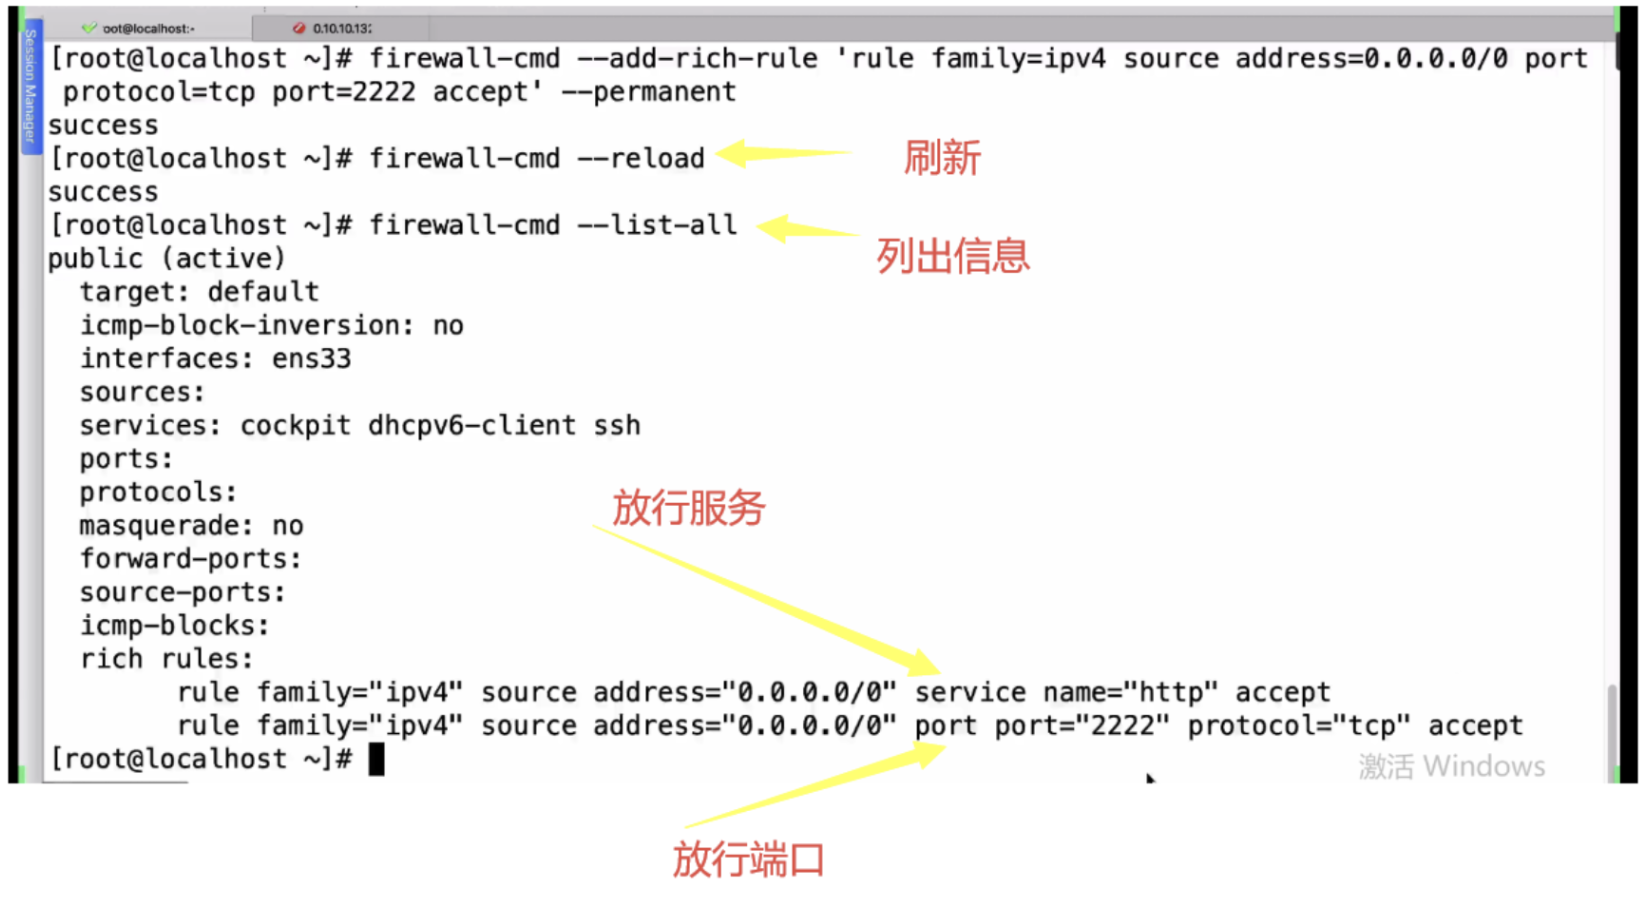
# 防火墙放行协议
[root@localhost ~]# firewall-cmd --add-rich-rule 'rule family=ipv4 source address=0.0.0.0/0 service name=http accept' --permanent
#重新加载
[root@localhost ~]# firewall-cmd --reload
#查看状态
[root@localhost ~]# firewall-cmd --list-all
........省略
rule family="ipv4" source address="0.0.0.0/0" service name="http" accept #看到这个就可以在真机里访问
#注意:在centos8/redhat8版本里不设置防火墙放行是访问不的
[root@localhost ~]# ip addr show ens160
2: ens160: <BROADCAST,MULTICAST,UP,LOWER_UP> mtu 1500 qdisc mq state UP group default qlen 1000
link/ether 00:0c:29:1c:4f:61 brd ff:ff:ff:ff:ff:ff
inet 192.168.229.146/24 brd 192.168.229.255 scope global dynamic noprefixroute ens160
valid_lft 1037sec preferred_lft 1037sec
inet6 fe80::20c:29ff:fe1c:4f61/64 scope link noprefixroute
valid_lft forever preferred_lft forever
[root@localhost ~]#


![[ Linux ] vim的使用(附:命令模式的常见命令列表)](https://img-blog.csdnimg.cn/direct/487e5ddbdf82478d9ca82563e4c1e378.png)