Spring Cloud
主要解决微服务架构的核心问题主要包括以下四个方面:
服务拆分(Service Decomposition):
微服务架构的一个核心原则是将应用程序拆分成一组小型、自治的服务。服务拆分的关键是确定如何将应用程序按照业务功能进行划分,并建立独立的服务来处理每个功能。这需要考虑服务的边界和接口设计,以确保服务之间的职责清晰、高内聚和低耦合。服务通信和调用(Service Communication and Invocation):
在微服务架构中,各个服务之间通过网络进行通信。服务之间需要进行远程调用,以实现跨服务的功能调用和数据交互。在设计服务之间的通信和调用时,需要考虑如何选择合适的通信协议、消息传递方式和序列化方式,以及如何处理服务之间的失败和容错。服务发现和注册(Service Discovery and Registration):
由于微服务架构中的服务数量较多,需要一种机制来管理和追踪这些服务的状态和位置。服务发现和注册是一种用于动态发现和注册服务的机制,它允许服务在运行时自动注册自己的信息,并让其他服务能够发现并与之通信。常见的服务发现和注册机制包括使用ZooKeeper、Consul、Eureka等。服务容错和监控(Service Resilience and Monitoring):
在微服务架构中,服务之间的调用是通过网络进行的,因此存在网络延迟、故障和错误的风险。为了保证系统的可靠性和稳定性,需要考虑服务容错和监控机制。容错机制包括服务的熔断、降级和限流等策略,以避免级联故障。监控机制可以追踪和记录服务的健康状态、性能指标和日志,以便及时发现和解决问题。
这些核心问题在微服务架构设计和实施过程中是需要重点关注和解决的,合理的解决方案能够提高微服务架构的可扩展性、可维护性和可靠性。
微服务技术栈

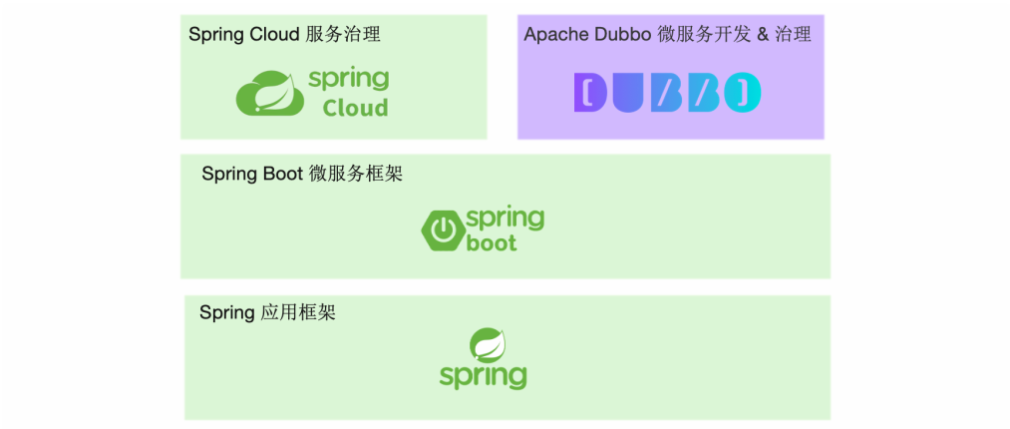
Dubbo和Spring Cloud是两个常用的微服务框架,它们都提供了一系列的功能和组件来支持微服务架构。下面是它们的一些特点和区别:
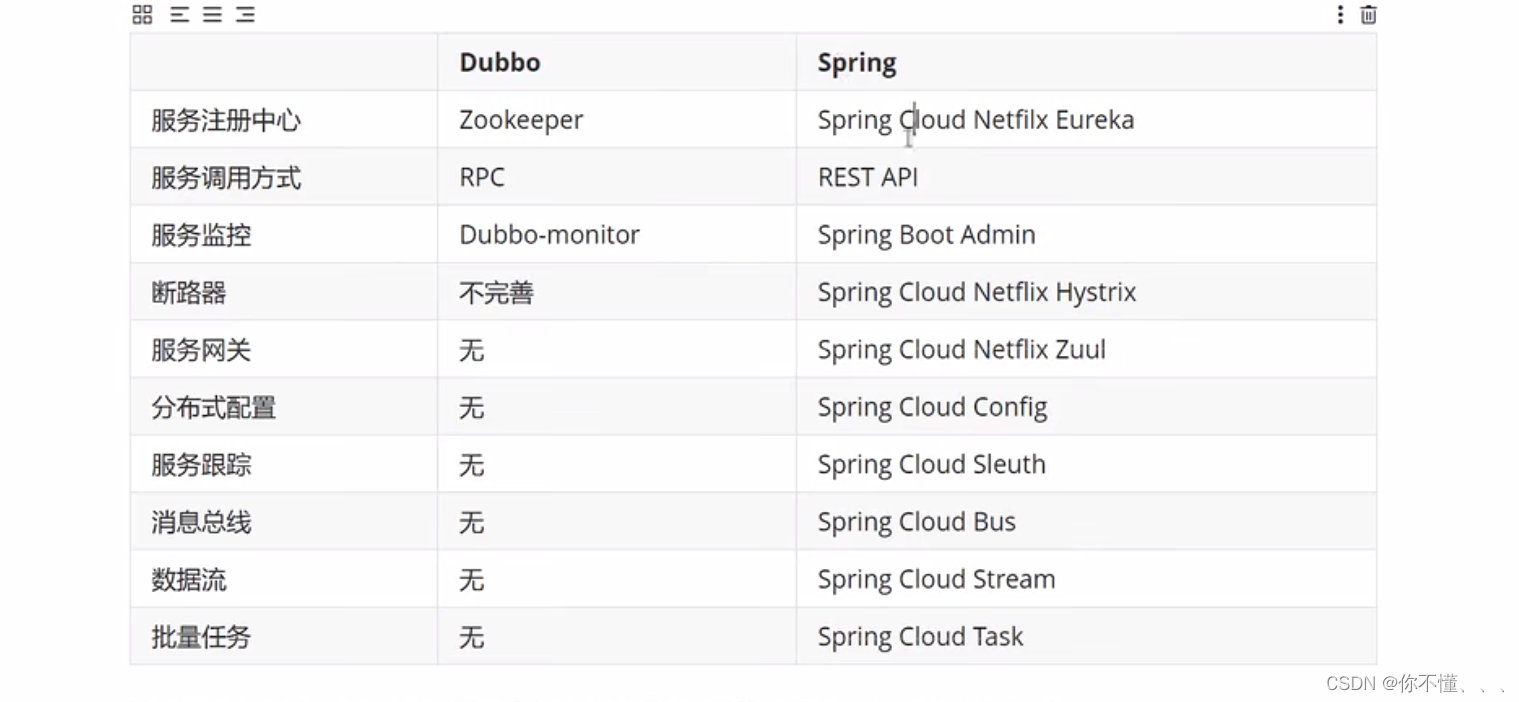
架构定位:
- Dubbo是一款专注于服务治理的高性能RPC框架,主要关注服务的注册与发现、负载均衡、容错处理等功能。
- Spring Cloud是一套完整的微服务解决方案,提供了更全面的功能,包括服务注册与发现、负载均衡、服务网关、配置管理、链路追踪等。
生态系统:
- Dubbo是由阿里巴巴开源的项目,在国内得到广泛的应用和支持。
- Spring Cloud是Spring生态系统下的一个子项目,与Spring Boot无缝集成,并且拥有更广泛的社区支持和生态系统。
通讯方式:
- Dubbo使用自定义的RPC协议进行通讯,支持多种网络传输协议(如TCP、HTTP、Dubbo协议等)和序列化协议(如Hessian、JSON等)。
- Spring Cloud使用HTTP协议进行通讯,常用的实现有基于RESTful风格的HTTP API和Feign客户端。
服务治理:
- Dubbo提供了丰富的服务治理功能,包括服务注册与发现、负载均衡、容错处理、服务降级等。
- Spring Cloud通过服务注册中心(如Eureka、Consul)来实现服务的注册与发现,同时提供了负载均衡、断路器、配置管理等功能。
配置管理:
- Dubbo需要通过单独的配置文件或注解来配置服务相关的信息。
- Spring Cloud提供了统一的配置中心(如Spring Cloud Config)来管理微服务的配置,可实现动态的配置更新和版本控制。
总的来说,Dubbo和Spring Cloud都是用于构建分布式系统中的微服务框架,它们在架构定位、生态系统、通讯方式、服务治理和配置管理等方面有一些差异。选择使用哪个框架要根据具体的需求、技术栈和团队情况来决定。如果你注重服务治理和高性能的RPC通讯,可以选择Dubbo;如果你需要更全面的微服务解决方案和与Spring生态系统的无缝集成,可以选择Spring Cloud。
Eureka
Eureka是Netflix开源的一款基于REST的服务发现组件,用于构建可实现服务注册和发现的微服务架构。它是微服务架构中的一个核心组件,被广泛应用于服务治理领域。
以下是使用Spring Cloud和Eureka实现服务注册和发现的简单代码示例:
1. 创建Eureka服务器(注册中心):
- 在pom.xml文件中添加
spring-cloud-starter-netflix-eureka-server依赖。 - 在应用的主类上添加
@EnableEurekaServer注解,启用Eureka服务器功能。
import org.springframework.boot.SpringApplication;
import org.springframework.boot.autoconfigure.SpringBootApplication;
import org.springframework.cloud.netflix.eureka.server.EnableEurekaServer;

@SpringBootApplication
@EnableEurekaServer
public class EurekaServerApplication {

    public static void main(String[] args) {

        SpringApplication.run(EurekaServerApplication.class, args);
    }
}
- 在应用的配置文件(application.properties或application.yml)中添加以下配置:
server.port=8761

# 表示是否向eureke注册中心注册自己
eureka.client.register-with-eureka=false
# 为false表示自己为注册中心
eureka.client.fetch-registry=false
# 监控页面~可以配置集群,和其他的配置中心服务进行关联
eureka.client.service-url.defaultZone=http://localhost:8762/eureka/
配置中的server.port设置了Eureka服务器的端口号,默认是8761。
eureka.client.register-with-eureka配置项设置为false,表示不将该服务器自身注册到注册中心。
eureka.client.fetch-registry配置项设置为false,表示不从注册中心获取注册信息。
2. 创建服务提供者:
- 创建一个新的Spring Boot应用作为服务提供者。
- 在pom.xml文件中添加
spring-cloud-starter-netflix-eureka-client依赖。 - 在应用的配置文件中,添加Eureka服务器的信息。
spring.application.name=service-provider
server.port=8081

# Eureka配置,服务注册
eureka.client.service-url.defaultZone=http://localhost:8761/eureka/
- 在应用的主类上添加
@EnableEurekaServer注解,启用Eureka服务器功能。
import org.springframework.boot.SpringApplication;
import org.springframework.boot.autoconfigure.SpringBootApplication;
import org.springframework.cloud.netflix.eureka.server.EnableEurekaServer;

@SpringBootApplication
@EnableEurekaClient
public class EurekaServerApplication {

    public static void main(String[] args) {

        SpringApplication.run(EurekaServerApplication.class, args);
    }
}
3. 创建服务消费者:
- 创建一个新的Spring Boot应用作为服务消费者。
- 在pom.xml文件中添加
spring-cloud-starter-netflix-eureka-client依赖。 - 在应用的配置文件中,添加Eureka服务器的信息。
spring.application.name=service-consumer
server.port=8082

# Eureka配置,服务注册
eureka.client.service-url.defaultZone=http://localhost:8761/eureka/
4. 创建服务提供者的API:
在服务提供者应用中创建一个RESTful API。
@RestController
public class ApiController {

    @GetMapping("/hello")
    public String hello() {

        return "Hello from service provider!";
    }
}
5. 创建服务消费者的调用逻辑:
在服务消费者应用中创建调用服务提供者的逻辑。
@RestController
public class ApiController {

    @Autowired
    private RestTemplate restTemplate;

    @GetMapping("/hello")
    public String hello() {

        ResponseEntity<String> response = restTemplate.getForEntity("http://service-provider/hello", String.class);
        return response.getBody();
    }
}
6. 启动应用程序:
首先,启动Eureka服务器(注册中心)。
然后,启动服务提供者和服务消费者应用程序。
通过以上步骤,服务提供者将会注册到Eureka服务器中,服务消费者通过Eureka服务器发现并调用服务提供者的API。
请注意,以上代码示例仅供参考,你需要根据实际情况进行适当的配置和修改。另外,你还可以使用Feign或Ribbon等工具来简化服务的调用和负载均衡。
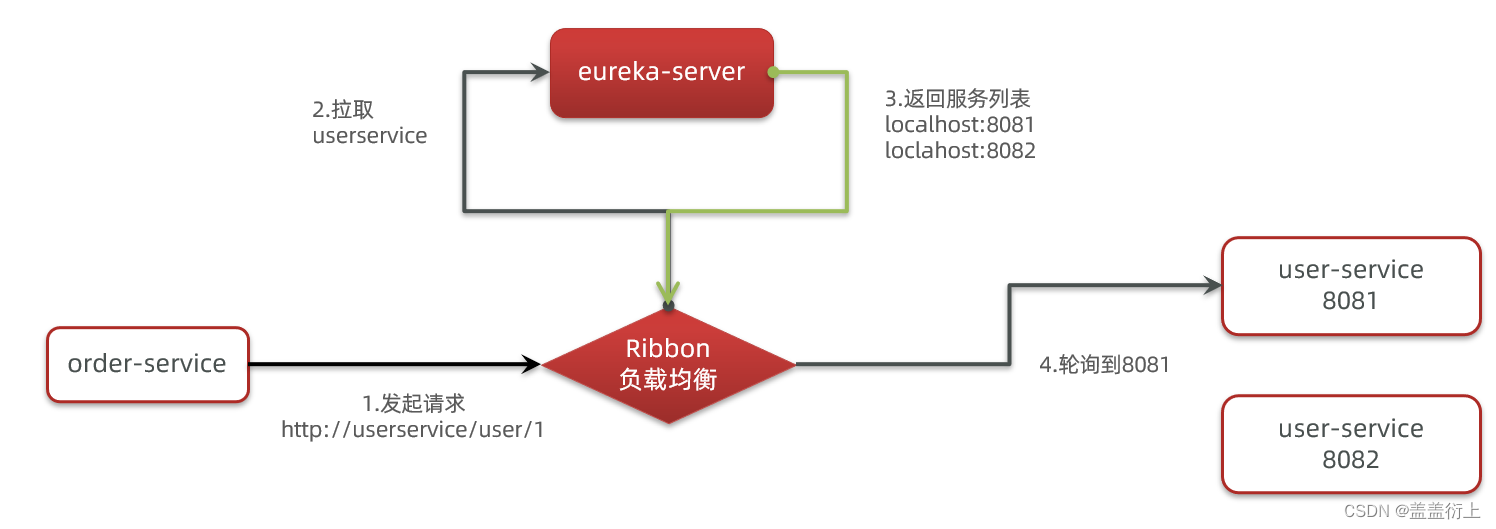
Ribbon
Ribbon是Netflix开源的一款客户端负载均衡器,它可以与Eureka、Consul等服务注册中心结合使用,帮助服务消费者在多个服务提供者之间实现负载均衡和故障转移。
下面是使用@LoadBalanced注解结合Eureka注册中心和Ribbon实现负载均衡的代码示例:
- 创建一个新的Spring Boot应用作为服务消费者。
- 在pom.xml文件中添加
spring-cloud-starter-netflix-eureka-client和spring-cloud-starter-netflix-ribbon依赖。 - 在应用的配置文件中,添加Eureka服务器的信息。
spring.application.name=service-consumer
server.port=8080

eureka.client.service-url.defaultZone=http://localhost:8761/eureka/
- 创建服务消费者的调用逻辑。
import org.springframework.beans.factory.annotation.Autowired;
import org.springframework.cloud.client.loadbalancer.LoadBalanced;
import org.springframework.http.ResponseEntity;
import org.springframework.stereotype.Service;
import org.springframework.web.client.RestTemplate;

@Service
public class ApiService {

    @Autowired
    @LoadBalanced // 添加@LoadBalanced注解
    private RestTemplate restTemplate;

    public String hello() {

        ResponseEntity<String> response = restTemplate.getForEntity("http://movie-service/hello", String.class);
        return response.getBody();
    }
}
在上述代码中,通过使用@LoadBalanced注解标记RestTemplate,使其具备负载均衡的能力。可以在调用服务提供者的URL时使用服务提供者的应用名称movie-service作为主机名。
- 创建一个配置类,用于创建RestTemplate的实例。
import org.springframework.context.annotation.Bean;
import org.springframework.context.annotation.Configuration;
import org.springframework.web.client.RestTemplate;

@Configuration
public class RestTemplateConfig {

    @Bean
    @LoadBalanced // 添加@LoadBalanced注解
    public RestTemplate restTemplate() {

        return new RestTemplate();
    }
}
在上述代码中,通过@Configuration注解和@Bean注解创建了一个RestTemplate的实例,并使用@LoadBalanced注解标记该实例具备负载均衡的能力。
- 创建一个Controller,用于接收请求并调用服务。
import org.springframework.beans.factory.annotation.Autowired;
import org.springframework.web.bind.annotation.GetMapping;
import org.springframework.web.bind.annotation.RestController;

@RestController
public class ApiController {

    @Autowired
    private ApiService apiService;

    @GetMapping("/hello")
    public String hello() {

        return apiService.hello();
    }
}
在上述代码中,通过调用ApiService的hello方法来实现对服务提供者的调用。
- 启动应用程序。
通过上述步骤,你可以实现服务消费者通过Ribbon和Eureka注册中心进行负载均衡和服务调用。使用@LoadBalanced注解标记RestTemplate,使其具备负载均衡的能力。并且通过配置类创建RestTemplate的实例,并使用@LoadBalanced注解标记该实例具备负载均衡的能力。
Feign
Feign是Spring Cloud中的一个声明式、模板化的HTTP客户端,用于简化微服务之间的HTTP通信。通过使用Feign,你可以像编写本地方法调用一样来调用远程服务。(注:Feign已经集成了Ribbon负载均衡的功能)
下面是使用Feign的一些基本步骤:
- 添加依赖:在你的Spring Boot项目中,添加Feign的依赖。可以在pom.xml文件中添加以下依赖:
<dependency>
    <groupId>org.springframework.cloud</groupId>
    <artifactId>spring-cloud-starter-openfeign</artifactId>
</dependency>
- 启用Feign客户端:在Spring Boot应用程序的启动类上添加
@EnableFeignClients注解,以启用Feign客户端。例如:
@SpringBootApplication
@EnableFeignClients
public class YourApplication {

    public static void main(String[] args) {

        SpringApplication.run(YourApplication.class, args);
    }
}
- 创建Feign客户端接口:创建一个接口,用于定义远程服务的API。通过使用Feign的注解来声明远程服务的HTTP请求。例如:
@FeignClient(name = "service-name")
public interface RemoteService {

    @GetMapping("/api/endpoint")
    String getEndpoint();
}
在上面的例子中,@FeignClient注解用于指定远程服务的名称,@GetMapping注解用于声明HTTP GET请求。
- 使用Feign客户端:在需要调用远程服务的地方,通过依赖注入的方式使用Feign客户端接口,并直接调用对应的方法。例如:
@RestController
public class YourController {

    private final RemoteService remoteService;

    public YourController(RemoteService remoteService) {

        this.remoteService = remoteService;
    }

    @GetMapping("/call-remote-service")
    public String callRemoteService() {

        return remoteService.getEndpoint();
    }
}
在上面的例子中,通过依赖注入的方式将RemoteService接口注入到YourController中,并调用getEndpoint()方法来远程调用服务。
以上是使用Feign的简单示例,你可以根据具体的需求和场景来使用Feign进行微服务之间的通信。Feign还支持更多的功能,如请求重试、自定义拦截器、文件上传等,可以根据官方文档和实际需求进行学习和使用。
Hystrix
Hystrix是Netflix开源的一款用于构建容错和弹性的库。它可以帮助开发人员在分布式系统中处理故障和延迟,并提供了服务熔断、服务降级、线程隔离、请求缓存等功能。
服务熔断和服务降级是在微服务架构中常用的容错机制,用于提高系统的稳定性和可靠性。下面分别对服务熔断和服务降级进行说明:
服务熔断(Circuit Breaker):
- 服务熔断是一种防止故障扩散的机制。当一个微服务出现故障或响应时间过长时,熔断器会迅速打开,将请求快速失败,不再调用该服务。这样可以减轻故障服务的压力,保护系统的稳定性。
- 熔断器会监控对特定服务的请求,并根据一定的条件来判断是否打开。例如,如果请求失败的比例超过了设定的阈值,熔断器就会打开。一旦熔断器打开,后续的请求会直接返回预设的错误响应,而不会再调用故障的服务。在一段时间后,熔断器会尝试半开状态,允许少量的请求通过,以检查故障服务是否恢复正常。
- 服务熔断可以避免故障服务对整个系统的影响,提高了系统的容错性和可用性。
服务降级(Fallback):
- 服务降级是一种在系统压力过大或异常情况下保证核心功能可用的策略。当系统遇到异常情况时,可以通过服务降级快速返回一个预设的默认响应,而不是执行原本的业务逻辑。这样可以保证核心功能的稳定可用,减少系统的负载和资源消耗。
- 服务降级可以根据具体的业务需求来设置,例如,可以返回一个固定的默认响应、返回缓存数据、返回静态页面等。通过降低对资源的依赖和调用次数,可以有效减少系统的负载和响应时间。
- 服务降级需要根据业务需求和系统状况进行灵活配置,避免将关键和必要的功能降级,以保证系统的可用性和用户体验。
总的来说,服务熔断和服务降级是微服务架构中用于容错和保护系统稳定性的重要机制。服务熔断用于防止故障扩散,提高系统的稳定性;服务降级用于保证核心功能的可用性,在异常情况下提供预设的默认响应。它们可以根据具体的业务需求和系统状况来配置和使用。
Hystrix是Netflix开源的一款用于构建容错和弹性的库,可以用于实现服务熔断和服务降级。以下是使用Hystrix实现服务熔断和服务降级的示例代码:
- 添加Hystrix依赖:在你的Spring Boot项目中,添加Hystrix的依赖。可以在pom.xml文件中添加以下依赖:
<dependency>
    <groupId>org.springframework.cloud</groupId>
    <artifactId>spring-cloud-starter-netflix-hystrix</artifactId>
</dependency>
- 启用Hystrix:在Spring Boot应用程序的启动类上添加
@EnableCircuitBreaker注解,以启用Hystrix。
@SpringBootApplication
@EnableCircuitBreaker
public class YourApplication {

    public static void main(String[] args) {

        SpringApplication.run(YourApplication.class, args);
    }
}
- 服务熔断的代码实现(服务端:提供者):
@RestController
public class YourController {

    @Autowired
    private RestTemplate restTemplate;

    @GetMapping("/call-service")
    @HystrixCommand(fallbackMethod = "fallbackMethod")
    public String callService() {

        // 调用远程服务
        return restTemplate.getForObject("http://service-name/api/endpoint", String.class);
    }

    public String fallbackMethod() {

        // 服务熔断处理逻辑,返回一个预设的错误响应
        return "Service is not available";
    }
}
在上述示例中,通过@HystrixCommand注解将callService()方法标记为一个Hystrix命令。当调用远程服务出现异常时,会触发服务熔断,进而调用fallbackMethod()方法进行熔断处理,返回一个预设的错误响应。
- 服务降级的代码实现一(客户端:消费者):
@RestController
public class YourController {

    @Autowired
    private RemoteService remoteService;

    @GetMapping("/call-service")
    @HystrixCommand(fallbackMethod = "fallbackMethod")
    public String callService() {

        // 调用远程服务
        return remoteService.getEndpoint();
    }

    public String fallbackMethod() {

        // 服务降级处理逻辑,返回一个预设的默认响应
        return "Default response";
    }
}
在上述示例中,通过@HystrixCommand注解将callService()方法标记为一个Hystrix命令。当调用远程服务出现异常时,会触发服务降级,进而调用fallbackMethod()方法进行降级处理,返回一个预设的默认响应。
需要注意的是,以上示例代码中使用了RestTemplate和Feign调用远程服务,你可以根据自己的实际情况选择适合的方式。同时,你也可以根据具体的业务需求和系统状况,对服务熔断和服务降级的逻辑进行更复杂的处理。
- 服务降级的代码实现二(客户端:消费者):
使用Hystrix的FallbackFactory接口可以更灵活地实现服务降级,允许在降级方法中获取异常信息。以下是使用Hystrix的FallbackFactory实现服务降级的示例代码:
- 创建FallbackFactory:
@Component
public class YourFallbackFactory implements FallbackFactory<YourService> {

    @Override
    public YourService create(Throwable throwable) {

        return new YourServiceFallback(throwable);
    }
}
FallbackFactory接口泛型中的YourService是你的服务接口,create方法中的Throwable参数用于获取调用服务时发生的异常信息。
- 创建服务降级的实现类:
public class YourServiceFallback implements YourService {

    private Throwable throwable;

    public YourServiceFallback(Throwable throwable) {

        this.throwable = throwable;
    }

    @Override
    public String getEndpoint() {

        // 服务降级处理逻辑,根据异常信息进行不同的处理
        if (throwable instanceof FeignException && ((FeignException) throwable).status() == 404) {

            // 处理404异常
            return "Service not found";
        } else if (throwable instanceof SocketTimeoutException) {

            // 处理超时异常
            return "Service timeout";
        } else {

            // 其他异常处理
            return "Default fallback response";
        }
    }
}
在YourServiceFallback类中,实现了YourService接口,并根据异常信息进行不同的处理。
- 在服务接口中使用FallbackFactory:
@FeignClient(name = "service-name", fallbackFactory = YourFallbackFactory.class)
public interface YourService {

    @GetMapping("/api/endpoint")
    String getEndpoint();
}
在YourService接口的@FeignClient注解中,通过fallbackFactory属性指定使用的FallbackFactory。
需要注意的是,以上示例代码中使用了Feign来调用远程服务,你也可以根据实际情况选择其他的方式。同时,在服务降级的实现类中,根据具体的业务需求和系统状况,可以对不同的异常进行不同的处理逻辑。
以上是使用Hystrix的FallbackFactory接口实现服务降级的示例代码,通过创建FallbackFactory和相应的降级实现类,可以更灵活地处理各种异常情况下的降级逻辑。
Zuul
Zuul是Netflix开源的一款边缘服务网关,用于在微服务架构中进行请求路由、负载均衡和过滤等功能。它作为系统的前置入口,负责将外部请求转发给后端的微服务。
以下是通过结合Eureka注册中心使用Zuul的代码示例:
- 在Zuul服务中添加Eureka和Zuul的依赖:
在Zuul服务的pom.xml文件中添加以下依赖:
<dependency>
    <groupId>org.springframework.cloud</groupId>
    <artifactId>spring-cloud-starter-netflix-zuul</artifactId>
</dependency>

<dependency>
    <groupId>org.springframework.cloud</groupId>
    <artifactId>spring-cloud-starter-netflix-eureka-client</artifactId>
</dependency>
- 启用Zuul代理和Eureka客户端:
在Zuul服务的主类上添加@EnableZuulProxy和@EnableEurekaClient注解,启用Zuul代理和Eureka客户端功能:
@SpringBootApplication
@EnableZuulProxy
@EnableEurekaClient
public class ZuulApplication {

    public static void main(String[] args) {

        SpringApplication.run(ZuulApplication.class, args);
    }
}
- 配置Zuul和Eureka:
在Zuul服务的配置文件(application.properties或application.yml)中添加以下配置:
# Zuul配置
zuul.routes.your-service.path=/your-service/**
zuul.routes.your-service.service-id=your-service

# Eureka配置,将当前服务注册到注册中心,注册中心为多个
eureka.client.service-url.defaultZone=http://localhost:8761/eureka/,http://localhost:8762/eureka/
上述配置中,your-service是你要路由的微服务的名称,/your-service/**是请求路径的匹配规则。
- 在被路由的微服务中添加Eureka的依赖:
在被路由的微服务的pom.xml文件中添加以下依赖:
<dependency>
    <groupId>org.springframework.cloud</groupId>
    <artifactId>spring-cloud-starter-netflix-eureka-client</artifactId>
</dependency>
- 在被路由的微服务的配置文件中添加Eureka配置:
在被路由的微服务的配置文件(application.properties或application.yml)中添加以下配置:
# Eureka配置,将当前服务注册到注册中心,注册中心为多个
eureka.client.service-url.defaultZone=http://localhost:8761/eureka/,http://localhost:8762/eureka/
- 启动Eureka注册中心、Zuul服务和被路由的微服务:
首先启动Eureka注册中心,然后分别启动Zuul服务和被路由的微服务。
通过结合Eureka注册中心使用Zuul,Zuul服务将会注册到Eureka注册中心,然后根据配置的路由规则将请求转发给相应的微服务。被路由的微服务也会注册到Eureka注册中心,以供Zuul服务发现。
请注意,在实际使用中,需根据你的具体环境和需求进行适当的配置和修改。以上代码示例仅供参考。
Spring Cloud Config
Spring Cloud Config是一个用于集中化管理和提供应用程序配置的工具,它提供了一种方便的方式来管理应用程序在不同环境中的配置,并支持配置的动态刷新。以下是使用Spring Cloud Config的基本步骤:
创建配置服务器(Spring Cloud Config Server):
首先,创建一个独立的Spring Boot应用作为配置服务器。在该应用中,添加spring-cloud-config-server依赖,并使用@EnableConfigServer注解启用配置服务器功能。配置Git仓库:
在配置服务器的配置文件(application.properties或application.yml)中,配置Git仓库的信息,包括仓库地址、用户名、密码等。配置服务器将从Git仓库中读取应用程序的配置文件。创建应用程序:
创建你的其他应用程序,并在它们的配置文件中添加一些需要外部化的配置项。这些配置文件可以命名为{application}-{profile}.properties或{application}-{profile}.yml,其中application是应用程序的名称,profile是应用程序的环境(例如dev、prod等)。启用配置客户端:
在你的应用程序中,添加spring-cloud-starter-config依赖,并在配置类上添加@RefreshScope注解,以支持配置的动态刷新。配置应用程序连接到配置服务器:
在应用程序的配置文件中,添加配置服务器的URL,以便应用程序能够连接到配置服务器并获取配置。访问配置:
启动配置服务器和应用程序后,应用程序将自动连接到配置服务器,并从配置服务器获取配置。你可以通过HTTP端点或通过程序访问配置。动态刷新配置:
如果配置文件发生了变化,你可以使用Actuator的/actuator/refresh端点触发配置的动态刷新,这将导致应用程序重新加载最新的配置。
通过Spring Cloud Config,你可以将应用程序的配置集中管理,并实现配置的动态刷新。这为多环境部署、配置的版本控制和集中化配置管理提供了方便和灵活性。
以下是使用Spring Cloud Config的代码实现示例:
- 创建配置服务器(Config Server):
创建一个新的Spring Boot应用作为配置服务器。
在pom.xml文件中添加spring-cloud-config-server依赖。
在应用的主类上添加@EnableConfigServer注解,启用配置服务器功能。
@SpringBootApplication
@EnableConfigServer
public class ConfigServerApplication {

    public static void main(String[] args) {

        SpringApplication.run(ConfigServerApplication.class, args);
    }
}
- 配置配置服务器:
在配置文件(application.properties或application.yml)中配置Git仓库的信息,指定要获取配置的应用程序和其对应的配置文件。
# Git仓库配置
spring.cloud.config.server.git.uri=https://github.com/your-account/your-config-repo.git
spring.cloud.config.server.git.username=your-username
spring.cloud.config.server.git.password=your-password

# 应用程序配置
spring.application.name=config-server
server.port=8888
- 创建应用程序:
创建你的其他应用程序,作为需要获取配置的客户端。
在pom.xml文件中添加spring-cloud-starter-config依赖。
在应用的配置文件中,指定要获取配置的应用程序名称和对应的环境。
# 获取config-server应用程序的配置
spring.application.name=config-server
spring.profiles.active=dev
spring.cloud.config.uri=http://localhost:8888
- 访问配置:
在需要获取配置的类中,使用@Value注解注入配置值。
@RestController
public class MyController {


    @Value("${my.property}")
    private String myProperty;

    @GetMapping("/my-property")
    public String getProperty() {

        return myProperty;
    }
}
- 启动应用程序:
首先,启动配置服务器(Config Server)。
然后,启动其他客户端应用程序。
通过以上步骤,客户端应用程序将从配置服务器获取配置,并使用@Value注解注入配置值。当配置发生变化时,可以通过使用Actuator的/actuator/refresh端点来刷新配置。
请注意,以上代码示例仅供参考,你需要根据实际情况进行适当的配置和修改。另外,你需要将Git仓库的URL、用户名和密码替换为你自己的配置。
总结
使用三部曲:1.导入依赖 2.编写配置 3.@Enablexxx
重点:授人以鱼不如授人以渔
参考书
- https://www.springcloud.cc/spring-cloud-netflix.html
- 中文API文档: https://www.springcloud.cc/spring-cloud-dalston.html
- SpringCloud中国社区http://springcloud.cn/
- SpringCloud中文网 https://www.springcloud.cc/


![[Angular 基础] - Angular 渲染过程 & 组件的创建](https://img-blog.csdnimg.cn/direct/e9c5d87c400c43609d4337fce33a11e6.png)