🧡💛💚TensorFlow2实战-系列教程 总目录
有任何问题欢迎在下面留言
本篇文章的代码运行界面均在Jupyter Notebook中进行
本篇文章配套的代码资源已经上传
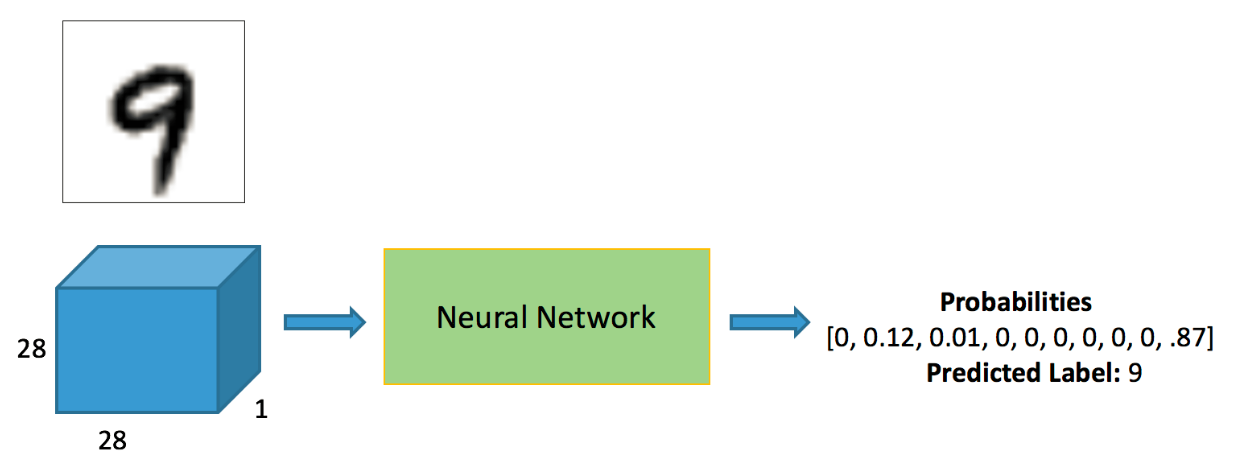
1、Mnist数据集
下载mnist数据集:
%matplotlib inline
from pathlib import Path
import requests

DATA_PATH = Path("data")
PATH = DATA_PATH / "mnist"
PATH.mkdir(parents=True, exist_ok=True)

URL = "http://deeplearning.net/data/mnist/"
FILENAME = "mnist.pkl.gz"

if not (PATH / FILENAME).exists():
        content = requests.get(URL + FILENAME).content
        (PATH / FILENAME).open("wb").write(content)
制作数据:
import pickle
import gzip

with gzip.open((PATH / FILENAME).as_posix(), "rb") as f:
        ((x_train, y_train), (x_valid, y_valid), _) = pickle.load(f, encoding="latin-1")
简单展示数据:
from matplotlib import pyplot
import numpy as np

pyplot.imshow(x_train[0].reshape((28, 28)), cmap="gray")
print(x_train.shape)
print(y_train[0])
打印结果:
(50000, 784)
5

2、模型构建
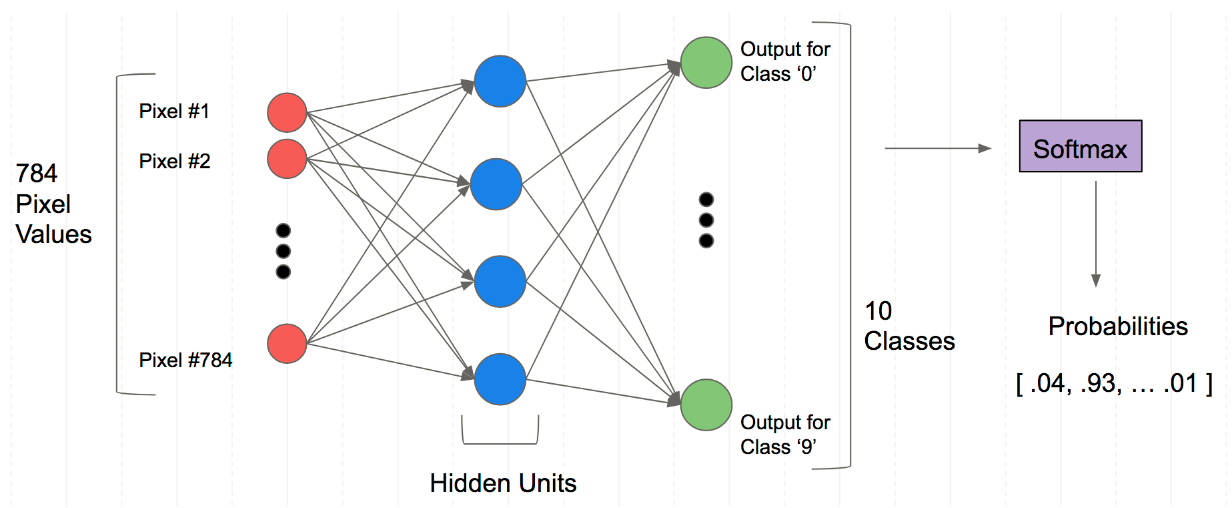
输入为784神经元,经过隐层提取特征后为10个神经元,10个神经元的输出值经过softmax得到10个概率值,取出10个概率值中最高的一个就是神经网络的最后预测值
构建模型代码:
import tensorflow as tf
from tensorflow.keras import layers
model = tf.keras.Sequential()
model.add(layers.Dense(32, activation='relu'))
model.add(layers.Dense(32, activation='relu'))
model.add(layers.Dense(10, activation='softmax'))
选择损失函数,损失函数是机器学习一个非常重要的部分,基本直接决定了这个算法的效果,这里是多分类任务,一般我们就直接选用多元交叉熵函数就好了:
TensorFlow损失函数API
编译模型:
model.compile(optimizer=tf.keras.optimizers.Adam(0.001),
             loss=tf.keras.losses.SparseCategoricalCrossentropy(),
             metrics=[tf.keras.metrics.SparseCategoricalAccuracy()])
- adam优化器,学习率为0.001
- 多元交叉熵损失函数
- 评价指标
模型训练:
model.fit(x_train, y_train, epochs=5, batch_size=64, validation_data=(x_valid, y_valid))
训练数据,训练标签,训练轮次,batch_size,验证集
打印结果:
Train on 50000 samples, validate on 10000 samples
Epoch 1/5 50000/50000  1s 29us
sample-loss: 115566 - sparse_categorical_accuracy: 0.1122 - val_loss: 364928.5786 - val_sparse_categorical_accuracy: 0.1064
Epoch 2/5 50000/50000 1s 21us
sample - loss: 837104 - sparse_categorical_accuracy: 0.1136 - val_loss: 1323287.7028 - val_sparse_categorical_accuracy: 0.1064
Epoch 3/5 50000/50000 1s 20us
sample - loss: 1892431 - sparse_categorical_accuracy: 0.1136 - val_loss: 2448062.2680 - val_sparse_categorical_accuracy: 0.1064
Epoch 4/5 50000/50000 1s 20us
sample - loss: 3131130 - sparse_categorical_accuracy: 0.1136 - val_loss: 3773744.5348 - val_sparse_categorical_accuracy: 0.1064
Epoch 5/5 50000/50000 1s 20us
sample - loss: 4527781 - sparse_categorical_accuracy: 0.1136 - val_loss: 5207194.3728 - val_sparse_categorical_accuracy: 0.1064
<tensorflow.python.keras.callbacks.History at 0x1d3eb9015f8>
模型保存:
model.save('Mnist_model.h5')
3、TensorFlow常用模块
3.1 Tensor格式转换
创建一组数据
import numpy as np
input_data = np.arange(16)
input_data
打印结果:
array([ 0, 1, 2, 3, 4, 5, 6, 7, 8, 9, 10, 11, 12, 13, 14, 15])
转换成TensorFlow格式的数据:
dataset = tf.data.Dataset.from_tensor_slices(input_data)
for data in dataset:
    print (data)
将一个ndarray转换成
打印结果:
tf.Tensor(0, shape=(), dtype=int32)
tf.Tensor(1, shape=(), dtype=int32)
…
tf.Tensor(14, shape=(), dtype=int32)
tf.Tensor(15, shape=(), dtype=int32)
3.2repeat操作
dataset = tf.data.Dataset.from_tensor_slices(input_data)
dataset = dataset.repeat(2)
for data in dataset:
    print (data)
tf.Tensor(0, shape=(), dtype=int32)
tf.Tensor(1, shape=(), dtype=int32)
…
tf.Tensor(14, shape=(), dtype=int32)
tf.Tensor(15, shape=(), dtype=int32)
tf.Tensor(0, shape=(), dtype=int32)
tf.Tensor(1, shape=(), dtype=int32)
…
tf.Tensor(14, shape=(), dtype=int32)
tf.Tensor(15, shape=(), dtype=int32)
会将当前的输出重复一遍
3.3 batch操作
dataset = tf.data.Dataset.from_tensor_slices(input_data)
dataset = dataset.repeat(2).batch(4)
for data in dataset:
    print (data)
tf.Tensor([0 1 2 3], shape=(4,), dtype=int32)
tf.Tensor([4 5 6 7], shape=(4,), dtype=int32)
tf.Tensor([ 8 9 10 11], shape=(4,), dtype=int32)
tf.Tensor([12 13 14 15], shape=(4,), dtype=int32)
tf.Tensor([0 1 2 3], shape=(4,), dtype=int32)
tf.Tensor([4 5 6 7], shape=(4,), dtype=int32)
tf.Tensor([ 8 9 10 11], shape=(4,), dtype=int32)
tf.Tensor([12 13 14 15], shape=(4,), dtype=int32)
将原来的数据按照4个为一个批次
3.4 shuffle操作
dataset = tf.data.Dataset.from_tensor_slices(input_data).shuffle(buffer_size=10).batch(4)
for data in dataset:
    print (data)
tf.Tensor([ 9 8 11 3], shape=(4,), dtype=int32)
tf.Tensor([ 5 6 1 13], shape=(4,), dtype=int32)
tf.Tensor([14 15 4 2], shape=(4,), dtype=int32)
tf.Tensor([12 7 0 10], shape=(4,), dtype=int32)
shuffle操作,直接翻译过来就是洗牌,把当前的数据进行打乱操作
buffer_size=10,就是缓存10来进行打乱取数据