1. 前言
前面写过《std::function从实践到原理》,管中规豹了std::function的一点点原理,不过还有一个与std::function密切相关的函数std::bind, 允许编程者绑定几个参数,本文着重介绍它的实现原理。不介绍一下它,有点吃肉不吃蒜味道少一半的感觉。
2. overview
在陷入繁琐的实现原理之前,我们先打印一下bind对象,看看它都有什么成员变量,这样好做到有个大局观,方便小细节的理解。
一个简单的程序:
#include <functional>
#include <iostream>

// A function taking three arguments
void printValues(int a, double b, const std::string& str) {

    std::cout << "Values: " << a << ", " << b << ", " << str << std::endl;
}

int main() {

    // Using std::bind to bind values to the function
    auto boundFunction3 = std::bind(printValues, 42, 3.14, "Hello");
        std::cout<<"sizeof(boundFunction3):"<<sizeof(boundFunction3)<<std::endl;
    // Invoking the bound function
    boundFunction3();  // Output: Values: 42, 3.14, Hello

    auto boundFunction1 = std::bind(printValues, 42, std::placeholders::_1, std::placeholders::_2);
        std::cout<<"sizeof(boundFunction1):"<<sizeof(boundFunction1)<<std::endl;
    // Invoking the bound function
    boundFunction1(3.14,"hello");  // Output: Values: 42, 3.14, Hello
    return 0;
}

可以看到
- std::bind返回的是一个std::_Bind对象,继承了std::_Weak_result_type
- 有两个成员对象:_M_f大概是指向原始函数的指针,_M_bound_args是一个tuple包含了3个元素(element)。
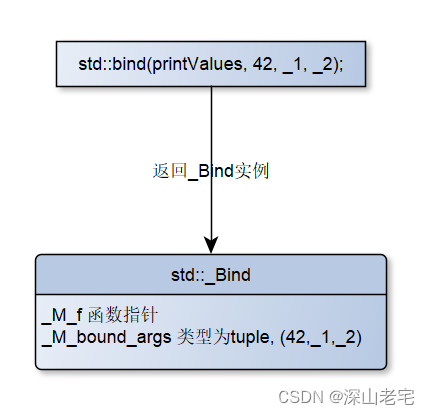
看了成员以后,我们就可以大概猜出_Bind对象大小了。

boundFunction3是32个字节,boundFunction1是16个字节。你猜对了吗?
3. 实现细节 – _Bind对象怎么构建
有了上面的概览,应该很容易想到在调用std::bind时做了两件事:
- 把函数存入_Bind对象的成员_M_f中。
- 把bind函数后面的参数存入_Bind对象的tuple内,包括_1, _2等。
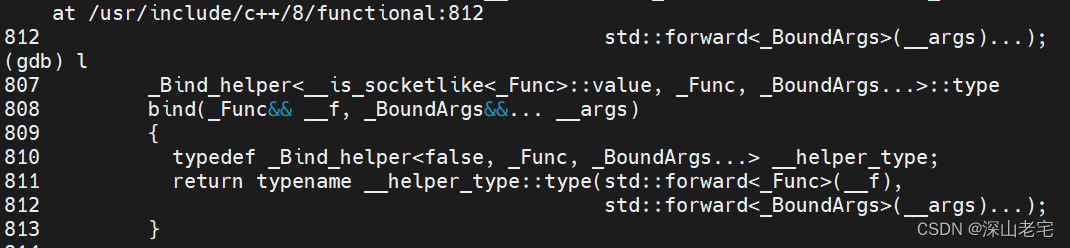
因为16行代码具有一般性(即有真参数,又有以后要绑定的参数_1_2), 我们直接按s调试这一行, gdb带我们来到了std::bind函数的定义:
__f承接了原始函数,在我们的例子中就是printValues;而__args是变参,承接了我们传进来的其余参数:
42, std::placeholders::_1, std::placeholders::_2
这些参数被转送给了__helper_type::type即_Bind类,它的构造函数如下:

很简单,只是给两个成员变量赋了值:
_M_f: 指针,指向原始函数
_M_bound_args: tuple类型,由传过来的42,_1,_2初始化
构造完毕.
4. 实现细节 – _Bind对象调用
4.1 想象实现
可以展开想象,_M_bound_args中有原始的参数列表,即42,_1,_2,还有原始的函数指针_M_f, 这些信息足够实现新函数的调用了。大概就是:
_M_f(_M_bound_args第一项,_M_bound_args第二项,_M_bound_args第三项),如果某一项是_n的形式,再用新函数中的第n项参数替换,在我们的例子中就是:
_M_f(42, _1被换成3.14, _2被替换成“hello”).
下面我们看看代码是不是如此?
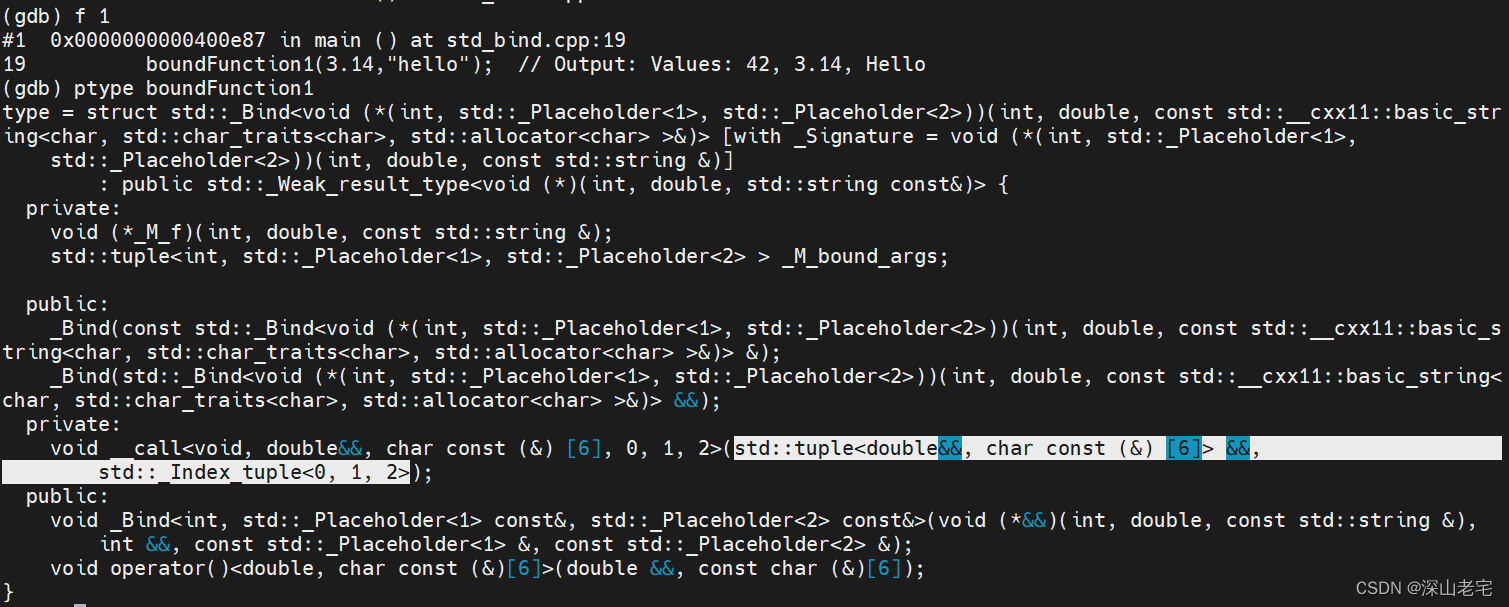
4.2 _Bind重载operator()()
19 boundFunction1(3.14,"hello");
第19行step into.
479             _Result
480             operator()(_Args&&... __args)
481             {

482               return this->__call<_Result>(
483                   std::forward_as_tuple(std::forward<_Args>(__args)...),
484                   _Bound_indexes());
485             }
显然,_Bind对象能被调用,必须重载了operator()()才行。传给了__call两个参数, 一个字面意思就是把传进来的参数3.14,"hello"打包成一个tuple, 另一个参数是_Bound_indexes()有点不明所以。
让我们先看看_Bound_indexes是什么?
385    template<typename _Functor, typename... _Bound_args>
 386     class _Bind<_Functor(_Bound_args...)>
 387     : public _Weak_result_type<_Functor>
 388     {

 389       typedef typename _Build_index_tuple<sizeof...(_Bound_args)>::__type
 390     _Bound_indexes;
而_Build_index_tuple是这样定义的:
297   // Builds an _Index_tuple<0, 1, 2, ..., _Num-1>.
298   template<size_t _Num>
299     struct _Build_index_tuple
300     {

301 #if _GLIBCXX_USE_MAKE_INTEGER_SEQ
302       template<typename, size_t... _Indices>
303         using _IdxTuple = _Index_tuple<_Indices...>;
304
305       using __type = __make_integer_seq<_IdxTuple, size_t, _Num>;
306 #else
307       using __type = _Index_tuple<__integer_pack(_Num)...>;
308 #endif
309     };
即_Bound_indexes是_Index_tuple<0, 1, 2>, 因为sizeof…(_Bound_args)的值是3. (_Bound_args对应int, std::_Placeholder<1>, std::_Placeholder<2>)
故传给this->__call的两个参数大概是这样:
- std::tuple(3.14, “hello”)
- _Index_tuple<0,1,2>类型的一个对象
这一点也可以通过打印boundFunction1的类型来进一步验证:
4.3 占位符与新参数的转换
4.3.1 幽灵_Mu
上面有点扯远了,让我们回到__call函数,看看它的定义:
395       // Call unqualified
 396       template<typename _Result, typename... _Args, std::size_t... _Indexes>
 397     _Result
 398     __call(tuple<_Args...>&& __args, _Index_tuple<_Indexes...>)
 399     {

 400       return std::__invoke(_M_f,
 401           _Mu<_Bound_args>()(std::get<_Indexes>(_M_bound_args), __args)...
 402           );
 403     }
这里又出现了没见过的模板类:_Mu,而且401行看起来还比较复杂,让我们先根据我们的实例将其展开[_Bound_args对应int, std::_Placeholder<1>, std::_Placeholder<2>,
_Indexes=0,1,2] :
_Mu<int>()(std::get<0>(_M_bound_args), __args),
_Mu<std::_Placeholder<1>>()(std::get<1>(_M_bound_args), __args),
_Mu<std::_Placeholder<2>>()(std::get<2>(_M_bound_args), __args),
让我们再回忆一下:
__args: 是一个tuple,由新函数传进来的参数组成的,此时为(3.14,“hello”)
_M_bound_args:也是一个tuple,等于(42,_1,_2)
上面的代码就变成了:
_Mu<int>()(42, tuple(3.14,"hello")),
_Mu<std::_Placeholder<1>>()(_1, tuple(3.14,"hello")),
_Mu<std::_Placeholder<2>>()(_2, tuple(3.14,"hello")),
可以盲猜一下:_Mu的作用就是把_n转成真正的参数,上面的三行最终要呈现出
42,
3.14,
“hello”
这样的样子, 以便传给_M_f即原始函数。
让我们看看_Mu的代码是不是这样?
264   /**
 265    *  Maps an argument to bind() into an actual argument to the bound
 266    *  function object [func.bind.bind]/10. Only the first parameter should
 267    *  be specified: the rest are used to determine among the various
 268    *  implementations. Note that, although this class is a function
 269    *  object, it isn't entirely normal because it takes only two
 270    *  parameters regardless of the number of parameters passed to the
 271    *  bind expression. The first parameter is the bound argument and
 272    *  the second parameter is a tuple containing references to the
 273    *  rest of the arguments.
 274    */
 275   template<typename _Arg,
 276        bool _IsBindExp = is_bind_expression<_Arg>::value,
 277        bool _IsPlaceholder = (is_placeholder<_Arg>::value > 0)>
 278     class _Mu;
注释说的很明白,功能就是我们猜的那样。
4.3.2 幽灵_Mu的N个变体
_Mu还有n个偏特化,不过我们这只介绍两个,也是我们这里用到得两个:
第一个处理42,没有占位符的情况
 /*********************************
 对应_IsBindExp _IsPlaceholder 都是false
_Mu<int>()(42, tuple(3.14,"hello")), 返回42
**********************************/
352   /**
 353    *  If the argument is just a value, returns a reference to that
 354    *  value. The cv-qualifiers on the reference are determined by the caller.
 355    *  C++11 [func.bind.bind] p10 bullet 4.
 356    */
 357   template<typename _Arg>
 358     class _Mu<_Arg, false, false>
 359     {

 360     public:
 361       template<typename _CVArg, typename _Tuple>
 362     _CVArg&&
 363     operator()(_CVArg&& __arg, _Tuple&) const volatile
 364     {
    return std::forward<_CVArg>(__arg); }
 365     };
直接返回42,后面的tuple(3.14,“hello”)没用。
GDB调试:

第二种处理有占位符的情况
 /*********************************
 对应_IsBindExp=false _IsPlaceholder=true
 取tuple(3.14,"hello")中第n-1个(以下标0开始)
 _Mu<std::_Placeholder<1>>()(_1, tuple(3.14,"hello")),
_Mu<std::_Placeholder<2>>()(_2, tuple(3.14,"hello")),
**********************************/
339   template<typename _Arg>
 340     class _Mu<_Arg, false, true>
 341     {

 342     public:
 343       template<typename _Tuple>
 344     _Safe_tuple_element_t<(is_placeholder<_Arg>::value - 1), _Tuple>&&
 345     operator()(const volatile _Arg&, _Tuple& __tuple) const volatile
 346     {

 347       return
 348         ::std::get<(is_placeholder<_Arg>::value - 1)>(std::move(__tuple));
 349     }
 350     };
看下_1 _2时GDB的输出:


终于我们组齐了所有的碎片:
42,
3.14,
“hello”
4.4 组齐碎片召唤神龙
到了召唤神龙的时候:
 398     __call(tuple<_Args...>&& __args, _Index_tuple<_Indexes...>)
 399     {

 400       return std::__invoke(_M_f,
 401           _Mu<_Bound_args>()(std::get<_Indexes>(_M_bound_args), __args)...
 402           );
 403     }
相当于:
return std::__invoke(_M_f, 42, 3.14, "hello");
全剧终!