目录
当没有CAN设备时,可使用 Ubuntu 的虚拟 CAN 进行通讯测试。
一、启用本机的 VCAN
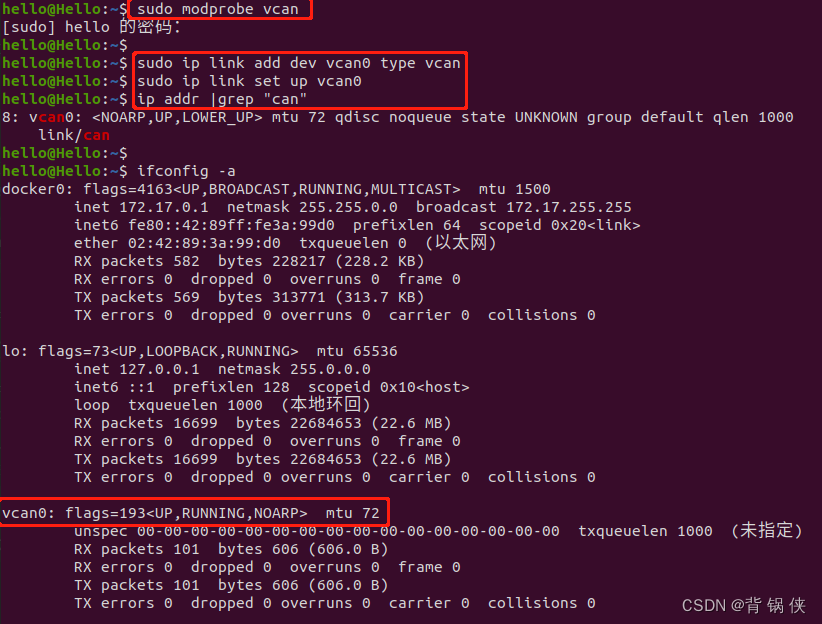
1.1 加载本机的 vcan
# 加载虚拟 CAN:
  sudo modprobe vcan
1.2 添加本机的 vcan0
# 添加 VCAN0 到操作系统:
  sudo ip link add dev can0 type vcan
1.3 查看添加的 vcan0
# 查看 CAN0 :
  ifconfig -a
1.4 开启本机的 vcan0
# 开启 CAN0 :
  sudo ip lin
1.5 关闭本机的 vcan0
# 关闭 CAN0 :
  sudo ip link set dev can0 down
1.6 删除本机的 vcan0
# 删除 CAN0 :
  sudo ip link del dev can0
二、测试本机的 VCAN
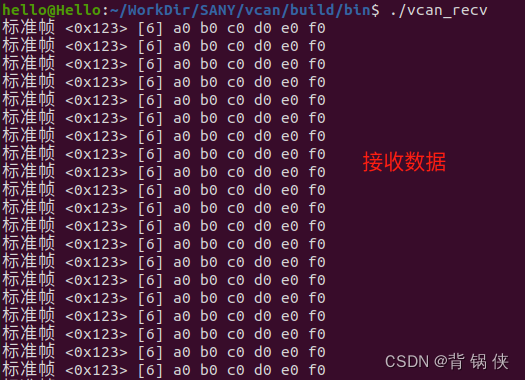
2.1 CAN 发送数据 代码
#include <stdio.h>
#include <stdlib.h>
#include <string.h>
#include <unistd.h>
#include <linux/can.h>
#include <linux/can/raw.h>
#include <sys/socket.h>
#include <sys/ioctl.h>
#include <net/if.h>

int main(int argc, char* argv[]) {
    int skt = socket(PF_CAN, SOCK_RAW, CAN_RAW);
    if (0 > skt) {
        perror("create socket error");
        return -1;
    }

    // 指定 can0 设备
    struct ifreq ifr = { 0 };
    strcpy(ifr.ifr_name, "vcan0");
    ioctl(skt, SIOCGIFINDEX, &ifr);

    struct sockaddr_can addr = { 0 };
    addr.can_family = AF_CAN;
    addr.can_ifindex = ifr.ifr_ifindex;

    // 将 can0 与套接字进行绑定
    int rv = bind(skt, (struct sockaddr*)&addr, sizeof(addr));
    if (rv < 0) {
        perror("bind socket error");
        close(skt);
        return -2;
    }

    // 设置过滤规则:不接受任何报文、仅发送数据
    setsockopt(skt, SOL_CAN_RAW, CAN_RAW_FILTER, NULL, 0);

    // 发送数据
    struct can_frame frame = { 0 };
    frame.can_id = 0x123;
    frame.can_dlc = 6; {
        frame.data[0] = 0xA0;
        frame.data[1] = 0xB0;
        frame.data[2] = 0xC0;
        frame.data[3] = 0xD0;
        frame.data[4] = 0xE0;
        frame.data[5] = 0xF0;
    }

    unsigned short index = 0;
    while (true) {
        // 开始发送数据
        rv = write(skt, &frame, sizeof(frame));
        if (sizeof(frame) != rv) {
            perror("write can frame failed");
            break;
        } else {
            printf("send count : %d \n", ++index);
            sleep(1); // 1 second
        }
    }

    close(skt);
    return 0;
}
2.2 CAN 接收数据 代码
#include <stdio.h>
#include <stdlib.h>
#include <string.h>
#include <unistd.h>
#include <linux/can.h>
#include <linux/can/raw.h>
#include <sys/socket.h>
#include <sys/ioctl.h>
#include <net/if.h>

int main(int argc, char* argv[]) {
    int skt = socket(PF_CAN, SOCK_RAW, CAN_RAW);
    if (0 > skt) {
        perror("create socket error");
        return -1;
    }

    // 指定 can0 设备
    struct ifreq ifr = { 0 };
    strcpy(ifr.ifr_name, "vcan0");
    ioctl(skt, SIOCGIFINDEX, &ifr);

    struct sockaddr_can addr = { 0 };
    addr.can_family = AF_CAN;
    addr.can_ifindex = ifr.ifr_ifindex;

    // 将 can0 与套接字进行绑定
    int rv = bind(skt, (struct sockaddr*)&addr, sizeof(addr));
    if (0 > rv) {
        perror("bind error");
        close(skt);
        return -2;
    }

    // 设置过滤规则
    // setsockopt(skt, SOL_CAN_RAW, CAN_RAW_FILTER, NULL, 0);

    // 接收数据
    struct can_frame frame = { 0 };
    while (true) {
        rv = read(skt, &frame, sizeof(struct can_frame));
        if (rv < 0) {
            perror("read can frame error");
            break;
        }

        // 校验是否接收到错误帧
        if (frame.can_id & CAN_ERR_FLAG) {
            printf("error can frame \n");
            break;
        }

        // 校验帧格式
        if (frame.can_id & CAN_EFF_FLAG) {
            printf("扩展帧 <0x%08x> ", frame.can_id & CAN_EFF_MASK);
        } else {
            printf("标准帧 <0x%03x> ", frame.can_id & CAN_SFF_MASK);
        }

        // 校验帧类型:数据帧还是远程帧
        if (frame.can_id & CAN_RTR_FLAG) {
            printf("remote request frame \n");
            continue;
        }

        // 打印数据
        printf("[%d] ", frame.can_dlc);
        for (int idx = 0; idx < frame.can_dlc; idx++) {
            printf("%02x ", frame.data[idx]);
        }   printf("\n");
    }

    close(skt);
    return 0;
}
2.3 CMakeLists.txt 代码
cmake_minimum_required(VERSION 3.0)

# 设置统一输出目录
set(CMAKE_ARCHIVE_OUTPUT_DIRECTORY ${PROJECT_BINARY_DIR}/lib)
set(CMAKE_LIBRARY_OUTPUT_DIRECTORY ${PROJECT_BINARY_DIR}/bin)
set(CMAKE_RUNTIME_OUTPUT_DIRECTORY ${PROJECT_BINARY_DIR}/bin)

# 设置统一链接目录
link_directories(${CMAKE_ARCHIVE_OUTPUT_DIRECTORY})
link_directories(${CMAKE_LIBRARY_OUTPUT_DIRECTORY})

# 主要工程项目
add_executable(vcan_recv vcan_recv.cpp)
add_executable(vcan_send vcan_send.cpp)
2.4 虚拟 CAN 收发测试
三、VCAN 的其它操作
安装 can 工具:sudo apt install can-utils
3.1 启用 VCAN
# 启用 CAN
  sudo ip link set vcan0 up
3.2 关闭 VCAN
# 关闭 CAN
  sudo ip link set vcan0 down
3.3 重启 VCAN
# 重启CAN
  sudo canconfig vcan0 restart
3.4 停止 VCAN
# 停止CAN
  sudo canconfig vcan0 stop
3.5 设备波特率
# 设置波特率
  sudo ip link set vcan0 up type can bitrate 250000
3.6 显示 VCAN 详细信息
# 显示 CAN 详细信息
  sudo ip -details link show vcan0
3.7 VCAN 回环测试
# 回环测试
  sudo canconfig vcan0 ctrlmode loopback on
3.8 发送 VCAN 数据
# 向 CAN 总线发送数据
  sudo cansend vcan0 --identifier=ID+数据
3.9 接收 VCAN 数据
# 接收 CAN 总线数据
  sudo candump vcan0
3.10 查看 VCAN 状态
# 查看CAN总线状态
  sudo canecho vcan0
3.11 VCAN 数据过滤
# 使用滤波器接收 ID 匹配的数据
  sudo candump vcan0 --filter=ID:mask