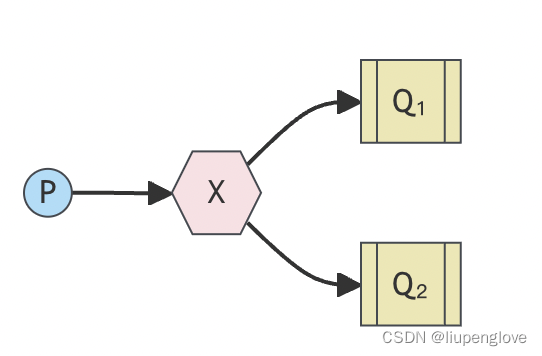
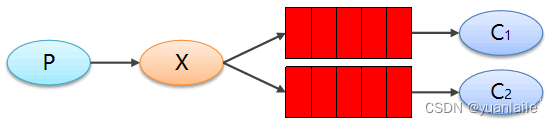
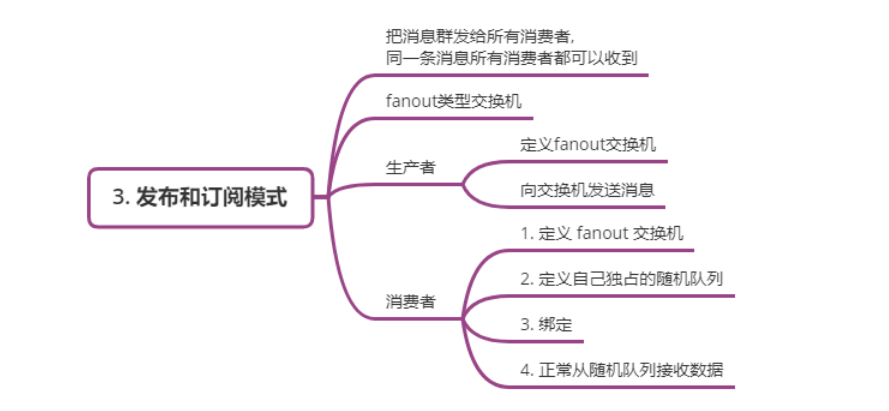
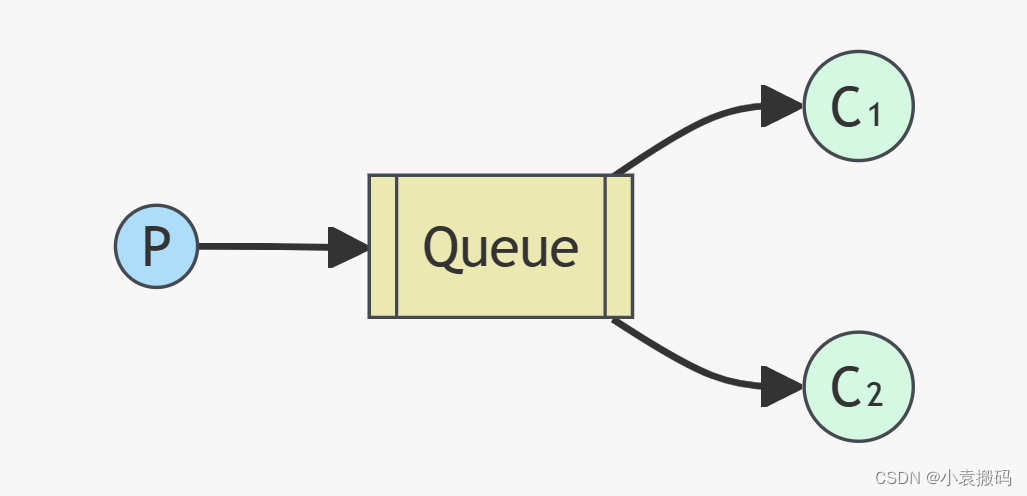
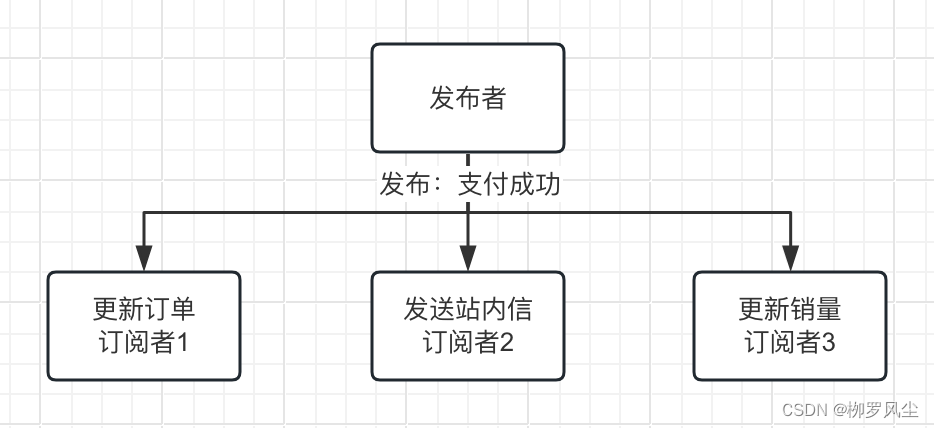
1 发布订阅
2 发布订阅高级之Routing(按关键字匹配)
2.1 发布订阅高级之Topic(按关键字模糊匹配)
3 基于rabbitmq实现rpc
1 发布订阅
发布者
import pika
credentials = pika.PlainCredentials("admin","admin")
connection = pika.BlockingConnection(pika.ConnectionParameters('101.133.225.166',credentials=credentials))
channel = connection.channel()

channel.exchange_declare(exchange='m1',exchange_type='fanout')

channel.basic_publish(exchange='m1',
                      routing_key='',
                      body='lqz nb')

connection.close()
订阅者(启动几次订阅者会生成几个队列)
import pika

credentials = pika.PlainCredentials("admin","admin")
connection = pika.BlockingConnection(pika.ConnectionParameters('101.133.225.166',credentials=credentials))
channel = connection.channel()

# exchange='m1',exchange(秘书)的名称
# exchange_type='fanout' , 秘书工作方式将消息发送给所有的队列
channel.exchange_declare(exchange='m1',exchange_type='fanout')

# 随机生成一个队列
result = channel.queue_declare(queue='',exclusive=True)
queue_name = result.method.queue
print(queue_name)
# 让exchange和queque进行绑定.
channel.queue_bind(exchange='m1',queue=queue_name)


def callback(ch, method, properties, body):
    print("消费者接受到了任务: %r" % body)

channel.basic_consume(queue=queue_name,on_message_callback=callback,auto_ack=True)

channel.start_consuming()
1 发布订阅高级之Routing(按关键字匹配)
发布者
import pika
credentials = pika.PlainCredentials("admin","admin")
connection = pika.BlockingConnection(pika.ConnectionParameters('101.133.225.166',credentials=credentials))
channel = connection.channel()

channel.exchange_declare(exchange='m2',exchange_type='direct')

channel.basic_publish(exchange='m2',
                      routing_key='bnb', # 多个关键字,指定routing_key
                      body='lqz nb')

connection.close()
订阅者1
import pika

credentials = pika.PlainCredentials("admin","admin")
connection = pika.BlockingConnection(pika.ConnectionParameters('101.133.225.166',credentials=credentials))
channel = connection.channel()

# exchange='m1',exchange(秘书)的名称
# exchange_type='direct' , 秘书工作方式将消息发送给不同的关键字
channel.exchange_declare(exchange='m2',exchange_type='direct')

# 随机生成一个队列
result = channel.queue_declare(queue='',exclusive=True)
queue_name = result.method.queue
print(queue_name)
# 让exchange和queque进行绑定.
channel.queue_bind(exchange='m2',queue=queue_name,routing_key='nb')
channel.queue_bind(exchange='m2',queue=queue_name,routing_key='bnb')


def callback(ch, method, properties, body):
    print("消费者接受到了任务: %r" % body)

channel.basic_consume(queue=queue_name,on_message_callback=callback,auto_ack=True)

channel.start_consuming()
订阅者2
import pika

credentials = pika.PlainCredentials("admin","admin")
connection = pika.BlockingConnection(pika.ConnectionParameters('101.133.225.166',credentials=credentials))
channel = connection.channel()

# exchange='m1',exchange(秘书)的名称
# exchange_type='direct' , 秘书工作方式将消息发送给不同的关键字
channel.exchange_declare(exchange='m2',exchange_type='direct')

# 随机生成一个队列
result = channel.queue_declare(queue='',exclusive=True)
queue_name = result.method.queue
print(queue_name)
# 让exchange和queque进行绑定.
channel.queue_bind(exchange='m2',queue=queue_name,routing_key='nb')


def callback(ch, method, properties, body):
    print("消费者接受到了任务: %r" % body)

channel.basic_consume(queue=queue_name,on_message_callback=callback,auto_ack=True)

channel.start_consuming()
2.1 发布订阅高级之Topic(按关键字模糊匹配)
发布者
import pika
credentials = pika.PlainCredentials("admin","admin")
connection = pika.BlockingConnection(pika.ConnectionParameters('101.133.225.166',credentials=credentials))
channel = connection.channel()

channel.exchange_declare(exchange='m3',exchange_type='topic')

channel.basic_publish(exchange='m3',
                      # routing_key='lqz.handsome', #都能收到
                      routing_key='lqz.handsome.xx', #只有lqz.#能收到
                      body='lqz nb')

connection.close()
订阅者1
只能加一个单词
#可以加任意单词字符
import pika

credentials = pika.PlainCredentials("admin","admin")
connection = pika.BlockingConnection(pika.ConnectionParameters('101.133.225.166',credentials=credentials))
channel = connection.channel()

# exchange='m1',exchange(秘书)的名称
# exchange_type='direct' , 秘书工作方式将消息发送给不同的关键字
channel.exchange_declare(exchange='m3',exchange_type='topic')

# 随机生成一个队列
result = channel.queue_declare(queue='',exclusive=True)
queue_name = result.method.queue
print(queue_name)
# 让exchange和queque进行绑定.
channel.queue_bind(exchange='m3',queue=queue_name,routing_key='lqz.#')


def callback(ch, method, properties, body):
    print("消费者接受到了任务: %r" % body)

channel.basic_consume(queue=queue_name,on_message_callback=callback,auto_ack=True)

channel.start_consuming()
订阅者2
import pika

credentials = pika.PlainCredentials("admin","admin")
connection = pika.BlockingConnection(pika.ConnectionParameters('101.133.225.166',credentials=credentials))
channel = connection.channel()

# exchange='m1',exchange(秘书)的名称
# exchange_type='topic' , 模糊匹配
channel.exchange_declare(exchange='m3',exchange_type='topic')

# 随机生成一个队列
result = channel.queue_declare(queue='',exclusive=True)
queue_name = result.method.queue
print(queue_name)
# 让exchange和queque进行绑定.
channel.queue_bind(exchange='m3',queue=queue_name,routing_key='lqz.*')


def callback(ch, method, properties, body):
  	queue_name = result.method.queue # 发送的routing_key是什么
    print("消费者接受到了任务: %r" % body)

channel.basic_consume(queue=queue_name,on_message_callback=callback,auto_ack=True)

channel.start_consuming()
3 基于rabbitmq实现rpc
服务端
import pika
credentials = pika.PlainCredentials("admin","admin")
connection = pika.BlockingConnection(pika.ConnectionParameters('101.133.225.166',credentials=credentials))
channel = connection.channel()

# 起翰监听任务队列
channel.queue_declare(queue='rpc_queue')

def on_request(ch, method, props, body):
    n = int(body)
    response = n + 100
    # props.reply_to  要放结果的队列.
    # props.correlation_id  任务
    ch.basic_publish(exchange='',
                     routing_key=props.reply_to,
                     properties=pika.BasicProperties(correlation_id= props.correlation_id),
                     body=str(response))
    ch.basic_ack(delivery_tag=method.delivery_tag)

channel.basic_qos(prefetch_count=1)
channel.basic_consume( queue='rpc_queue',on_message_callback=on_request,)
channel.start_consuming()
客户端
import pika
import uuid

class FibonacciRpcClient(object):
    def __init__(self):
        credentials = pika.PlainCredentials("admin", "admin")
        self.connection = pika.BlockingConnection(pika.ConnectionParameters('101.133.225.166', credentials=credentials))
        self.channel = self.connection.channel()

        # 随机生成一个消息队列(用于接收结果)
        result = self.channel.queue_declare(queue='',exclusive=True)
        self.callback_queue = result.method.queue

        # 监听消息队列中是否有值返回,如果有值则执行 on_response 函数(一旦有结果,则执行on_response)
        self.channel.basic_consume(queue=self.callback_queue,on_message_callback=self.on_response, auto_ack=True)

    def on_response(self, ch, method, props, body):
        if self.corr_id == props.correlation_id:
            self.response = body

    def call(self, n):
        self.response = None
        self.corr_id = str(uuid.uuid4())

        # 客户端 给 服务端 发送一个任务:  任务id = corr_id / 任务内容 = '30' / 用于接收结果的队列名称
        self.channel.basic_publish(exchange='',
                                   routing_key='rpc_queue', # 服务端接收任务的队列名称
                                   properties=pika.BasicProperties(
                                         reply_to = self.callback_queue, # 用于接收结果的队列
                                         correlation_id = self.corr_id, # 任务ID
                                         ),
                                   body=str(n))
        while self.response is None:
            self.connection.process_data_events()

        return self.response

fibonacci_rpc = FibonacciRpcClient()

response = fibonacci_rpc.call(50)
print('返回结果:',response)