WebRTC 中的带宽估计是其拥塞控制机制的核心组成部分,基于延迟的带宽估计是其中的一种策略,它主要基于延迟变化推断出可用的网络带宽。
1. 总体架构
1.1. 静态结构
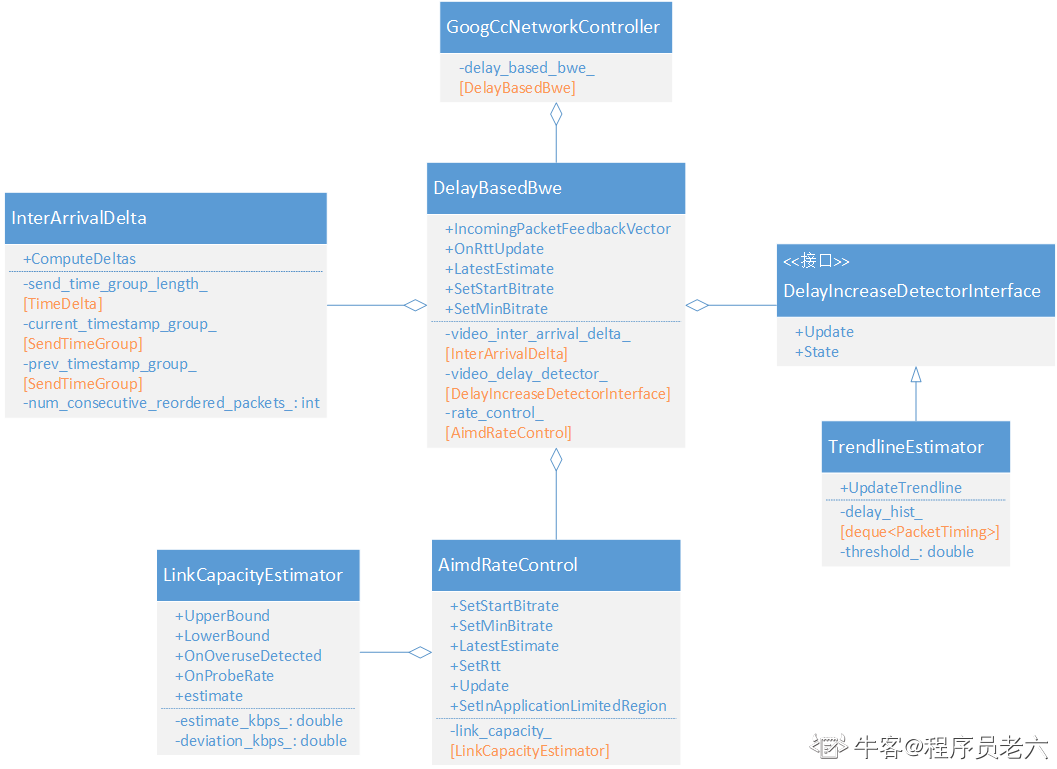
1)DelayBasedBwe 受 GoogCcNetworkController 控制,接收其输入并返回带宽估计值。
2)DelayBasedBwe 内部使用 InterArrivalDelta、TrendlineEstimator 和 AimdRateControl 来完成带宽估计。
3)InterArrivalDelta 用来计算到达时间延迟。
4)TrendlineEstimator 根据到达时间延迟判断带宽使用是否过载。
5)AimdRateControl 内部运行一个状态机,根据状态机不断调整带宽估计值。
1.2. 调用流程
1)GoogCcNetworkController 收到 TransportFeedback,调用 DelayBasedBwe::IncomingPacketFeedbackVector 来计算基于延迟的带宽估计值。
2)DelaybasedBwe 调用 InterArralDelta::ComputeDeltas 计算延迟差值。
3)DelaybasedBwe 调用 TrendlineEstimator::Update 传入延迟差值计算得到带宽过载情况。
4)DelaybasedBwe 调用 AimdRateControl::Udpate 传入带宽过载情况计算得到延迟带宽估计值。
5)GoogCcNetworkController 调用 SendSideBandwidthEstimation::UpdateDelayBasedEstimate 传入延迟带宽估计值,融合基于丢包的带宽估计值,获得最终的带宽估计值。

1.3. 逻辑架构
1)DelayBaseBWE 接收一坨输入,经过计算输出DelayBasedBwe::Result(见 DelayBasedBwe 数据结构)。
2)InterArrivalDlata 基于 TransportFeedback 计算延迟差。
3)TrendLineEstimator 基于延迟差计算 BandwidthUsage。
4)LinkCapacityEstimator 基于过载状态下的 ACK 码率估算链路容量并计算 3sigma 上下界。当AIMD 升码率时,基于链路容量估计值来决定是采用加性增还是乘性增。当 AIMD 降码率时,下降之后的码率不能高于链路容量估计值。3sigma 上下界用来判断当前链路容量估计值的有效性,如果新的 ACK 码率超出 3sigma 范围,则链路容量估计值要重置并重新进行估算。
5)DelayBaseBWE 设置 ALR 状态到 AimdRateControl,当根据带宽使用情况决策应该要升码率时,如果此时进入了 ALR 状态,不允许升码率,和之前码率保持一致。
6)网络非过载状态下,DelayBaseBWE 设置 Probe bitrate 到 AimdRateControl,用探测带宽更新估计值。此时探测带宽很可能是链路的真实带宽,这样更新是合理的。
7)AimdRateControl 使用 TrendLineEstimator 输出的 BandwidthUsage 更来状态机状态,然后根据新的控制状态来更新带宽估计值,如果是 kRcHold 则保持估计值不变,如果是 kRcIncrease 则采用加性增或乘性增来增加带宽估计值,如果是 kRcDecrease 则降低估计值。
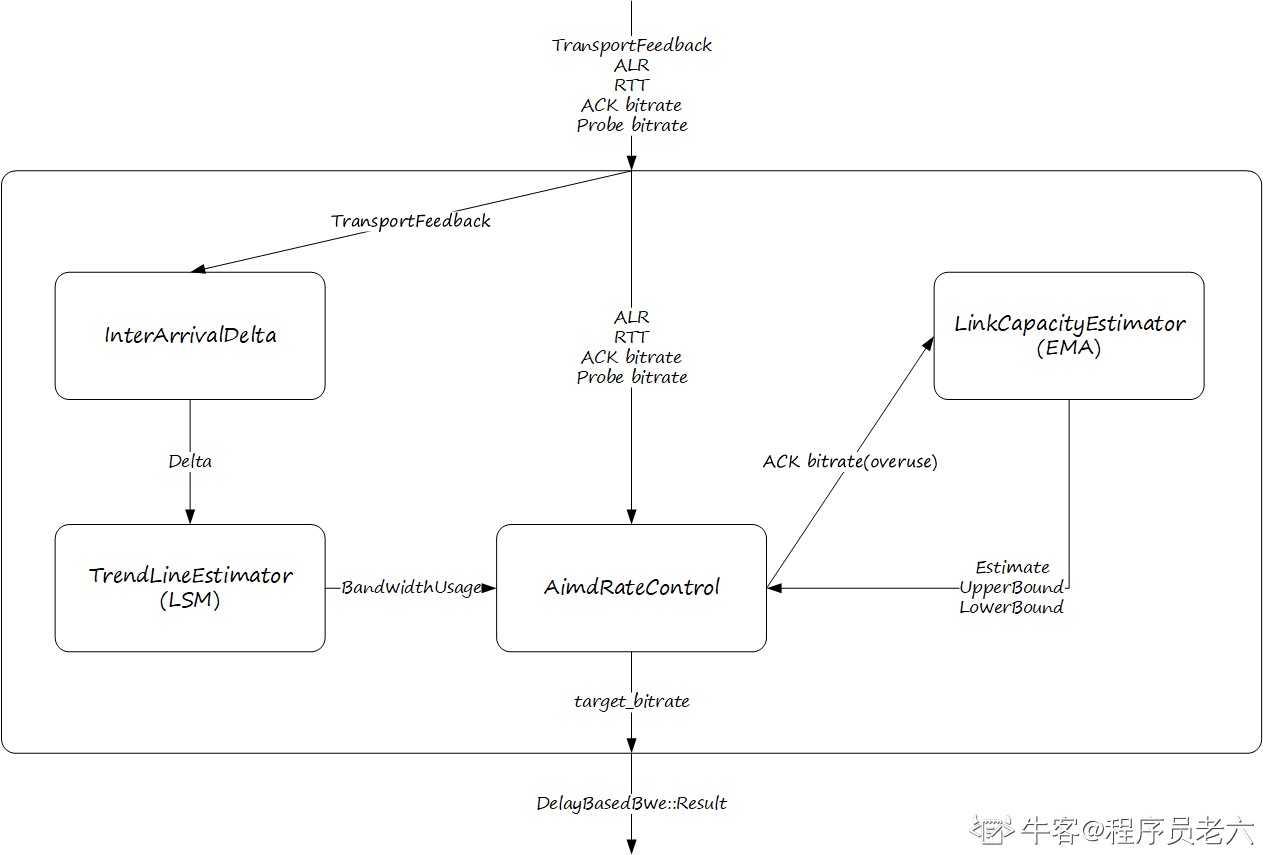
DelayBaseBWE 在调用 AimdRateControl 之前,会根据 BandwidthUsage 进行前处理:
1)如果链路处于 overusing 状态,且没有可用的 ACK 码率,则估计值砍半,这个频率(间隔)由 RTT 决定。
2)如果链路处于normal/underusing 状态,且有可用的探测带宽,则使用探测带宽更新估计值。
其他情况,才会更新 AimdRateControl 状态机,由 AimdRateControl 给出带宽估计值。
2. DelayBasedBwe
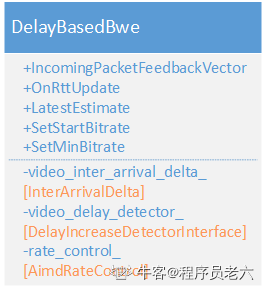
2.1. 重要属性
1)video_inter_arrival_
用来计算报文到达延迟差。
2)video_delay_detector_
TrendLineEstimator,用来检测链路过载状态。
3)rate_control_
根据链路过载状态及其变化来对带宽进行估计。
2.2. 重要方法
1)IncomingPacketFeedbackVector
传入 TransportFeedback 以计算报文到达延迟差,同时还会传入 ACK 码率、探测码率和 ALR 状态。
2)OnRttUpdate
更新链路 RTT,AimdRateControl 使用。
3)LatestEstimate
从 AimdRateControl 获取最近延迟带宽估计值。
4)SetStartBitrate
设置 AimdRateControl 的起始码率。
5)SetMinBitrate
设置 AimdRateControl 的最小码率。
2.3. 数据结构
带宽使用有正常、欠载和过载三种状态。
enum class BandwidthUsage {
  kBwNormal = 0,
  kBwUnderusing = 1,
  kBwOverusing = 2,
  kLast
};
延迟带宽估计器返回值。
struct DelayBasedBwe::Result {
  // 带宽估计值是否有更新
  bool updated = false;
  // 是否是使用探测值进行的更新
  bool probe = false;
  // 更新后的目标码率估计值
  DataRate target_bitrate = DataRate::Zero();
  // 是否是从过载恢复
  bool recovered_from_overuse = false;
  // 根据算法计算得到的带宽使用情况
  BandwidthUsage delay_detector_state = BandwidthUsage::kBwNormal;
};
2.4. 源码分析
2.4.1. IncomingPacketFeedbackVector
收到 TransportFeedback 后,使用延迟差值更新趋势线估计器,更新 ALR 状态,然后调用 MaybeUpdateEstimate 获取估计结果。
DelayBasedBwe::Result DelayBasedBwe::IncomingPacketFeedbackVector(
    const TransportPacketsFeedback& msg,
    absl::optional<DataRate> acked_bitrate,
    absl::optional<DataRate> probe_bitrate,
    absl::optional<NetworkStateEstimate> network_estimate,
    bool in_alr) {
  // 按时间进行排序
  auto packet_feedback_vector = msg.SortedByReceiveTime();
  ...
  // 逐个处理feedback
  for (const auto& packet_feedback : packet_feedback_vector) {
    delayed_feedback = false;
    // 计算时延delta,并更新detector状态
    IncomingPacketFeedback(packet_feedback, msg.feedback_time);
    // 网络状态从欠载状态到正常状态,说明已经恢复
    if (prev_detector_state == BandwidthUsage::kBwUnderusing &&
        active_delay_detector_->State() == BandwidthUsage::kBwNormal) {
      recovered_from_overuse = true;
    }
    prev_detector_state = active_delay_detector_->State();
  }

  // 更新ALR状态
  rate_control_.SetInApplicationLimitedRegion(in_alr);

  // 从AIMD获取目标码率
  return MaybeUpdateEstimate(acked_bitrate, probe_bitrate,
                             std::move(network_estimate),
                             recovered_from_overuse, in_alr, msg.feedback_time);
}
2.4.2. MaybeUpdateEstimate
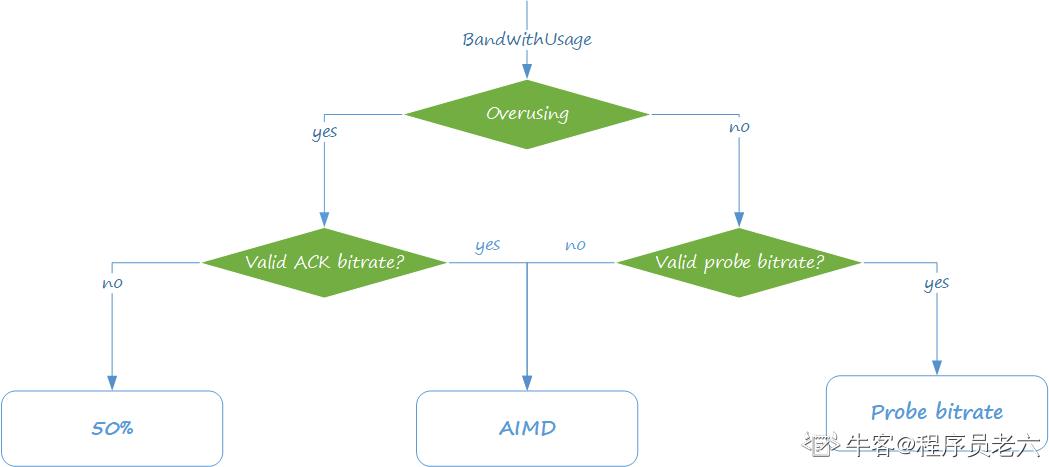
1)在没有获取到 ACK 码率的情况下,如果网络过载,算法简单粗暴,每 200ms 下降 50%。在未获得测量值的前提下,保守处理比较好。
2)在获得探测码率的情况下,如果网络不过载,则使用探测码率更新估计值。这是因为探测码率是通过主动探测获得的,它能更快、更真实地反映网络当前的实际承载能力。
DelayBasedBwe::Result DelayBasedBwe::MaybeUpdateEstimate(
	absl::optional<DataRate> acked_bitrate,
	absl::optional<DataRate> probe_bitrate,
	absl::optional<NetworkStateEstimate> state_estimate,
	bool recovered_from_overuse,
	bool in_alr,
	Timestamp at_time) {
	Result result;

	// 网络过载,需要降码率
	if (active_delay_detector_->State() == BandwidthUsage::kBwOverusing) {
		if (acked_bitrate &&
				rate_control_.TimeToReduceFurther(at_time, *acked_bitrate)) {
			// 已经获取ACK码率,且符合调整频率限制,基于 ACK 码率更新估计码率
			result.updated = UpdateEstimate(at_time, acked_bitrate, &result.target_bitrate);
		} else if (!acked_bitrate &&
				rate_control_.ValidEstimate() &&
				rate_control_.InitialTimeToReduceFurther(at_time)) {
			// 未获得 ACK 码率,码率下降 50%
			rate_control_.SetEstimate(rate_control_.LatestEstimate() / 2, at_time);
			result.updated = true;
			result.probe = false;
			result.target_bitrate = rate_control_.LatestEstimate();
		}
	// 网络欠载或正常
	} else {
		// 已经获得了探测码率,则使用探测码率更新AIMD的估计值
		if (probe_bitrate) {
			result.probe = true;
			result.updated = true;
			rate_control_.SetEstimate(*probe_bitrate, at_time);
			result.target_bitrate = rate_control_.LatestEstimate();
		} else {
			// 没有探测码率,则由AIMD基于ACK码率计算估计码率
			result.updated =
				UpdateEstimate(at_time, acked_bitrate, &result.target_bitrate);
			result.recovered_from_overuse = recovered_from_overuse;
		}
	}

	BandwidthUsage detector_state = active_delay_detector_->State();

	// 更新内部状态
	if ((result.updated && prev_bitrate_ != result.target_bitrate) ||
		detector_state != prev_state_) {
		DataRate bitrate = result.updated ? result.target_bitrate : prev_bitrate_;
		prev_bitrate_ = bitrate;
		prev_state_ = detector_state;
	}

	result.delay_detector_state = detector_state;
	return result;
}
3. InterArrivalDelta
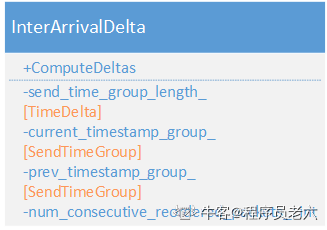
3.1. 重要属性
1)send_time_group_length_
约束一个分组的长度不能 send_time_group_length_,用来协助划分时间戳分组。
2)current_timestamp_group_
当前时间戳分组。
3)prev_timestamp_group_
上一个时间戳分组。
4)num_consecutive_reordered_packets_
连续乱序报文数量,乱序定义为分组间的到达时间差为负数。
3.2. 重要方法
1)ComputeDeltas
返回 true 表示达到计算条件,返回发送时间差和接收时间差。返回false,继续更新当前分组数据。
3.3. 报文分组
计算相邻两个报文的到达时间差的噪声太大,计算两个报文分组的到达时间差会更可靠。这就涉及到如何对报文进行分组。
3.3.1. 数据结构
struct SendTimeGroup {
    // 第一个报文
    bool IsFirstPacket() const { return complete_time.IsInfinite(); }
    // 所有报文大小之和
    size_t size;
    // 第一个报文的发送时间
    Timestamp first_send_time;
    // 不断更新的发送时间,但须保持单调递增
    Timestamp send_time;
    // 第一个报文的接收时间
    Timestamp first_arrival;
    // 不断更新的接收时间
    Timestamp complete_time;
    // 每次更新时当前系统时间(发送端收到反馈时的本地系统时间)
    Timestamp last_system_time;
};
3.3.2. 分组规则
1)收到的报文是当前分组第一个报文,则表示分组开始。
2)收到的报文和当前分组属于同一个 burst,则报文归属于当前分组。
3)收到的报文的发送时间与当前分组中第一个报文的发送时间之差小于等于 5ms,则报文归属当前分组。
4)否则,报文属于新的分组。
bool InterArrivalDelta::NewTimestampGroup(Timestamp arrival_time, Timestamp send_time) {
	if (current_timestamp_group_.IsFirstPacket()) {
		// 当前Group还未收到报文
		return false;
	} else if (BelongsToBurst(arrival_time, send_time)) {
		// 与当前Group同属于一个burst
		return false;
	} else { // 根据发送时间跨度来划分分组
		// send_time_group_length_ = TimeDelta::Millis(5)
		return send_time - current_timestamp_group_.first_send_time >
			send_time_group_length_;
	}
}
3.3.3. Burst 规则
1)发送时间相同,肯定属于同一个 burst。
2)由于链路拥塞,导致不同发送时间的报文也可能形成一个 burst,具体规则见注释。
bool InterArrivalDelta::BelongsToBurst(Timestamp arrival_time,Timestamp send_time) {

	// 计算数据包到达时间和当前时间组完成时间(最近报文的 arrival_time)之间的时间差
	TimeDelta arrival_time_delta =
	arrival_time - current_timestamp_group_.complete_time;

	// 计算数据包发送时间和当前时间组发送时间(分组当前最大的 send_time)之间的时间差
	TimeDelta send_time_delta = send_time - current_timestamp_group_.send_time;

	// send_time一样,属于同一个burst发出来
	if (send_time_delta.IsZero())
		return true;

	// 计算传播时间差,即到达时间差减去发送时间差,表示在网络中的传播时间
	TimeDelta propagation_delta = arrival_time_delta - send_time_delta;

	// 即使send_time不一样,如果同时满足以下条件,也认为属于同一个burst:
	// 1)传播时间差为负,说明与当前分组最后一个报文是积压在链路然后一起发送过来
	// 2)到达时间差小于等于5ms
	// 3)报文到达时间与当前分组第一个包的到达时间之差小于100ms
	if (propagation_delta < TimeDelta::Zero() &&
		arrival_time_delta <= kBurstDeltaThreshold &&
		arrival_time - current_timestamp_group_.first_arrival < kMaxBurstDuration)
		return true;

	return false;
}
3.4. Delta 计算
Delta 的计算方式比较简单,两组报文的 send_time 相减和 complete_time 相减分别得到 send_time_delta 和 arrival_time_delta。但还需要处理乱序、系统时间漂移等异常情况,以防异常数据污染,使得计算结果变得不可靠。
1)系统时间漂移
system_time 是收到反馈的本地系统时间,通过比较前后两次系统时间的差值,如果超出正常范围,则认为系统时间可以被人为修改,数据需要重置,重新进行统计。
2)乱序
连续出现 3 次 arrival_time_delta 为负,说明网络乱序情况非常严重,基于当前数据计算结果不可靠,需要进行重置。
bool InterArrivalDelta::ComputeDeltas(Timestamp send_time, Timestamp arrival_time,
  Timestamp system_time, size_t packet_size, TimeDelta* send_time_delta,
  TimeDelta* arrival_time_delta, int* packet_size_delta) {
  bool calculated_deltas = false;

  if (current_timestamp_group_.IsFirstPacket()) {
    // 如果是第一个数据包,则仅存储发送和到达时间,因为需要至少两帧数据来计算差异。
    current_timestamp_group_.send_time = send_time;
    current_timestamp_group_.first_send_time = send_time;
    current_timestamp_group_.first_arrival = arrival_time;
  } else if (current_timestamp_group_.first_send_time > send_time) {
    // 如果当前数据包的发送时间早于第一个发送时间,表明是乱序包,直接返回
    return false;
  } else if (NewTimestampGroup(arrival_time, send_time)) {
    // First packet of a later send burst, the previous packets sample is ready.
    if (prev_timestamp_group_.complete_time.IsFinite()) {
      // 两组报文的发送时间差
      *send_time_delta =
        current_timestamp_group_.send_time - prev_timestamp_group_.send_time;
      // 两组报文的接收时间差
      *arrival_time_delta = current_timestamp_group_.complete_time -
        prev_timestamp_group_.complete_time;

      TimeDelta system_time_delta = current_timestamp_group_.last_system_time -
      prev_timestamp_group_.last_system_time;

      // 发现系统时间偏移,重置
      if (*arrival_time_delta - system_time_delta >= kArrivalTimeOffsetThreshold) {
        Reset();
        return false;
      }

      // 两组报文乱序到达,超过3个乱序报文,重置
      if (*arrival_time_delta < TimeDelta::Zero()) {
        ++num_consecutive_reordered_packets_;
        if (num_consecutive_reordered_packets_ >= kReorderedResetThreshold) {
          Reset();
        }
        return false;
      } else {
        num_consecutive_reordered_packets_ = 0;
      }

      // 两组报文大小差
      *packet_size_delta = static_cast<int>(current_timestamp_group_.size) -
        static_cast<int>(prev_timestamp_group_.size);
      // 完成差异计算
      calculated_deltas = true;
    }
    // current -> prev
    prev_timestamp_group_ = current_timestamp_group_;
    // The new timestamp is now the current frame.
    current_timestamp_group_.first_send_time = send_time;
    current_timestamp_group_.send_time = send_time;
    current_timestamp_group_.first_arrival = arrival_time;
    current_timestamp_group_.size = 0;
  } else {
    // 属于当前 group 的正常报文,更新 send_time
    current_timestamp_group_.send_time =
      std::max(current_timestamp_group_.send_time, send_time);
  }
  // Accumulate the frame size.
  current_timestamp_group_.size += packet_size;
  current_timestamp_group_.complete_time = arrival_time;
  current_timestamp_group_.last_system_time = system_time;

  return calculated_deltas;
}
4. TrendLineEstimator
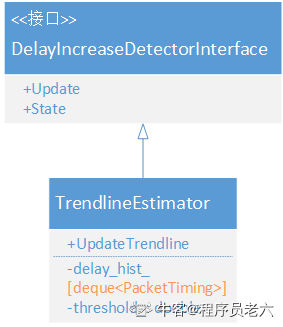
4.1. 重要属性
1)delay_hist_
保存用来计算延迟斜率的元素,元素定义如下:
struct PacketTiming {
  // 相对队列第一组报文到达的相对时间,即 X 坐标
  double arrival_time_ms;
  // 平滑后的累积延迟差,即 Y 坐标
  double smoothed_delay_ms;
  // 平滑前的累积延迟差
  double raw_delay_ms;
};
2)threshold_
计算的延迟斜率通过与 threshold_ 比较来判断网络使用状态。
4.2. 重要方法
1)Update
内部调用 UpdateTrendLine。
2)UdpateTrendline
传入新的时间差值,更新网络使用状态。
3)State
获取当前网络使用状态。
4.3. 源码分析
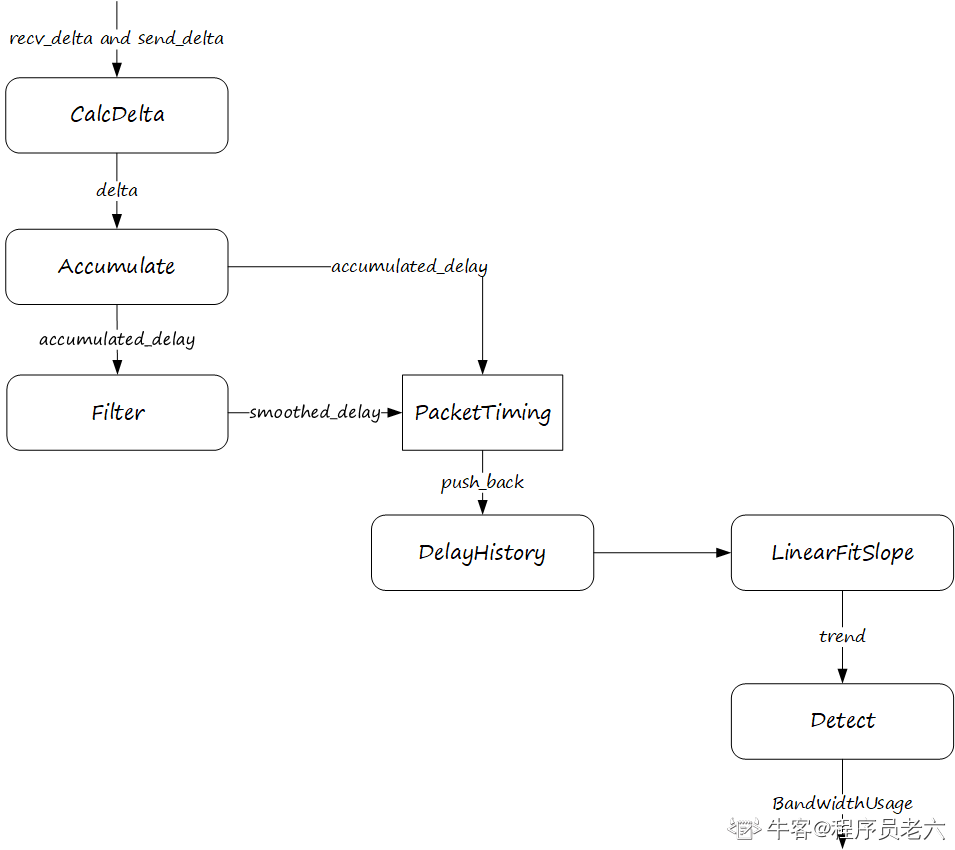
4.3.1. UpdateTrendline
这是 TrendLineEstimator 的主函数,延迟差值累积到一定数量后,计算一个拟合后的斜率,然后基于斜率判断带宽使用情况,逻辑比较清晰,处理流程如下图所示:
void TrendlineEstimator::UpdateTrendline(double recv_delta_ms,
                                         double send_delta_ms,
                                         int64_t send_time_ms,
                                         int64_t arrival_time_ms,
                                         size_t packet_size) {
  // 计算延迟差
  const double delta_ms = recv_delta_ms - send_delta_ms;

  // 累加次数
  ++num_of_deltas_;

  // 最大值约束
  num_of_deltas_ = std::min(num_of_deltas_, kDeltaCounterMax);

  if (first_arrival_time_ms_ == -1)
    first_arrival_time_ms_ = arrival_time_ms;

  // 平滑前延迟累积
  accumulated_delay_ += delta_ms;

  // 平滑后延迟累积,使用指数加权平均算法:smoothing_coef_ = 0.9
  smoothed_delay_ = smoothing_coef_ * smoothed_delay_ +
                    (1 - smoothing_coef_) * accumulated_delay_;

  // 插入新元素
  delay_hist_.emplace_back(
      static_cast<double>(arrival_time_ms - first_arrival_time_ms_),
      smoothed_delay_, accumulated_delay_);

  // 确保按照 arrival_time_ms 升序排列
  if (settings_.enable_sort) {
    for (size_t i = delay_hist_.size() - 1;
         i > 0 &&
         delay_hist_[i].arrival_time_ms < delay_hist_[i - 1].arrival_time_ms;
         --i) {
      std::swap(delay_hist_[i], delay_hist_[i - 1]);
    }
  }

  // 维持窗口大小
  if (delay_hist_.size() > settings_.window_size)
    delay_hist_.pop_front();

  // Simple linear regression.
  double trend = prev_trend_;

  // 当累积的数据量达到这个大小时,触发趋势线的更新
  if (delay_hist_.size() == settings_.window_size) {
    trend = LinearFitSlope(delay_hist_).value_or(trend);
    if (settings_.enable_cap) {
      absl::optional<double> cap = ComputeSlopeCap(delay_hist_, settings_);
      if (trend >= 0 && cap.has_value() && trend > cap.value()) {
        trend = cap.value();
      }
    }
  }

  // 基于趋势线计算,检测网络使用状态
  Detect(trend, send_delta_ms, arrival_time_ms);
}
4.3.2. ComputeSlopeCap
考虑到最小二乘法对异常值比较敏感,需要对通过最小二乘法计算的斜率进行约束,约束值的计算方法是:取历史数据中前七个数据中最小原始延迟数据,取历史数据中后七个数据中最小延迟数据,一前一后两个数据计算一个斜率,用这个斜率来约束通过最小二乘法计算的斜率。
absl::optional<double> ComputeSlopeCap(
    const std::deque<TrendlineEstimator::PacketTiming>& packets,
    const TrendlineEstimatorSettings& settings) {
  // 从前数7个数据,寻找最小原始延迟数据点
  TrendlineEstimator::PacketTiming early = packets[0];
  for (size_t i = 1; i < settings.beginning_packets; ++i) {
    if (packets[i].raw_delay_ms < early.raw_delay_ms)
      early = packets[i];
  }

  // 从后数7个数据,寻找最小原始延迟数据点
  size_t late_start = packets.size() - settings.end_packets;
  TrendlineEstimator::PacketTiming late = packets[late_start];
  for (size_t i = late_start + 1; i < packets.size(); ++i) {
    if (packets[i].raw_delay_ms < late.raw_delay_ms)
      late = packets[i];
  }

  // 检查late和early两个数据点之间的时间跨度,如果小于1ms,
  // 则认为时间跨度太小,不足以进行有效计算
  if (late.arrival_time_ms - early.arrival_time_ms < 1) {
    return absl::nullopt;
  }

  // 使用找到的两个数据点计算斜率
  return (late.raw_delay_ms - early.raw_delay_ms) /
           (late.arrival_time_ms - early.arrival_time_ms) +
           settings.cap_uncertainty;
}
4.3.3. Detect
使用调整后斜率与 threshold_ 进行比较,判断网络使用情况,租后还需要更新阈值,以适应网络变化。
1)斜率小于 -threshold_,标识网络为 kBwUnderusing;
2)斜率处于 [-threshold, threshold] 范围内,标识网络为 kBwNormal;
3)斜率大于 threshold_ 且满足以下三个条件则标识网络为 kBwOverusing:
a)连续处于 overuse 状态超过 10ms
b)连续处于 overuse 状态两次及以上
c)最后一次计算的斜率比之前的斜率更大。
void TrendlineEstimator::Detect(double trend, double ts_delta, int64_t now_ms) {
  // 初始阶段,样本数不足,假设网络正常
  if (num_of_deltas_ < 2) {
    hypothesis_ = BandwidthUsage::kBwNormal;
    return;
  }

  // 调整原始trend,具体原理未知,kMinNumDeltas=60,threshold_gain_=4.0
  const double modified_trend =
    std::min(num_of_deltas_, kMinNumDeltas) * trend * threshold_gain_;

  // 更新上次调整后trend
  prev_modified_trend_ = modified_trend;

  if (modified_trend > threshold_) {
    if (time_over_using_ == -1) {
      // 初始化计时器。假设自上次采样以来,有一半时间处于过度使用网络的状态。
      time_over_using_ = ts_delta / 2;
    } else {
      // 累加 overusing 时长
      time_over_using_ += ts_delta;
    }

    overuse_counter_++; // 累加 overuse 次数

    // 处于 overuse 状态很长时间,且检测到 overuse 大于一次
    if (time_over_using_ > overusing_time_threshold_ && overuse_counter_ > 1) {
      if (trend >= prev_trend_) { // trend 还在加强
        time_over_using_ = 0;
        overuse_counter_ = 0;
        hypothesis_ = BandwidthUsage::kBwOverusing;
      }
    }
  } else if (modified_trend < -threshold_) {
    time_over_using_ = -1;
    overuse_counter_ = 0;
    hypothesis_ = BandwidthUsage::kBwUnderusing;
  } else { // [-threshold, threshold]
    time_over_using_ = -1;
    overuse_counter_ = 0;
    hypothesis_ = BandwidthUsage::kBwNormal;
  }

  prev_trend_ = trend; // 更新trend

  // 动态更新阈值
  UpdateThreshold(modified_trend, now_ms);
}
4.3.4. UpdateThreshold
threshold_ 初始值为 12.5,在计算过程中会进行动态更新,以适应网络条件变化。
void TrendlineEstimator::UpdateThreshold(double modified_trend, int64_t now_ms) {
  if (last_update_ms_ == -1)
    last_update_ms_ = now_ms;

  // kMaxAdaptOffsetMs = 15.0
  // 调整后趋势与当前阈值的差值超过了kMaxAdaptOffsetMs,则不进行阈值调整。
  // 这可以防止因网络突发的大延迟(如路由变化或瞬时拥塞)导致阈值被错误地大幅提高或降低。
  if (fabs(modified_trend) > threshold_ + kMaxAdaptOffsetMs) {
    last_update_ms_ = now_ms;
    return;
  }

  // k_up_(0.0087), k_down_(0.039), threshold_(12.5)
  // 选择阈值调整系数
  const double k = fabs(modified_trend) < threshold_ ? k_down_ : k_up_;

  // 约束time_delta_ms最大值为100ms
  const int64_t kMaxTimeDeltaMs = 100;
  int64_t time_delta_ms = std::min(now_ms - last_update_ms_, kMaxTimeDeltaMs);

  // trend如果在normal区间内,则减小threshold_
  // trend如果在normal区间外,则增大threshold_
  threshold_ += k * (fabs(modified_trend) - threshold_) * time_delta_ms;

  // 约束threshold_在[6, 600]范围
  threshold_ = rtc::SafeClamp(threshold_, 6.f, 600.f);

  last_update_ms_ = now_ms;
}
5. LinkCapacityEstimator
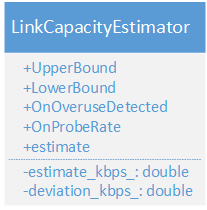
5.1. 重要属性
1)estimate_kbps_
估计的链路容量。
2)deviation_kbps_
链路容量估计值的方差,用来量化估计值的不确定性或波动性,初始值为 0.4。
5.2. 重要方法
1)UpperBound
链路容量估计的上界,等于链路容量估计值加上 3 倍标准差。
2)LowerBound
链路容量估计的下界,等于链路容量估计值减去 3 倍标准差。
3)OnOveruseDetected
当 AIMD 检测到 overuse 时,调用此接口,传入 ACK 码率,LinkCapacityEstimator 对 ACK 码率使用 0.05 的权重来更新估计值。网络处于 overuse 状态时,ACK 码率能够真实反映链路容量。
void LinkCapacityEstimator::OnOveruseDetected(DataRate acknowledged_rate) {
  Update(acknowledged_rate, 0.05);
}
4)OnProbeRate
探测码率具有更好的实时性,LinkCapacityEstimator 对探测码率赋予更高的权重(0.5)来更新估计值。
void LinkCapacityEstimator::OnOveruseDetected(DataRate acknowledged_rate) {
  Update(acknowledged_rate, 0.05);
}
5)estimate
获取链路容量估计值。
5.3. 源码分析
5.3.1. UpperBound/LowerBound
可以认为链路容量估计值符合正态分布,正态分布中大约 99.7% 的数据位于均值的三倍标准差之内,可以提供一个相对宽松但合理的上限和下限估计。
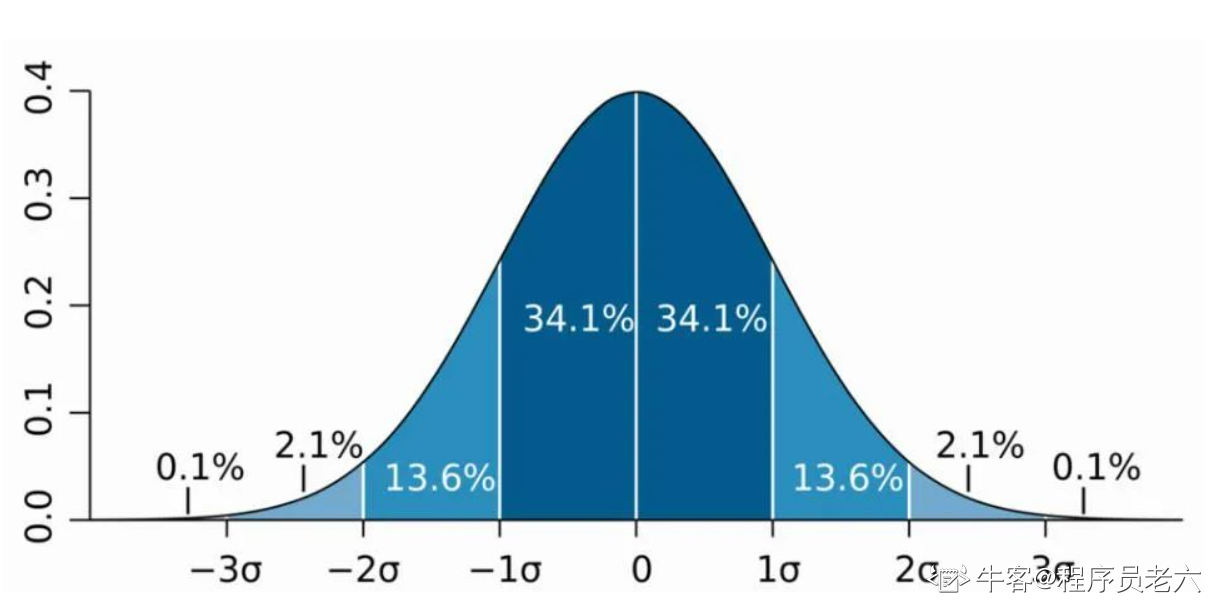
UpperBound 取链路容量估计值加上 3 倍标准差,LowerBound 取链路容量估计值减去 3 倍标准差。
DataRate LinkCapacityEstimator::UpperBound() const {
  if (estimate_kbps_.has_value())
    return DataRate::KilobitsPerSec(estimate_kbps_.value() +
                                    3 * deviation_estimate_kbps());
  return DataRate::Infinity();
}

DataRate LinkCapacityEstimator::LowerBound() const {
  if (estimate_kbps_.has_value())
    return DataRate::KilobitsPerSec(
        std::max(0.0, estimate_kbps_.value() - 3 * deviation_estimate_kbps()));
  return DataRate::Zero();
}

double LinkCapacityEstimator::deviation_estimate_kbps() const {
  // 计算标准差之前先恢复归一化
  return sqrt(deviation_kbps_ * estimate_kbps_.value());
}
5.3.2. Update
AimdRateControl 在网络处于过载状态时,会调用此接口传入 ACK 码率,来更新链路容量估计值。只有处于网络过载状态的 ACK 码率才能真实反映当前链路容量。LinkCapacityEstimator 使用指数移动平均算法对链路容量值进行平滑,并计算归一化方差。
void LinkCapacityEstimator::Update(DataRate capacity_sample, double alpha) {
  double sample_kbps = capacity_sample.kbps();
  if (!estimate_kbps_.has_value()) {
    estimate_kbps_ = sample_kbps;
  } else {
    // 使用指数移动平均算法来平滑估计值
    estimate_kbps_ = (1 - alpha) * estimate_kbps_.value() + alpha * sample_kbps;
  }

  // 方差归一化参数
  const double norm = std::max(estimate_kbps_.value(), 1.0);

  // 计算估计值与当前样本值之间的差,相当于样本值与平均值的差
  double error_kbps = estimate_kbps_.value() - sample_kbps;

  // 计算归一化方差并进行平滑,注意这里的归一化并没有完全归一,单位是 kbps。
  // 如果要做完全归一化,分母应该是 norm 的平方。
  deviation_kbps_ =
    (1 - alpha) * deviation_kbps_ + alpha * error_kbps * error_kbps / norm;

  // 对归一化方差进行约束(这是个经验值)
  deviation_kbps_ = rtc::SafeClamp(deviation_kbps_, 0.4f, 2.5f);
}
限制 deviation_kbps_ 在 [0.4, 2.5] 范围,这应该是一个经验值。相当于 500Kbps 的估计值,归一化方差范围对应的估计误差大约在 14kbps 到 35kbps 之间。
(500-x)^2 / 500 = 0.4
|500-x| = sqrt(500 * 0.4)
|500-x| ~= 14kbps

(500-x)^2 / 500 = 2.5
|500-x| = sqrt(500 * 2.5)
|500-x| ~= 35kbps
6. AimdRateControl
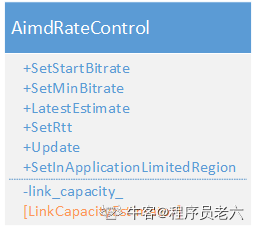
6.1. 重要属性
1)link_capacity_
链路容量估计器,用来辅助调整估计带宽,具体参考源码分析。
6.2. 重要方法
1)SetStartBitrate
设置起始估计值。
2)SetMinBitrate
设置估计值的下限。
3)LatestEstimate
获取最近的估计值。
4)SetRtt
更新 RTT,当进行加性提速时,需要使用 RTT 来计算增速。
5)Update
外部周期性调用,传入 ACK 码率,驱动 AimdRateControl 的状态机运转。
6)SetInApplicationLimitedRegion
设置 ALR 状态,ALR 状态不允许提速(如果有配置的话)。
6.3. 状态机
码率控制状态定义如下:
enum class RateControlState {
  kRcHold,
  kRcIncrease,
  kRcDecrease
};
码率控制状态在网络过载信号的刺激下会作出相应的响应和变化,形成一个状态机,如下图所示。

状态机状态变化规则说明:
1)状态机一开始进入 Incr 状态。
【注】Incr 状态码率每次增长系数见源码分析
2)检测到 overuse 信号,不管当前处于什么状态,都转换到 Decr 状态。
【注】Decr 状态码率每次下降系数为
3)检测到 underuse 信号,不管当前处于什么状态,都转换到 Hold 状态。
【注】即使之前处于 Incr 状态,也必须转换到 Hold 状态。因为 underuse 信号,说明网络正处于排空期,在排空完成前不要提升速率,否则可能会增加延迟。
4)在 Decr 状态,检测到 normal 信号,进入 Hold 状态,降速可以结束了。
5)在 Hold 状态,检测到 normal 信号,进入 Incr 状态,需要开始提速了。
【注】Hold 是一个暂态,会不停往上疯狂试探网络容量的上界。因此,Hold 的意思,更像是等待网络排空的Hold,而不是码率保持的 Hold。
6)在 Incr 状态,检测到 normal 信号,继续保持 Incr 状态,提速还不能停。
【注】说明这是一个相对激进的带宽评估状态机,不会停在刚刚好,而是一定会走到 underuse。
状态机运行相关代码如下:
void AimdRateControl::ChangeState(const RateControlInput& input, Timestamp at_time) {
  switch (input.bw_state) {
    case BandwidthUsage::kBwNormal:
      // 带宽使用状态正常
      // 如果之前是保持,现在可以提升估计值了
      // 如果之前是提升,现在继续提升
      // 如果之前是降低,现在继续降低
      if (rate_control_state_ == RateControlState::kRcHold) {
        time_last_bitrate_change_ = at_time;
        rate_control_state_ = RateControlState::kRcIncrease;
      }
      break;
    case BandwidthUsage::kBwOverusing:
      // 网络过载,不管之前是什么控制状态,现在都要降低估计值
      if (rate_control_state_ != RateControlState::kRcDecrease) {
        rate_control_state_ = RateControlState::kRcDecrease;
      }
      break;
    case BandwidthUsage::kBwUnderusing:
      // 网络欠载,不管之前是什么控制状态,现在都要保持估计值
      rate_control_state_ = RateControlState::kRcHold;
      break;
    default:
      RTC_DCHECK_NOTREACHED();
  }
}
6.4. 源码分析
6.4.1. ChangeBitrate
使用输入参数中的网络使用信号更新状态机,然后根据新的状态指示作出相应处理。有几个处理细节需要注意:
1)ACK 码率是提速和降速的基础,这是因为 ACK 码率是一个链路容量的一个观测值,也是当前链路容量的可靠估计值。
2)LinkCapacityEstimator 是基于 ACK 码率的估计,当收到新的 ACK 码率超出估计值的 3 倍标准差,有理由认为当前的估计值与真实值有较大偏差,需要重置。
void AimdRateControl::ChangeBitrate(const RateControlInput& input,
                                    Timestamp at_time) {
  absl::optional<DataRate> new_bitrate;

  // ACK 码率
  DataRate estimated_throughput =
      input.estimated_throughput.value_or(latest_estimated_throughput_);

  // 更新
  if (input.estimated_throughput)
    latest_estimated_throughput_ = *input.estimated_throughput;

  // 未设置或者未评估,
  if (!bitrate_is_initialized_ && input.bw_state != BandwidthUsage::kBwOverusing)
    return;

  // 状态机更新
  ChangeState(input, at_time);

  switch (rate_control_state_) {
    // 保持
    case RateControlState::kRcHold:
      break; // 码率不变

    // 提速
    case RateControlState::kRcIncrease: {
      // ACK 码率超过估计值的 3*sigma 范围,需要重置 LinkCapacityEstimator
      if (estimated_throughput > link_capacity_.UpperBound())
        link_capacity_.Reset();

      // 以 ACK 码率的 1.5 倍作为提速上限
      DataRate increase_limit =
          1.5 * estimated_throughput + DataRate::KilobitsPerSec(10);

      // 发送端,设置了 ALR 状态不允许升速
      if (send_side_ && in_alr_ && no_bitrate_increase_in_alr_) {
        increase_limit = current_bitrate_;
      }

      if (current_bitrate_ < increase_limit) {
        DataRate increased_bitrate = DataRate::MinusInfinity();
        if (link_capacity_.has_estimate()) {
          // 链路容量估计值有效,认为目标码率与链路容量较为接近,采用加性增进行调整。
          DataRate additive_increase =
              AdditiveRateIncrease(at_time, time_last_bitrate_change_);
          increased_bitrate = current_bitrate_ + additive_increase;
        } else {
          // 链路容量估计值无效,则使用乘性增方式来探索新的链路容量。
          DataRate multiplicative_increase = MultiplicativeRateIncrease(
              at_time, time_last_bitrate_change_, current_bitrate_);
          increased_bitrate = current_bitrate_ + multiplicative_increase;
        }
        new_bitrate = std::min(increased_bitrate, increase_limit);
      }

      time_last_bitrate_change_ = at_time;
      break;
    }

    // 降速
    case RateControlState::kRcDecrease: {
      DataRate decreased_bitrate = DataRate::PlusInfinity();

      // 降速目标设置为 ACK 码率的 85%
      decreased_bitrate = estimated_throughput * beta_;
      if (decreased_bitrate > DataRate::KilobitsPerSec(5) &&
          subtract_additional_backoff_term_) {
        decreased_bitrate -= DataRate::KilobitsPerSec(5);
      }

      // 如果降速目标还是比当前码率高,则尝试使用链路容量估计值的 85%
      if (decreased_bitrate > current_bitrate_) {
        if (link_capacity_.has_estimate()) {
          decreased_bitrate = beta_ * link_capacity_.estimate();
        }
      }

      // 有可能降速目标还是比当前码率高
      if (decreased_bitrate < current_bitrate_) {
        new_bitrate = decreased_bitrate;
      }

      // 更新 last_decrease_
      if (bitrate_is_initialized_ && estimated_throughput < current_bitrate_) {
        if (!new_bitrate.has_value()) {
          last_decrease_ = DataRate::Zero();
        } else {
          last_decrease_ = current_bitrate_ - *new_bitrate;
        }
      }

      // ACK 码率超过估计值的 3*sigma 范围,需要重置 LinkCapacityEstimator
      if (estimated_throughput < link_capacity_.LowerBound()) {
        link_capacity_.Reset();
      }

      bitrate_is_initialized_ = true;

      // 使用 overuse 信号下的 ACK 码率更新链路容量估计
      link_capacity_.OnOveruseDetected(estimated_throughput);

      // Stay on hold until the pipes are cleared.
      rate_control_state_ = RateControlState::kRcHold;

      time_last_bitrate_change_ = at_time;
      time_last_bitrate_decrease_ = at_time;
      break;
    }
    default:
      RTC_DCHECK_NOTREACHED();
  }

  // 更新当前估计值
  current_bitrate_ = ClampBitrate(new_bitrate.value_or(current_bitrate_));
}
6.4.2. AdditiveRateIncrease
加性提速根据 rtt_ 和 current_bitrate_ 来计算增速,相当于每个 rtt 多发送一个 packet,这样的增速看上去是比较温和的。
DataRate AimdRateControl::AdditiveRateIncrease(Timestamp at_time,
                                               Timestamp last_time) const {
  double time_period_seconds = (at_time - last_time).seconds<double>();
  double data_rate_increase_bps =
      GetNearMaxIncreaseRateBpsPerSecond() * time_period_seconds;
  return DataRate::BitsPerSec(data_rate_increase_bps);
}
double AimdRateControl::GetNearMaxIncreaseRateBpsPerSecond() const {
RTC_DCHECK(!current_bitrate_.IsZero());
// 假定视频帧率为30FPS,计算每帧的时间间隔 kFrameInterval 为大约33.3毫秒
const TimeDelta kFrameInterval = TimeDelta::Seconds(1) / 30;
// 根据当前比特率和帧间隔,计算单帧数据的大小,这代表了每帧数据传输所需的总比特数
DataSize frame_size = current_bitrate_ * kFrameInterval;
// 设定每数据包的大小为1200字节
const DataSize kPacketSize = DataSize::Bytes(1200);
// 计算每帧数据需要多少个这样的数据包,取上界值(因为即使最后一包不满,也按一整个包计算)
double packets_per_frame = std::ceil(frame_size / kPacketSize);
// 基于总帧大小和包的数量,计算平均每个包的大小
DataSize avg_packet_size = frame_size / packets_per_frame;
// 注:纯粹数学推导,avg_packet_size == kPacketSize
// 在真实RTT的基础上加上100ms再乘以2,使得加性增速更加保守?
TimeDelta response_time = rtt_ + TimeDelta::Millis(100);
response_time = response_time * 2;
// 按照ping-pong模式(收到ack后再发送下一个报文)一秒钟可以多发送多少数据。
double increase_rate_bps_per_second =
(avg_packet_size / response_time).bps<double>();
double kMinIncreaseRateBpsPerSecond = 4000;
return std::max(kMinIncreaseRateBpsPerSecond, increase_rate_bps_per_second);
}6.4.3. MultiplicativeRateIncrease
乘性提速会计算一个增益值,初始化增益为 8%,会根据时间频率来调整增益系数。
DataRate AimdRateControl::MultiplicativeRateIncrease(
    Timestamp at_time,
    Timestamp last_time,
    DataRate current_bitrate) const {
  // 初始化增益系数
  double alpha = 1.08;

  // 如果之前调整过码率,距离上次调整码率时间过去越久,增益系数越大
  if (last_time.IsFinite()) {
    auto time_since_last_update = at_time - last_time;
    alpha = pow(alpha, std::min(time_since_last_update.seconds<double>(), 1.0));
  }

  // 根据增益系数计算增速,限制最低码率增速为 1Kbps
  DataRate multiplicative_increase =
      std::max(current_bitrate * (alpha - 1.0), DataRate::BitsPerSec(1000));

  return multiplicative_increase;
}
7. 总结
基于延迟的带宽估计,以处于非 ALR 状态的 ACK 码率为基础,基于延迟梯度估计链路真实带宽,实现对链路带宽的动态跟踪,算法的核心逻辑可以表述为:
1)网络过载,说明网络产生拥塞,当前发送码率过高,需要降低发送码率。
2)网络欠载,说明网络正在排空,不要急着提升发送码率,先保持当前发送码率一段时间。
3)网络正常,可以试着增加发送码率,探测下带宽的上限。
同时,在网络非过载状态下,使用探测带宽对估计值进行校正,使估计更加精准。算法在计算延迟梯度、判断网络使用状况都做了精心的设计,会尽量排除随机噪声的干扰。